Thursday, December 26, 2019

SketchUp Extension Review: Eneroth Upright Extruder

Among the most used extensions for Trimble SketchUp, the Eneroth Upright Extruder stands out for its unique features and usability. Today we will talk about how we can use this powerful extension to easily modify and design complex models.

Designed by Eneroth3, the Eneroth Upright Extruder (EUE) is available for SketchUp 2013 and above. Of course, it requires the Pro version of SketchUp to install plugins into this awesome 3D modeling interface.

What is Eneroth Upright Extruder


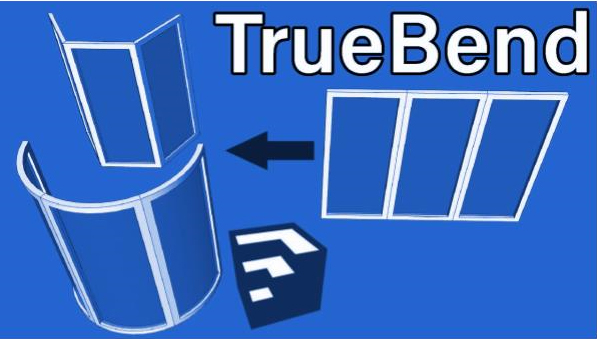
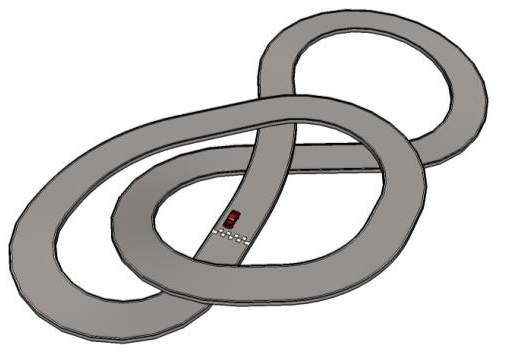
The EUE is an extension for the SketchUp software which is used for 3D modeling and rendering. With this extension, you can project profiles while maintaining it upright.

In the default SketchUp tools pools, there is a similar tool available called "Follow Me". However, the Follow Me tool keeps the sides of the extrusion straight. This leads to not keeping the extrusion upright. The EUE extension remedies this issue by twisting the sides to make the project the extrusion upwards.

Eneroth Upright Extruder

~~~~~~~~~~~~~~~~~~~~~~~~~~~~
Published By
Rajib Dey
www.sketchup4architect.com
~~~~~~~~~~~~~~~~~~~~~~~~~~~~

Monday, December 23, 2019

SketchUp Extension Review : Solid Inspector 2

One of the best things about Trimble SketchUp is that it can extend its abilities by adding plugins or extensions to it. Today, we will talk about Solid Inspector 2, one such extension that helps in preparing your 3D model for 3D printing and other volumetric operations.

What is Solid Inspector 2

Solid Inspector 2 for SketchUp 2014 or later is a plugin or extension that you can use with a registered SketchUp Pro software. It finds and highlights the issues that are preventing your model from being a complete solid.

There are three main kinds of discrepancies that Solid Inspector 2 can detect in a given object: Model not solid, Useless face in model, Inverted face, Hidden lines.

The SI2 will highlight errors in a model and jump from one error to the next, repairing as you go. This gives the extension tremendous usability in confirming and repairing a model's solid shell. For anyone making solid models or 3D printing, this is an indispensable plugin.

Technical Details

The Solid Inspector 2 (SI2) extension can be found in the Extension Warehouse. The plugin is so popular, that chances are you will see it in the very first screen in the featured or most popular sections; if not, here is the link for the plugin page. The extension is also available in the GitHub repository, you can find it here.

Being an open-source development, you can download and use it for free. The RBZ is fairly small and installs fast. You would have to have Trimble SketchUp 2014 or newer in order to use the plugin. If you are using an older version of SketchUp, you can consider downloading the first version of the tool instead.

Read more
SketchUp Extension Review : Solid Inspector 2
~~~~~~~~~~~~~~~~~~~~~~~~~~~~
Published By
Rajib Dey
www.sketchup4architect.com
~~~~~~~~~~~~~~~~~~~~~~~~~~~~

Thursday, December 19, 2019

SketchUp Extension Review: Artisan

Ease of use, simple interface, and flexibility are the main reasons behind the enormous popularity of Trimble SketchUp. The said flexibility of SketchUp comes from the ability to upgrade, enhance, and change the way its default tools behave by the addition of a myriad of extensions from outside. SketchUp Pro and above enable this feature for the users, who can find these extensions in the SketchUp Extension Warehouse 2.0 or some third-party web sites.

Artisan is one such extension or plugin. This powerful plugin can turn SketchUp from a 3D geometric designer to a 3D organic modeler. In other words, Artisan lets you design your model with such complex geometry that the result looks and feels like a natural object. For example, you can literally draw a lifelike flower using the Artisan extension.

Previously, Artisan was released with the name "Subdivide and Smooth" and it was a hit then already. Developer Del has worked hard for two years over it and the child of this labour is what we see as Artisan - a complex remake and upgrade with a plethora of added features.

The extension exposes itself in the form of a toolbar with large, friendly-looking buttons. Each button represents an important function, and they are arrayed in four basic functional groups. These are Surface Subdivision, Sculpting Tools, Vertex Transformation, Mesh Optimization. Let us delve further into each group below.

1. Subdivision Surfaces
These functions are used for smoothing a given hard geometry by introducing more subdivisions in the object to make it appear more organic and softer. The robust subdivision algorithm works blisteringly fast on any number of selected faces, groups or components. You can also use the Crease tool to create hard edges from edges or vertices. The Knife tool will let you create loops and the Extrude tool will further help you in this by making loops without interior faces. With the latest version of Artisan, you can preview the subdivision content change before committing. The Proxy button presents you with a low-poly mode that updates subsurface geometry in real-time parallel to your editing.
SketchUp Extension Review: Artisan
~~~~~~~~~~~~~~~~~~~~~~~~~~~~
Published By
Rajib Dey
www.sketchup4architect.com
~~~~~~~~~~~~~~~~~~~~~~~~~~~~

Tuesday, December 17, 2019

SketchUp Extension Review: TrueBend

Arguably the most popular 3D modeling and design software on earth, Trimble SketchUp gathers its immense following and customer base due to the user-friendliness and flexibility of the application. The flexibility comes from the enabling of adding external code, called “extensions” or “plugins”, into SketchUp. These extensions enhance the way SketchUp tools behave, add new tools or new content to enrich and ease your usage of the software.
One of the points to remember while intending to use SketchUp extensions is that only the SketchUp Pro version or above allows the users to import extensions within it. The Free, Make or Shop versions do not have this ability.
Most extensions for SketchUp are found in the Extension Warehouse from Trimble, which has released the 2.0 version of it recently with new and improved features. Other third-party web sites also host SketchUp extensions. One of these Extensions is called TrueBend, and it is that of which we will talk about today.

What is TrueBend

TrueBend from Thom Thom is a quite popular Trimble SketchUp extension found in the Extension Warehouse. When integrated with SketchUp, it enables the user to bend a given object for a certain degree. It will retain the original length of the object instance. The plugin uses the bottom front of the bounding box edge, therefore the user needs to line up the instant axis line up with the bend.

How TrueBend Works

    The TrueBend plugin helps the user in bending an object within SketchUp for a given radius. It will also help you to bend the instance while maintaining the length of the object. Let us take an example to understand this better. Consider that the user wishes to bow a shape 60 inches long and the curvature of the bend is 180 degrees. To do this, the user needs to select ‘TrueBend’ in the menus or toolbar, and then click and drag the red bar on the SketchUp design screen to bend the object. Alternatively, you can click the red bar and enter the curvature value in degrees in the VCB for a precise manual curving. After finishing the dragging, or hitting enter after giving the value, you will see that the object instance has bowed to form the expected shape yet it still retains the original length.
    SketchUp Extension Review: TrueBend

    ~~~~~~~~~~~~~~~~~~~~~~~~~~~~
    Published By
    Rajib Dey
    www.sketchup4architect.com
    ~~~~~~~~~~~~~~~~~~~~~~~~~~~~

Saturday, December 14, 2019

What’s New in Extension Warehouse 2.0

One of the most beloved and favored 3D modeling and designing software is Trimble SketchUp. It is immensely popular not only among professionals but also with amateurs as well, thanks to its simple interface, easy-to-learn tools, comparatively cheap pricing, and great performance. However, arguably the most effective reason for SketchUp’s popularity would be its awesome flexibility and adaptiveness.

Trimble SketchUp achieves this by enabling users to attach “extensions” or “plug-ins” with the mother software, which augment its functionality to no end. These extensions can be developed by professionals as well as amateurs and change or upgrade the way you can draw in SketchUp, or improve its performance, or provide new resources to play with, or even connect to external software for additional support.

Many developers choose to host these extensions on their own site. However, the most common location to find the best SketchUp extensions is at the Extension Warehouse. The Extension Warehouse is an online resource full of plug-ins developed especially for SketchUp. The extensions are neatly categorized and presented here. When you wish to install a given plugin, just download the corresponding RBZ file and use your SketchUp’s Extension Manager tool to assimilate it.

One word of note here that support for plugins is not enabled in the Free or Shop versions of SketchUp. Only SketchUp Pro and above supports plugins, opening up a whole new world of customization for you. Whether you are an artist or an architect, the Extension Warehouse will have the right plugins, often a whole bunch of them, to set up your SketchUp in the way that best fits you, offering you the tools that you really need above and beyond SketchUp’s default toolset.

In their neverending quest to bring you the features that you need most and tools that make your designing and rendering efforts much easier, the Trimble team has just launched a few awesome improvements and enhancements that are sure to bring you a bundle of joy into your workflow. Let us see what are the new stuff in the Extension Warehouse 2.0.


What’s New in Extension Warehouse 2.0

~~~~~~~~~~~~~~~~~~~~~~~~~~~~
Published By
Rajib Dey
www.sketchup4architect.com
~~~~~~~~~~~~~~~~~~~~~~~~~~~~

Thursday, December 12, 2019

How to use CAD files in SketchUp

Trimble SketchUp is probably the most popular 3D modeling software among people who aren’t hardcore professionals. Its ease of use, easy-to-understand toolset and flexibility have fanned the fumes of popularity for SketchUp. Most of the time, we are happy to be working with the default SketchUp files (.skp). But sometimes we may need to use files from other applications into SketchUp.
For example, quite often architects, construction professionals or engineers need to use their professional CAD software flies inside Trimble SketchUp. Most commonly, we see the need for importing AutoCAD files, like DWG or DXF, for this purpose. Today we will see how to properly import and use CAD files into SketchUp.
Compatibility
Before you whisk your DWG into SketchUp, you will need to know if they are compatible or not. Only the SketchUp Pro version supports importing CAD files into it; any lesser versions like SketchUp Web/Free, Make or Shop will not let you do this. Since the Pro Bundle and Unity come with SketchUp Pro, they support importing as well. Files spawned by most versions of AutoCAD are supported by the latest version of SketchUp Pro. However, AutoCAD 2013-14 version files work best in SketchUp, so you might probably want to save your drawing to that version format if you were using a higher version of AutoCAD.
How to use CAD files in SketchUp

~~~~~~~~~~~~~~~~~~~~~~~~~~~~
Published By
Rajib Dey
www.sketchup4architect.com
~~~~~~~~~~~~~~~~~~~~~~~~~~~~

Wednesday, October 16, 2019

How to use Enscape 3D to create real time visualization in sketchup

This sketchup video provides brief demonstration on Enscape 3D, a powerful rendering plug in for sketchup that can make your visualization process smarter. This plugin is still in beta testing phase.

The users don’t require any additional plugin for their project. Just install the Enscape plugin and walk through your projects with simple mouse click.

In conjunction with the Oculus Rift, it is possible to virtually walk trough your project in Enscape. Experience your work as it was developed previously.

Read Continue

How to use Enscape 3D to create real time visualization in sketchup

~~~~~~~~~~~~~~~~~~~~~~~~~~~~
Published By
Rajib Dey
www.sketchup4architect.com
~~~~~~~~~~~~~~~~~~~~~~~~~~~~

Monday, September 30, 2019

A position is vacant for project architect in NY, USA

Douglas C. Wright Architects invite applications for highly motivated Project Architects with 3+ years experience for full time positions:
Skills and Abilities:
 
• Project Architect experience, showing experience with all aspects of project management (budgets, schedules, communications with clients and consultants, document management from design through construction documents, document production and Construction Administration ).

• Knowledge with high-end residential work (either apartments, townhouses, or single family homes).

• Added advantage will be given for experience with country clubs but it is not mandatory.

• Added advantage will be given for managing the teams of 1 or more architects.

• Leadership and collaboration skills.

• Sound communication skills with other architects, contractors, consultants and capability of coordinating these teams.

Read more

A position is vacant for project architect in NY, USA

~~~~~~~~~~~~~~~~~~~~~~~~~~~~
Published By
Rajib Dey
www.sketchup4architect.com
~~~~~~~~~~~~~~~~~~~~~~~~~~~~

Wednesday, September 18, 2019

Bring your SketchUp Model to Life Using Photoshop

Generally when it comes to rendering our SketchUp models, we normally use V-Ray. But instead, we can use Photoshop to generate some life-like results. This works best with collage-style illustration. These types of illustrations are not only great for speed, but also for informal presentations. Here broad ideas and atmosphere are in focus rather than details. Post-processing is less strict and it is not important to maintain proper perspective.
This skechup plugin is compatible with sketchup 2016.

Compositions are rather more playful with no rules.

1. Base Image – The base image will be used as a guide for laying down other textures and materials in Photoshop.
2. Background – Here you can carefully go through to select backgrounds you may like, or you can randomly select a background too.
3. Textures – There are countless textures available on the internet. You need to go through them to carefully select what you want. Here is a tip, after choosing upon your textures you can store them in a pre designated folder. This is will help you be organized when working on a project.
Bring your SketchUp Model to life using Photoshop

~~~~~~~~~~~~~~~~~~~~~~~~~~~~
Published By
Rajib Dey
www.sketchup4architect.com
~~~~~~~~~~~~~~~~~~~~~~~~~~~~

Tuesday, August 27, 2019

How to import a Google Map into SketchUp

SKETCHUP: It is a three dimensional computer modeling software program that is used for architectural designing, film making, building designing, etc. Sketchup has different versions:
1. SKETCHUP MAKE(FREE): It gives free access to users. Users can login once account has been created.
2. SKETCHUP PRO($695): It is a premier version of the software containing some exclusive features like importing numerous file formats, achieving 2 documentarian software, layout tools as well as a style builder to generate convention edge styles for models.
STEPS TO IMPORT A GOOGLE MAP INTO SKETCHUP:
1. Initially, at the top screen, open GEO Location and then click on ADD LOCATION down in file tab. Here, one can identify the location according to choice similar to google map. For instance, while searching for ENGLAND, then simply type “ENGLAND” to it.
2. Any custom address can also be included. Besides, the box with white border can also be utilized to choose specific region.
3. As soon as the particular site is found, select a wider information on the site or extremely detailed information on your site.
4. Wider information is very suitable when you do not want to remodel the site or remain in a rural site without pertinent surroundings.
5. For more densely colonized site as well as modeling a site, more detailed version is preferred.
6. After getting clear idea about the type of information needed, you can then set your zoom. A close-up zoom provides complex details and zoomed out version provides a general view.
7. As soon as your region is selected, choose GRAB button to put in the map data for your model.
8. Once the map data remains in your model, it is possible to track areas, streets, locations onto it. Besides, the areas can be drawn for building. You can also obtain rough ideas and a location stand point.
9. In order to verify the angle of terrain, click terrain option in the google toolbar to tilt the terrain to specific angles according to your choice as well as get a broader view.
How to import a Google Map into SketchUp
~~~~~~~~~~~~~~~~~~~~~~~~~~~~
Published By
Rajib Dey
www.sketchup4architect.com
~~~~~~~~~~~~~~~~~~~~~~~~~~~~

Thursday, August 22, 2019

Sky View Analysis is the newest member in the extension warehouse

Sky View Analysis is an exclusive sketchup plugin that can be used to work out sky exposure and sky view factor.
SVF: Sky View Factor (SVFs) demonstrates the ratio at a point in space among the visible sky and a hemisphere centered over the analyzed location (Oke 1981).
• If SVF of a point is 0 the entire sky is barred from view through obstacles.
• If SVF of a point is 1 the whole sky is free from view through obstacles (ideal rural scenario).
A relation persists among Sky View Factor and Radiation.
for SVF = 0 :
1. there is no short-wave reflection
2. there is no long-wave nocturnal interference
for SVF > 0 :
1. incoming day-time short-wave reflection is raised throughout the day
2. outgoing night-time long-wave radiation is decreased
3. incoming night-time long-wave radiation is raised
4. altered soil heat flux
Features:
• Generate Sky Exposure Mask
• Generate Sky View Factor Mask
• Apply several times similar dome for Sky Exposure measurement
It belongs to an open source plugin and it is available in GitHub-AntonelloDN
For online demonstration, go through the following video tutorial.
Sky View Analysis is the newest member in the extension warehouse
~~~~~~~~~~~~~~~~~~~~~~~~~~~~
Published By
Rajib Dey
www.sketchup4architect.com
~~~~~~~~~~~~~~~~~~~~~~~~~~~~

Tuesday, August 20, 2019

Demonstration of Windows Builder Sketchup Plugin

In this exclusive sketch tutorial, you learn how to utilize Windows Builder sketchup plugin to make different window/door types as components of any shape and arrange them automatically in walls.

This skechup plugin is compatible with sketchup 2016.

With this plugin, the users will be able to generate and arrange various window components in their models. The windows are either rectangular or depends on a selected face of any shape.

Different types of windows are available like fixed, sliding, French and single-double hung. There are different parameters for windows like window length, window height, frame width, frame depth, sash width, sash depth and frame materials.

Options:

1. window type
2. component name
3. materials of all parts
4. glazing (simple, double, triple)
5. muntins (numbers, dimensions)
6. cover profile (side, shape, dimensions)

7. horizontal bar (sill, dimensions)
8. shutter (side, dimensions)
9. screen (side, dimensions, opening %)
10. cuts opening (checkbox)
11. glue to (none, arbitrary, horizontal, vertical, sloped)
12. scaling constraint (none, 1D, 2D, 3D)


This sketchup extension is available in extensions.sketchup.com
Go through the following video tutorial to gather more knowledge.

Demonstration of Windows Builder Sketchup Plugin

Read more

~~~~~~~~~~~~~~~~~~~~~~~~~~~~
Published By
Rajib Dey
www.sketchup4architect.com
~~~~~~~~~~~~~~~~~~~~~~~~~~~~

Monday, August 19, 2019

Free update to the latest version of Twinmotion

Advent S.A. just introduced the updated version of Twinmotion that allows the users to transit from Sketchup Pro to VR instantly with some simple clicks of mouse. Besides, Twinmotion also contains a new series of high-quality grasses for creating realistic lawns and landscapes.
Twinmotion belongs to a superior quality, user-friendly real-time visualization tool for architecture, interior design, urban planning, and landscaping.
Given below, some exclusive features of newest version :-
SketchUp direct link: It now becomes easier to deal with SketchUp data easily and quickly with new one-click direct link synchronization with SketchUp Pro other than accessible direct links with ARCHICAD and Revit and automatic material replacement and geometry optimization.
Import time with the direct link is also accelerated as compared to import a SKP file. Besides, the issue with rendering is resolved with flipped faces. Now, the import method now handles properly with geometry that contains various materials on each side.
New high-quality grass pack: It is now possible to generate delightful lawns and realistic landscapes with a brand-new pack of grasses. The seven existing flowers are enhance with the addition of 25 new grasses.
Greater stability and performance: The consistency and rendering speed for imported data is significantly enhanced with the static mesh rendering pipeline. Some minor bugs are also resolved. Go through the release notes (login required) for more details.
This sketchup extension is available in www.unrealengine.com
To get online demonstration of the latest version, watch the following video tutorial.
Free update to the latest version of Twinmotion

~~~~~~~~~~~~~~~~~~~~~~~~~~~~
Published By
Rajib Dey
www.sketchup4architect.com
~~~~~~~~~~~~~~~~~~~~~~~~~~~~

Tuesday, August 13, 2019

PlaceMaker is a SketchUp extension that lets you instantly build 3D cities into your model! Import buildings, trees and forests. Place 3D roads, paths and water.

Purchase now to get a commercial single seat annual subscription license for $199.
Enjoy access to over 450 million buildings worldwide, NEW Premium high resolution aerials, roads and paths. Save HOURS if not DAYS of work and effort!
Each commercial license includes 3000 imagery map tile credits from Mapbox.  For example, if you purchase 2 licenses, you will receive 6000 imagery map tile credits.  For more information about the how the imagery map tile credits work, please see the FAQ.
You’ll also receive a coupon code to get the Building Bundle Component Library for FREE!
With a commercial license you get:
  • PlaceMaker 1-year subscription with 3000 credits for Mapbox Imagery Import
  • Building Bundle of over 300 buildings (a $60 value)
  • FREE Subscription to 15 hours of SketchUp Master Tutorial Videos (a $30 value)
  • FREE subscription includes over 3000 component models and other downloadable content!
For volume licensing, be sure to input the quantity of licenses you require for your organization when filling out the order form.

Please note that you need SketchUp version 2016 or newer to use PlaceMaker.

                  BUY PLACEMAKER
                 BUY FROM A LOCAL RESELLER

After you order, you will receive an email receipt from PlaceMaker that contains links to download the latest version of PlaceMaker as well as instructions for activating the license.

Building Bundle (FREE when you Purchase PlaceMaker)
Over 300 high quality building components ready to place in your SketchUp model! $59.99 Learn more
                    PURCHASE BUILDING BUNDLE
Purchase Additional Mapbox Imagery Credits
Increase your number of Mapbox imagery map tile credits by 3000 for the remainder of your subscription term for $99 US.
                    UPGRADE IMAGERY CREDITS (+3000)
Purchase Nearmap Imagery Credits (USA only)
Nearmap credits are purchased as an ‘in-app’ purchase right from inside PlaceMaker v2!  Just open a geo-located model, expand PlaceMaker imagery options and select ‘Nearmap’ as your source. Then, click the imagery import button.
If there is no Nearmap imagery available at your selected location, you will not be able to purchase any credits.
Nearmap with PlaceMaker
~~~~~~~~~~~~~~~~~~~~~~~~~~~~
Published By
Rajib Dey
www.sketchup4architect.com
~~~~~~~~~~~~~~~~~~~~~~~~~~~~

Some new functionalities of FredoPortrait sketchup plugin

In this sketchup video tutorial, you will be familiar with some new features of FredoPortrait sketchup plugin to transform a complex 3D model into 2D FaceMe geometry.

FredoPortrait is a useful sketchup extension that can be used to generate custom camera views and export custom images from inside of sketchup.

The plugin comprises of a custom camera tool that saves and loads cameras captured from the viewport. Custom Cameras are preserved within the model or at Sketchup level, which create a way to move cameras across models.

Portrait Studio contains a wide array of tools which are used to identify a camera precisely and clarify the view depending on the selection. It then facilitates to create or update scenes, images in different formats, and more commonly render or export the selection with the native Sketchup exporters or 3rd party exporters. It also facilitates to create 2D Components out of selected 3D objects (for SU2018 and higher versions).

FredoPortrait is applied for the following purposes :

1. Move cameras inside a model and across models.
2. Create images and exports of the selection only
3. Create 2D components from selected 3D objects (for SU2018 and higher version)
4. Modify the camera positions and save them as scenes.


Most features are available in the FredoPortrait Studio dialog box.

To get online demonstration of this sketchup extension, go through the following video tutorial.

Read Continue

Some new functionalities of FredoPortrait sketchup plugin

~~~~~~~~~~~~~~~~~~~~~~~~~~~~
Published By
Rajib Dey
www.sketchup4architect.com
~~~~~~~~~~~~~~~~~~~~~~~~~~~~

Thursday, August 8, 2019

KG-dev - CADoptimus - Tag Manager 2019 – The newest sketchup plugin

This exclusive sketchup plugin is developed by KG Dev, the renowned developer of custom sketchup extensions.
The plugin is compatible with SketchUp 2017, SketchUp 2018 and SketchUp 2019.
By applying Tag Manager, the users can instantly assign numerous tags to any entity. As soon as few tags are included, one can search back those entities depending on 1 or more tags. It is a useful substitute to a workflow where one would normally utilize groups and layers to handle their drawing.
To download KG-dev - CADoptimus - Tag Manager 2019, click on the following link extensions.sketchup.com
To learn how this plugin works, go through the following video tutorial.
KG-dev - CADoptimus - Tag Manager 2019 – The newest sketchup plugin

~~~~~~~~~~~~~~~~~~~~~~~~~~~~
Published By
Rajib Dey
www.sketchup4architect.com
~~~~~~~~~~~~~~~~~~~~~~~~~~~~

Tuesday, August 6, 2019

Some useful tricks to utilize skatter plugin in sketchup

In this sketchup tutorial, you will learn the functionalities of skatter plugin in sketchup. The tutorial focuses on the following sections :-
1. Distribution
2. Uniform
3. Grid
4. Vertices
5. Faces centers
It is a robust scattering extension for sketchup to render numerous vegetation, instantly populate city blocks, generate parametric assemblies, crowds, carpets etc.
By applying “Render only” feature, one can deliver all the scattering information directly to the render engines, skipping Sketchup. In this way, it is possible to retain a lightweight and responsive file whereas still rendering huge amounts of objects.
The users can return back and edit your work at any time. Every option and parameter is saved, so it is not necessary to delete everything and restart from beginning.
Produce huge grass fields with simple mouse clicks. Besides the default grass, trees, bushes, gravel, rocks and more, the users will be able to save their own presets for reapplication, and allocate them with others.
To download skatter, click on the following link getskatter.com
Some useful tricks to utilize skatter plugin in sketchup

~~~~~~~~~~~~~~~~~~~~~~~~~~~~
Published By
Rajib Dey
www.sketchup4architect.com
~~~~~~~~~~~~~~~~~~~~~~~~~~~~

Friday, August 2, 2019

Envimet INX – The newest sketchup plugin in extension warehouse

AntonelloDN has developed Envimet INX for sketchup. It belongs to a elementary plugin that can be used to write *.inx files for ENVI_MET 4.3.
Features:
Work out grid dimensions automatically depending on buildings
Develop a 3d model with buildings, 2d trees
Limits:
1. Unit of the template should remain in "meter"
2. Components and Group are not supported
3. Buildings should be volumes
4. Only one wall material and roof material can be used for all buildings or context
5. The soils and dem can’t be managed
To do:
a) A better method to create voxels... if model is huge it will run slow
b) Study a way to apply materials
c) Dem modeling
d) Soil modeling
e) Improve location settings. E.g. a way to set timezone.
f) Improve exception handling
g) Manage Components and Groups
To get more information, click on the following link github.com
Envimet INX – The newest sketchup plugin in extension warehouse

~~~~~~~~~~~~~~~~~~~~~~~~~~~~
Published By
Rajib Dey
www.sketchup4architect.com
~~~~~~~~~~~~~~~~~~~~~~~~~~~~

Thursday, August 1, 2019

Demonstration of material replacer for sketchup

In this sketchup tutorial, you will get online demonstration of an exclusive sketchup extension called material replacer for sketchup.
Material Replacer is developed by Thomas Thomassen. It is used to swap out any material in your model with simple mouse clicks. It can substitute one material for another by choosing material in the model.
This sketchup extension is compatible with SketchUp 6, SketchUp 7, SketchUp 8, SketchUp 2013, SketchUp 2014, SketchUp 2015, SketchUp 2016, SketchUp 2017, SketchUp 2018, SketchUp 2019.
Menus & Toolbars
• Tools » Material Replacer
Requirements
• TT_Lib2 — 2.7.0
To learn the functionality of this extension, go through the following video tutorial.
One can download this extension from extension warehouse
Video Source TheSketchUpEssentials
Demonstration of material replacer for sketchup

~~~~~~~~~~~~~~~~~~~~~~~~~~~~
Published By
Rajib Dey
www.sketchup4architect.com
~~~~~~~~~~~~~~~~~~~~~~~~~~~~

Monday, July 29, 2019

Thumb Cinema for sketchup – Newest sketchup extension

Aerilius has developed Thumb Cinema, a useful sketchup plugin that supports sketchup 2019. It allows the users to apply the mouse wheel for scrolling through scenes of the model with the flick of a finger to instantly navigate to a particular scene or view an animation in action with fine-grained control of interim steps among succeeding scenes.
Application:
• The tool can be activated from the toolbar or menu Window → Thumb Cinema
• Scroll up/down over the 3D viewport to toggle scenes forward/backward. As an alternative, press ←/→ on the keyboard.
• Press ⇧ Shift to switch rapidly (9× speed).
• Type a number and press Enter to settle the number of interim steps among two scenes (1 for each scene being only a single step, default is 9).
Requirements:
SketchUp 2019.2 — The mouse wheel is a new feature only accessible since the second SketchUp feature release of 2019. If one possesses a current subscription, just download and install the upgrade.
To download the extension Thumb Cinema, click on the following link extensions.sketchup.com
Thumb Cinema for sketchup – Newest sketchup extension

~~~~~~~~~~~~~~~~~~~~~~~~~~~~
Published By
Rajib Dey
www.sketchup4architect.com
~~~~~~~~~~~~~~~~~~~~~~~~~~~~

Wednesday, July 24, 2019

How to make naturalistic pool water design in v-ray for sketchup

In this exclusive tutorial, you will get step-by-step guidelines to make a naturalistic pool water with v-ray for sketchup. Here, the design is made for a rectangular pool with white tiles.
Various water materials are provided in the pool. To avail water material, go to v-ray material library and click on the liquid category and choose the materials for water.
V-ray caustics effect is another useful function to make physically perfect water bodies in swimming pools. Caustics belong to the wavy light patterns which are developed under clear water while sunlight refracts through any uneven water surface.
Another useful option is to perform clay render in Vray SketchUp. For this purpose, go to the global switches in the Vray options and mark override materials.
To learn the complete process for making naturalistic pool water, go through the following video tutorial.
To download the model of pool, click on the following link gumroad.com/l/AI19
How to make naturalistic pool water design in v-ray for sketchup

~~~~~~~~~~~~~~~~~~~~~~~~~~~~
Published By
Rajib Dey
www.sketchup4architect.com
~~~~~~~~~~~~~~~~~~~~~~~~~~~~

Friday, July 19, 2019

How perform exterior rendering for a concrete box house with v-ray for sketchup

This is a useful tutorial for the architects where they will learn how to perform exterior rendering with v-ray for sketchup for a modern concrete box house.
Given below, some useful tips for rendering with v-ray for sketchup :-
1. Model what you observe.
2. Choose the time of day.
3. Render in eye level view.
4. Render in 2-point perspective.
5. Perform fast test renders.
6. Recognize your resources.
7. Apply sketchup materials inifially.
8. Utilize VFB channels.
9. Utilize settings presets.
10. Apply an HDRI image for your lighting.
To learn complete rendering process, watch the following video tutorial.
The model can be downloaded from Gumroad, by clicking on the following link gumroad.com
How perform exterior rendering for a concrete box house with v-ray for sketchup

~~~~~~~~~~~~~~~~~~~~~~~~~~~~
Published By
Rajib Dey
www.sketchup4architect.com
~~~~~~~~~~~~~~~~~~~~~~~~~~~~