Friday, December 31, 2010

Google 3D Warehouse – Storage of SketchUp Components

Google 3D Warehouse is the one stop solution of all the SketchUp users to download, upload or view the SketchUp models with ease. While you can let your creativity soar when using Google SketchUp, creating your own 3-Dimentional models and collections, it is not always necessary to reinvent the wheel. 3D Warehouse is the huge library of models and collections of known geographical locations, original buildings, objects and people that can be used with Google SketchUp.

It’s a user-driven community, which means people can upload their creations for general use or showcase purposes. It also means that it’s likely you’ll be able to find the model you’re seeking. By giving Google SketchUp Warehouse access directly from within SketchUp, Google has made it a simple matter to share 3D designs with other users.

Google 3D Warehouse is a website dedicated to the display and storage of models that were created using Google SketchUp 3D design software. The website features an easy-to-navigate interface that lets users view new and popular models that have been uploaded by the user community so that others might integrate their work into scenes of their own. Users can get to know other SketchUp modellers, learn about modelling competitions, and find models either separately or as part of a larger collection with ease. The best features of the Google Warehouse aren't located on the website, however; Google has integrated their 3D Warehouse into SketchUp itself, making the process of uploading or downloading content as easy as possible for those who wish to share their own designs.

Download Models Into Google SketchUp:

  • Start Google SketchUp and click on the ‘Get Models’ button. It’s located in the Getting Started toolbar and looks like an open cardboard box with an arrow shooting out of it. 3D Warehouse will appear in a pop-up window.

  • Then start browse through the model libraries or enter specific search terms to find the type of model you’re seeking. Click the ‘Download Model’ link when you’ve found a model that will work with your project. You can choose to either load the model directly into your SketchUp project or to save the model to your hard drive for later use.

  • Choose "Yes" to make your own placement for the model in your Google SketchUp. If you get a dialog asking you whether you want to place the model yourself this typically happens if the model you've chosen if you're using a terrain image from Google Earth and the model you downloaded was uploaded with a specific Google Earth location. If you select "No" then the model will be placed at the correct terrain location, whether or not it's close to your project's location.

  • Place imported models using the "Move" tool. The object will move around your Google SketchUp screen until you click to place it.

Upload Models to 3D Warehouse

  • Save and name the model you've created in Google SketchUp. Since you'll be sharing the file with the community, make sure to name it something intuitive. If you name the White House "that place at 1600" users are less likely to find it in a search.

  • Go to File, then to "3D Warehouse", then to "Share model." When the 3D Warehouse page appears, sign in using your Google account information.

  • Enter a title and brief description for your model. You can also add extra information to make the model more accessible to other users. For example, you can add tags for categorization purposes or the URL or logo of your website.

  • Click "Upload to 3D Warehouse."

Thursday, December 30, 2010

Blog: How to Create Virtual Model in SketchUp

In every sphere of life you may have to create a virtual model of any design. For a student, a virtual model can be useful for his or her school project. If you want to make a house of your own then a virtual model is important to see the floor plan and get a better understanding. For a designer, interior decorator or an architect always seek the help of the virtual model for the success of their profession. Though there are various tools for 3D designing. SketchUp is known as the most user friendly and easy to access 3D drawing tool from the house of the Google.

Making a free virtual model lays the foundation for creating entire scenes and environments, which you then use for games or simulations. With some simple tools you can easily draw a model in SketchUp. You can rotate and view the details of the model from all sides. SketchUp gives flexibility and freedom to make change in the model. You can add suitable color material and texture in the model according to your choice. In the following part there is a short guideline on how to make models on SketchUp.

Make a Model with Sketchup:

1. Open SketchUp, which is the easiest free CAD program to learn. SketchUp can create only simple animations for evaluating a model. In contrast, Blender and Art of Illusion can animate walking characters. Also, SketchUp lacks a full rendering engine; models you render with it don't look as realistic but there are some plug ins to fill up the void. You'll make a model house with SketchUp.

2. Click the top toolbar's square icon to enter the mode for drawing squares. A square forms the base of the model house.

3. Drag a square on the ground plane, then press "P" to run the "Push/Pull" tool.

4. Click the square and drag upward to turn the square into a box.

5. Press "Control-C," then "Control-V" to make a copy of the box, which will form the roof.

6. Click the second box's top face, then press "S" to run the scale tool. Drag any two opposing edges of the box's top face until they touch each other. This forms the wedge shape of the roof.

7. Press "M" to run the "Move" tool, then drag the roof atop the house to complete the house model.

Tuesday, December 28, 2010

Sketchup Ruby

Ruby is an interpreted scripting language that SketchUp can understand via its SketchUp Ruby application programming interface (API). It was first introduced in SketchUp Version 4 with the intention to quick and easy object-oriented programming.
With ruby script sketchup users can use to write plugins (scripts) for Google SketchUp and develop extra functionality by creating dozens of new tools & component generators for SketchUp beyond its built-in abilities in the Ruby programming language.
Ruby scripts can be any thing from short snippets of code to more elaborate tool development.

Benefits of Ruby
· Produce custom advanced drawing tools which boost up the modeling speed and provide assistance to create complex objects with a few clicks.
· Make 3d models that go ahead of geometry. The sketchup user can get the opportunity to add text or numeric attributes to any part of a SketchUp model and then produces reports.
· The task of the SketchUp becomes automated with the API. It will be very helpful in the case of repetitive modeling requirements as a script can save time and money to a great extent.
· Google produce free Ruby Scrambler, the sketchup users are able to protect their IP and sell thier plugins to this extensive user base.
Resources for learning Ruby
"Programming Ruby" online at
http://www.ruby-doc.org/docs/ProgrammingRuby
"The "Ruby user's guide" online at
http://www.ruby-doc.org/docs/UsersGuide/rg/
"Introduction to Ruby" online at
http://www.ruby-doc.org/docs/Tutorial/
"Learn to Program - A Tutorial for the Future Programmer" on line at http://pine.fm/LearnToProgram/
Bezier Splines in SketchUp Using Ruby Scripts at http://www.aecbytes.com/tipsandtricks/2009/issue42-sketchup.html

Sketchup Ruby interference

Ruby Extensions
The Sketchup extension is similar to other ruby script. It is known as ‘.rb’ and is applied at the end of a file name. The sketchup users have to create few extra code calls to make it easier to manage all of their rubies. To make use of plug-ins and other Ruby tools written by Google - like Sandbox and Dynamic Components - extensions must be enabled by clicking a checkbox under the SketchUp Preferences > Extensions menu.
SketchUp Ruby API
The SketchUp Ruby API (Application Programmer's Interface) is a way that Ruby programmers can extend the capabilities of SketchUp to meet their needs. Create custom drawing tools, like a tool for creating windows.
This API documentation includes sample code for each SketchUp Ruby method. There is one sample code file, also known as test file, for each SketchUp Ruby class file. All of the sample code is accessible in a .zip file on the SketchUp Web site (www.sketchup.com) under the Downloads tab. Unzip the test files in the Plugins folder within the SketchUp installation directory. These files end in the word “Tests,” such as “EdgeTests”.
You should check each test file using a text editor. You may also accomplish the tests to make out how each API works within SketchUp.
The Ruby API presents a binding to the TET C API. The API functionalities are included in a single Ruby module called as ‘Rbtet’. This module will have to be imported at the start of the test code require “Rbtet”
The SketchUp Ruby API contains a series of SketchUp-specific Ruby modules known as classes in the object-oriented programming (OOP) world, and corresponding commands known as methods in the OOP world. These modules are utilized for formulating macros and controlling geometry in SketchUp. Classes are considered to be a mechanism for grouping related SketchUp ruby commands.
Advantages with Ruby API
Attach attributes to drawing elements such as cost, supplier, etc.
Read attributes to generate reports, cut lists, or bills of material.
Automate common tasks like generating scenes from a set of rotations.
Animate stuff, from drawing elements to camera position.
Make games inside SketchUp by combining these activities.
Ruby Plugin
In the SketchUp world, "plugins" are identical to ruby scripts. Scripts belong to text files with a .rb (ruby) or .rbs (scrambled ruby) extension that includes Ruby programming code.
WebDialog Class
The Ruby WebDialog class supports DHTML webdialogs created with JavaScript. As for instance webdialogs can be formed from Ruby code to exhibit a web site or to recognize user input and utilize the results in your Ruby code.
Ruby Observer Mechanism
If any changes occur in the object of SketchUp application or model, it can be notified to Ruby script with the help of Ruby Observer Mechanism. For instance, an observer class can be created that "listens" to when SketchUp leaves and then makes some action.
Make a Ruby class of an exact observer type, like AppObserver, prevail the desired methods, such as onQuit, and put in an example of the observer to the related objects in your Ruby script (applying the addobserver method for that object). Refer to individual observer edges for additional information.
Ruby Script
Some complex scripts, like this version of BezierSpline, contain instructions inside its folder. For this purpose, the instructions are obtainable through a submenu entry exists in SketchUp. Other scripts may arise in the form of an easy, informational text file or no special document.
While updating a script one should eliminate the older version to keep away from loading errors and inconsistencies. But if you wish to maintain copies of the older versions in the Plugins directory, then the file extensions must be renamed.
In order to learn ruby script :-
Ruby Tutorial - Hello World
Ruby Tutorial - Accessing Entities

Posted by
Rajib Dey
Business Development
Sketchup4architect

Monday, December 27, 2010

Catch Santa this Christmas with SketchUp

Every year Santa Clause comes in the sledge pulling by the reindeer with the elf and distributes gift among the children of all over the world. But we always get surprise about his magical journey. We always want to know how he visits so many children in just one night. Every child’s mind is full with the curiosity that would he eat the cookies or how he manages to store all the gifts in the sledge. All of these questions keep the Santa Clause a mystery for years.

Not only the child but also the elder people want to know where Santa is at the very moment. North American Aerospace Defense Command or NOARD with the help of SketchUp and advance GPS system tracks Santa.

From 2 a.m EST of 24th December they start to track Santa. For more information visit www.noardsanta.org. You can visit his journey around the world and see the jolly man delivering gifts to the children of all over the world. We will just love to see the unmistakable red suit all over the day.

This is not the first time. NOARD started to track Santa since 1955. Google as announced in their official website that they partnered with NOARD in this mission. Embracing the spirit of the season, NORAD used its satellite and radar capabilities to offer callers sleigh-location updates, and has tracked Santa’s whereabouts on Christmas Eve ever since. Then in 2004, Google started tracking Santa on Google Earth as a 20% project, which in 2007 grew into a partnership with NORAD, adding the mapping technology of Google Maps and Google Earth to the NORAD experience. This time SketchUp come along in this venture to give it a more realistic view.

  • See Santa on a Google Map: On your home computer or laptop, visit www.noradsanta.org and choose your preferred language. You’ll see a large Google Map on the page displaying Santa’s current location and his next stop. Click the video icons to watch “Santa Cam” videos, and click the gift icons to learn more about each city.

  • Watch Santa fly with the Google Earth Plug-in: From www.noradsanta.org, click on the link Track Santa in Google Earth. You'll see Santa steering his sleigh right on the webpage. If you don't have the Google Earth plug-in, you can get ready by downloading it ahead of time.

  • Follow Santa on your phone: Track Santa from your mobile phone by opening Google Maps for mobile and searching for [Santa]. Or, visit m.noradsanta.org on your phone’s browser.

  • Get real-time information about Santa’s location: Use Google’s Realtime Search to get updates from social networks, news and micro-blogs like Twitter at @noradsanta, and keep up with news about his journey on this Facebook page.

Thursday, December 23, 2010

Sketchup ur Space – an one of a kind magazine on SketchUp


SketchUp ur Space is a unique flash magazine though you can have the pdf version also. Since September, 2010 this magazine have come out with lots of informative feature articles, blog, review, tips and tricks article and many more things. The image quality of the SketchUp models is also good. Here you can have a through discussion on the SketchUp and its plug ins. It helps you to keep yourself updated on various SketchUp related issues.

Since its first edition, you can get lot of useful information on SketchUp. In the first issue of Sketchup ur Space, they welcome all in the 3D world and introduced to the SketchUp. After the introduction we came to know various features and benefits of SketchUp in the second issue. Now days SketchUp is almost incomplete without its plug ins. Plug ins have become the integral part of SketchUp now. It not only enhances the functionality of the SketchUp but also gives the users freedom to spread the wings of their creativity. That’s why in the November issue of SketchUp ur Space, there is a details description of various SketchUp plug ins.

This SketchUp magazine already has become quite well known in the SketchUp community. Different SketchUp artist of all over the world are providing write ups on SketchUp in this magazine. We find promotional write ups on various plug ins by the plug in developers here. Sketchup ur Space proves to be very useful for the SketchUp users. In the cover story of every edition there are discussions on the main theme of the issue. There is a section where we find the valuable write ups by eminent SketchUp users like Albert Hart, Eike Theile, Justin Anderson, Kendall Wayland and many more. Apart from the blog from the editor herself, there are the extracts of various blog posting by SketchUp blogger Dennis Fukai and Jim Leggitt on the Sketchup ur Space. The Tips and Tricks articles are also of great assist to the new SketchUp users for providing guidance. In the Review section, you find reviews of plug ins which help you in time of taking purchasing decision.

In the December edition they come out with a Christmas Special issue. In this edition the theme of Sketchup ur Space is render plugins. Render plug ins are the most important and popular plug ins in SketchUp. There is also a new section called Press Room, where you will get to know new releases of various plug ins and SketchUp products. Hope that you will love to read this issue. If you want the regular issues free of cost then just subscribe it by clicking here.

Wednesday, December 22, 2010

Google Announces The winner of Ponoko Challenge and Geo Super Modeler

In this season of Christmas SketchUp transform itself to Santa Clause… rather 3D Santa. It brings happiness to the faces of Ed Lewis and Huang Chung-Tang (a.k.a Tang). They are the new winner in two different competitions arranged by Google SketchUp.

Ed Lewis is the winner of Google SketchUp and Ponoko 3D printing competition and Tang is the new Supermodeler for the November month.
Ed Lewis, aka Fungus Amungus, who created an all-around fantastic Instructable for using Google SketchUp with Ponoko 3D printing to win the Google + Ponoko Challenge. The prize package of this competition includes worth $1,500 and includes a Google SketchUp Pro license, a 12 month subscription to Ponoko Prime, plus a $537 Ponoko digital making voucher.

In the Instructable, Lewis walks you through 7 easy steps to go from a simple cube in SketchUp to a 3D printed, level-3 Menger sponge.

In an interview after winning the competition Lewis said about SketchUp; “I like that I can quickly jump in and get a 3D rendering of an idea out in a few minutes. For getting an idea across to someone, it often takes less time to make a model than it does to describe it verbally. You can quickly move on to the stage where you’re trying out several different variations, which is great because that’s the fun stuff. I’ve tried a couple of other 3D programs and they’re pretty amazing, but for my purposes SketchUp is my goto program. Having a free version means I can share ideas with anyone else in the world. I can push a project as far as I want to, put up the file, and then see someone else take it even further. That’s awesome.”

In another competition announced in November for awarding supermodeler status to the world’s best geo modelers Huang Chung-Tang came out as the winner of the process. With 140 top-notch models currently in Google Earth’s 3D Buildings layer, he’s certainly deserving of the honor. After the announcement, Tang was interviewed by Google. From the interview we came to know that though he had a dream to become an architect, he specialized in Interior and Space design. SketchUp gives him the opportunity to fulfill his dream. With the help of it he started building geo models for Google Earth.

According to Tang, “My first model passed through Google’s review process and appeared in Google Earth’s 3D Buildings layer in 2008. The feeling of excitement when I see my models in Google Earth remains today. Maybe this is the Google Earth and SketchUp charm. I think all modelers share this kind of feeling.” When he was asked about his goal he said, “It’s my hope that more people in Taiwan will participate in geo-modeling. We could create a community where we work collaboratively to build geo-models of Taiwan to appear on Google Earth. My goal is have more buildings of Taiwan to be seen by everyone around the world. In the last few years Peter has taught me a lot about modeling, and helped me produce better models using SketchUp. I think this is what they mean by a ‘global village’.”

Tuesday, December 21, 2010

Process of Easy Creation of Stunning Laser-cut 3D forms!

Creating a 3D model in SketchUp is a great as well as easy enough than any other complicated 3D designing tool. Everyday more and more plug ins are launched to lower the barrier to people creating their own great designs in SketchUp. It allows you to build models from a simple scratch or you have the freedom to download your required model from the 3D Warehouse. But a 3D model is not enough for this cutting edge technology age. You can have a laser cut 3D models with the help of a wonderful plug in named SliceModeler.

Sliceform modeling is a technique which lies happily on the borders between art and mathematics. The models are made from intersecting sets of parallel panels made of paper, cardboard, wood, Plexiglas or MDF which slot together to generate interesting 3-dimensional surfaces or objects.

Slicemodeler allows you to take a 3D model form and slice it up into interlocking pieces through a series of simple steps. You enter the distance apart that you want the sections, the material thickness, choose which axes the slices are on, and the software calculates the intersections. Once you have all the slices, in this time the SVG outline plugin comes in. Select the sections you want (that have been conveniently laid out by Slicemodeler) and hit Export to SVG file.

Now you have a file (or files) you can open in Inkscape or Illustrator to arrange for laser cutting. The SVG export plugin also lets you label the different parts so you can keep track of things.

If you're new to SketchUp and have familiarity with other modeling programs, no problem - simply model your designs in your preferred program and then import them into SketchUp. You can then take advantage of the various plugins, including those mentioned here.

The process goes something like this:

  • Create the form in SketchUp (If you are using a different modelling program, you'll then need to export a .3ds file and import it into SketchUp )
  • Run SliceModeler (see above)
  • Export SVG files from SketchUp
  • Open in Illustrator (or similar), label and laser cutting

It sounds like a lot of steps but it is actually a simple process compared to imagining how these pieces interlock and drawing the sections in 2D in Illustrator and free 3d models.

Previously, this style of form creation has been possible with premium 3D modeling software like Rhino, but the great thing about SketchUp and its plugins is that they are free 3d models.

This significantly lowers the barriers that stop people making things. And the plugins are either free or for a small donation which is totally worth it to support the great independent software creators that add huge value to these bigger software packages.

Saturday, December 18, 2010

Instant Roof – a wonderful aid to SketchUp


Though drawing a house in SketchUp is not at all a tedious work, but some times it becomes easier than ever getting help from other software. Instant Roof is something like that which helps you to end the 3D modeling in SketchUp faster. This cool plug in is easy to use in every sphere from installation to execution.

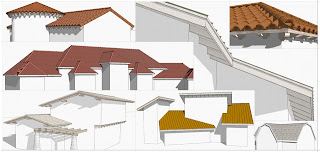
Instant Roof is a wonderful creation of SketchUp Ruby Script by Chuck Vali of Vali Architect. With the help of the Instant Roof, you can create various types of Roof for your models of the house instantly. When you use it, you’ll be able to easily create hips, sheds, trellises, and gables wherever you need them.

With the help of this software, drawing roof is not the only easy task – the installation, learning as well as execution all are easy enough. You just have pop one file in to your plug in folder and you set to use this plug in. The software comes with the wonderful easy to understand pdf file from where you can easily understand all the tips and tricks of Instant Roof. Along with that, a bunch of useful videos are there in their website which helps you to be a master in this tool instantly. The website help section is also very useful.

The most important attribute of the Instant Roof is the quick productivity. For a organized plug in menu, you don’t need to memorize the names of each and every small button and can do your drawing without any hassle. The input method for telling the script where to put gables and sheds couldn't be simpler.

The main attributes of the Instant Roof are:
• Create a complex roof in seconds - just select faces and edges; then run Instant Roof.
• Hip, gable, shed, dutch-gable, mansard, plantation, gambrel, open-trellis, combined, more...
• Eave types: boxed-in, exposed, soffited
• Hips and rafters with customizable ends
• Fascia, fascia-trim, ridge and hip tiles, shingles, or sheet-metal
• Complete mission tile or standing-seam roof
• Use default roof styles - or create your own
• Export and Import user defined roof styles
• Choose any unit type supported by Sketchup: Metric- angles for slope or Feet/ inches - ratio for slope
• Upgrade to Pro version for more roof slopes (The free version will only create the following roof slopes: 1/8:12 (0.6 degrees) ; 2:12 (9.5 degrees) ; 6:12 (26.6 degrees) ; 16:12 (53 degrees) or 24:12 (63 degrees).


In the Instant Roof there are a number of different roof styles that are really just preset combinations of different parameters you can play around with. That means the possibilities are endless! You can modify the preset roofs to create eaves, fascia, rafters, and slopes. Every feature is completely adjustable. In addition to that, you will also be able to select a few different roof details like shingles, standing seams, sheet metal, and tile.

There are two versions of Instant Roof; the free version and the Pro avaiulable. The Pro version gives you a bit more when it comes to roof slopes and other features, but if you’re not doing serious work, you can have a lot of fun with the free version. The Pro version will run you about $39.

Friday, December 17, 2010

Google Earth gets its complete look by SketchUp

Google Earth is the digital atlas from the house of Google. We know that we can have the geo modeling on Google Earth of various cities. And when we talk about 3D modeling of Google, the name of SketchUp must be included. With the help of SketchUp, geo modeling of many cities can be done and uploaded in Google Earth. Till date there are almost 109 cities in the Google Earth and the number is still counting. There are models of Oklahoma City, Oklahoma, Oslo, Norway, The Hague, The Netherlands, San Antonio, Texas, Tucson, Arizona, Norfolk, Virginia, Salt Lake City, Utah and many more cities. The latest addition to this list is Paris, the city of love.

http://www.sketchup4architect.com/ may have brought out the designer side in everyone with models ranging from the very simple to the very intricate. But it is Google Earth where these models are vividly brought to life. Now using these two tools, the average internet user doesn’t even need to leave their house in order to travel around the world – or even make money.

The buildings of any city seem to be all the rage and whole towns and cities are starting to appear on Google Earth as 3D SketchUp buildings. Soon we’ll have every street corner and alleyway meticulously reproduced in 3D virtual reality. This is starting to become a boom industry as businesspeople are starting to see the financial incentives. Not only is there a thriving industry in making the models for other people but professionals such as real estate agents and architects can also harness the power of SketchUp and Google Earth to build 3D models of properties to show to prospective clients. Why look at a patch of empty ground and imagine what will be there eventually when you can make an interactive 3D model instead?


Another advantage of this collaboration of Google Earth and SketchUp is for the travelers. They can check out the targeted destination on Google Earth. Even they can map the route on Google Earth to see how far away the airport is from the hotel. Prospective house buyers can also check out the area they are contemplating moving to if they happen to live far away. But the best advantage of all is that you can re-live memories. After coming back from holiday, you can go to Google Earth and see the sights again and pretend you’re still there.

So SketchUp and Google Earth make the perfect pair. SketchUp provides the tools to make the models and Earth brings them to life.

Wednesday, December 15, 2010

SketchUp, an Innovative Tool for Home Designing

SketchUp is the place where creativity mingles with fun, where simplicity wins over complex procedures, where hand paint effect adds with photo realistic rendering. Now you don’t need to be a professional designer or architect to draw a model in 3D. SketchUp makes all your necessities of designing possible without any hassle.

With the help of SketchUp you can draw the complex floor plan of your house in a simple way. With the three axes you can easily draw the lines with the pencil tool. There are many tools like Arc tool, Freehand Tool, Rectangle tool, Circle Tool and Polygon Tool to give you the flexibility to draw as you like. Then the Push or Pull tool helps you to make the design in to 3D. You can add colors, texture material according to your choice from the Paint Bucket Tool. You can do any modification with the help of the Eraser Tool. The Move Tool, Rotate Tool, Scale Tool Follow Me Tool and Offset tool will help you to modify the existing geometry of the image.

You can experience the model of you house will look at different times of day and night. Landscape of your house can be added in SketchUp. From the 3D Warehouse you can add different types of components like tree, shrubs, indoor plants, car, building, people and many more things. All these things will help you to give a real time feel on your 3D designing. It will help to have you a better understanding of the floor plan of your dream home. SketchUp also allows you to have last minute change in an inexpensive way and see the model in ‘what if’ condition.

SketchUp is also a great option for redesign your existing home. You can change the color of your rooms and rearrange the furniture to give a new look. You can also add new furniture or components like show pieces, table lamp, sofa, electronic gadgets or indoor plants. You can also change the carpet of your room. Furniture is also created with it. You can make 3D designing of various new furniture unlashing your creativity. You can find help in www.sketchup4architect.com which is a wonderful website providing tutorials, components and many other important requirements for 3D designing.

Posted By
Debarati Nath
Content Writer
Sketchup4architect

Monday, December 13, 2010

Driving Dimensions plug-in 1.4 for Google sketchup

Ledas just launched the revised version 1.4 of the Driving Dimensions plug-in for SketchUp.

This new plugin is fully compatible with the free 8 and the Pro 8. The plugin is also tested with the 32-bit versions of Windows XP, Vista, and 7, and on Mac OS X 10.6.

The Commercial licenses of Driving Dimensions v1.4 is priced for US$145 (EUR 145 in Europe). The users who have purchased the licenses during last year can upgrade to v1.4 free of charge.

Free test drives of the Driving Dimension plug-in is available www.DrivingDimensions.com/SketchUp.

The free version is not allowed for commercial utilization and limits users to 10 driving dimensions per model.

The code of the Driving Dimensions plug-in has been modified to get the most out of several important changes made to SketchUp V8. Now the inferred dimensions mechanism of Driving Dimensions performs accurately in both the new and previous versions of SketchUp.

Now the sketchup users can easily add parametric to the SketchUp V8 licenses.

Driving Dimensions is a plug-in for SketchUp that facilitates to create parametric changes of any 3D model. The users can modify any dimension (length, distance, radius, angle) in your SketchUp model in just one click.

Posted by
Rajib Dey
Business Development
Sketchup4architect

Keyframe animation plugin for sketchup

It is an animation plug-in for Google SketchUp and compatible with 7, 8 or Free or Pro.
This Plugin works inside SketchUp and creates keyframe animation in SketchUp.The animation can even be exported as an AVI or MOV video file.

The users can easily add, delete, rename and reorder keyframes. Groups and components are animated between keyframes by translation or rotation. The camera moves between keyframes by the usual SketchUp interpolation.

For installation move the file, rp_keyframe_animation.rbs, to your SketchUp Plugins folder and then Restart SketchUp.

Posted by
Rajib Dey
Business Development
Sketchup4architect

Thursday, December 9, 2010

Pointools launched a new plug-in for sketchup users

Pointools has offered a new Plug-in for Google SketchUp. This plug-in is ideal for all SketchUp and SketchUp Pro users as the plug-in helps to keep the visual quality and correctness of point cloud models in SketchUp.

The plug-in will show the numerous points on screen by reading the Pointools POD model file format easily and thus enhance the modeling productivity.

The users also use this plug-in as a support for Google’s geo-location services to maintain StreetView textures and aerial imagery alongside point clouds.

By applying this plug-in the sketchup users can reuse the same point cloud models inside sketchup and simplify the scan-to-model workflows. The plug-in also assists to generate 3D city models from mobile scan data.

Posted by
Rajib Dey
Promotion & Development
Sketchup4architect

Tuesday, December 7, 2010

Combination of Alibre Design Expert and "Moment of Inspiration TM (MoI)" Software

Aliber Inc presents Moment of Inspiration TM (MoI) in Alibre Design Expert. Michael Gibson creates this concept creation and surfacing design tool that will help designers to create product and concept design easy and fast.

With the help of it’s additional tool the designers get the optimal design with the aspects of ergonomics and visual richness.

The combination is very much helpful for 3D CAD programs like Solidworks, Inventor, and Pro/E, allowing their native CAD models to be conveyed into Blender, SketchUp, Maya and any other rendering or game development platform which supports OBJ files. It will also support SketchUp output (SKP).

Posted by
Rajib Dey
Business Development & Promotion
Sketchup4Architect

Monday, December 6, 2010

Sketchup4architect is a storehouse of Sketchup services

Sketchup4architect outsource Sketchup services to the offshore companies for several years. They have emerged out as the leader of Sketchup services in the world wide web. Finest quality of Sketchup services since 2006 keep all the customers full satisfied.

Sketchup is a wonderful tool for 3D designing. It is much faster and accurate than any other 3D designing tools available in the market. This magic tool from the house of Google helps the architects, designer, educators, game designer, film designer, graphic are designer, interior designer. Any general people can use this user friendly designing tool. This is success used by the school students for their project. Even the people with autism disorder can make beautiful model with the help of Sketchup. 3 dimensional model of any object like building, people, tree, car or any thing can be created promptly. Photo realistic rendering is also done with Sketchup to get a more real time look of the design. One can add texture, experience first person view via ‘walk through’, rotate the structure and can see it from every angle to get a better understanding.

Sketchup 4 Architect is doing an excellent job in providing the Sketchup service to the Architect Firm, Landscape Architect, Interior Designer, Graphic Designer, Real Estate Agency, Engineering Company, Game Industry, Film Industry, Woodworking Industry, Mechanical Industry and many other sectors. They are providing Sketchup services like: 3D Modeling, Architectural design, 3D Construction design, Interior design, Landscape Architecture, Film & Stage visualizing, GIS sketching, Mechanical Design, BIM Modeling with Google SketchUp and SketchUp for furniture design. Apart from these services you will find there lots of pre designed components like building, library, car, people, tree, door, windows, furniture and many more things by the Sketchup artist of the firm. Sketchup4architect is a treasure trove of the Sketchup plugins. One can download various Plug ins like SketchUcation Extensions Index, Lightup for Sketchup, Ies ve Sketchup Plugin, Turbosketch Studio, Indigo Renderer, Hypershot, Twilight Render, Shaderlight Plugin for SketchUp, 3D Paint Brush for Google Sketchup, Arc Gis, Podium, Vray, SU2KT, Artlantis for Sketchup, Edrawings Publisher, Google Sketchup Web Exporter Beta, Hypercosm Teleporter for Sketchup, Idx Renditioner, Urban Developer, 3skeng, Waybe, SketchyPhysics, Ifc2skp, Irender for Sketchup, Nxt render for Sketchup, Rps 3d pdf Exporter, RPS Productivity Tools, Render Plus System, Rp Tools, Space Design, Renderplus NPR Tools and many other.