Tuesday, February 26, 2019

CompoTools⠀CompoScene 2.0.6 for sketchup

Rafael Rivera has developed the most updated version CompoTools CompoScene i.e. version 2.0.6 for sketchup users. It is useful sketchup extension compatible with SketchUp 2017, SketchUp 2018, SketchUp 2019.

The purpose of this sketchup plugin is to generate and export sketchup scenes with rendering channels for composing in photoshop or other leading painting app.

This sketchup is very useful for comic book artists and manga artists to create stunning 3D backgrounds in their panels. The artists can create a mock-up of the scene to be produced with various camera angles for several panels.

CompoScene produces rendering channels for the users to build upon and develop your own art style.

This sketchup plugin is available in extension warehouse.

To watch online demonstration of the plugin, go through the following video tutorial.

Video SourceCompoTools

~~~~~~~~~~~~~~~~~~~~~~~~~~~~
Published By
Rajib Dey
www.sketchup4architect.com
~~~~~~~~~~~~~~~~~~~~~~~~~~~~

"Projecting with SketchUp Follow Me Tool”

SketchUp users have worked with various tools in 3D models and among them SketchUp Follow Me tool is one that is used to control a face collaboratively along with a path.

There are many tools within SketchUp which are useful in creating 3D models or geometry and one of them is the SketchUp Follow Me Tool. It is the Pied Piper of 3D geometry that controls a face collaboratively a path for creating a 3D shape and it is the only thing this tool does. But it has a multitude of applications and enables users to draw complex 3D models with only a few clicks. Follow Me tool is users favorite tool as it is very handy in modeling finishing details that track a perimeter or edge like crown modeling or gutters and also make easier to work with modeling boarded objects like a spindle and curved vessels etc.

This tool can be found in the places of SketchUp like: Tools menu, Edit Toolbar, Large Tool Set Toolbar and Tool Palette in macOS. Here are some examples of applying Follow Me tool in different modeling:

  • Automatically projecting a profile with Follow Me:
It is the easiest method of all and usually preferable way using the Follow Me tool, the method follows the steps to extrude the face automatically. At first users need to raw a profile of the face that needs to follow the path and this profile has to be nearly perpendicular to the path; then using the Select Tool the continuous set if edges have to select that depict the path. Next select the Follow Me tool and click on the created profile where the surface is projected automatically along users’ preselected path.


        2.Manually projecting a profile with Follow Me:

Extruding or projecting a profile along a path manually is a matter of a bit more work but users can easily control the direction the extrusion goes through some steps. Users at first have to identify the path for the extrusion, they need to draw a face or profile that want to follow the path and this profile has to be perpendicular to the path. Then select the Follow Me tool, click and drag the created face along the path; while dragging the mouse pointer will touch the created path and SketchUp will automatically highlight the path in red color. If the starting edge does not start the profile, then Follow Me will start extruding at the edge; at last click to finish the Follow Me operation after reaching the end of the path.


         3.Modeling a lathed shape with Follow Me:

Follow Me tool can also be used to replicate a lathe through the following steps: at first draw a circle using the Circle tool; next the Line, Arc and Freehand tools are used to draw a cutaway of half of the final shape. Now the cutaway will create a face which is perpendicular to the circle and the bottom of the cutaway aligns with the center point of the circle. Now use the Select tool to select the circle, next click o the Follow Me tool on the face of the cutaway; this particular step needs some time to complete.


Projecting with SketchUp Follow Me Tool

~~~~~~~~~~~~~~~~~~~~~~~~~~~~
Published By
Rajib Dey
www.sketchup4architect.com
~~~~~~~~~~~~~~~~~~~~~~~~~~~~

Thursday, February 21, 2019

BoxUp XYZ 1.3.0 for sketchup

BoxUp XYZ is the newest sketchup plugin that is well matched with SketchUp 2017, SketchUp 2018, SketchUp 2019. It is only compatible with windows platform.
BoxUp expands Sketchup Dynamic Components with Dynamic Materials, Costing, Lists and includes 14 new dynamic functions. It will be very effective while working with sheet/profile based modular systems like; Kitchens, Office furniture, Shelving, Wardrobes, Aluminium profile systems and so on.
Sheet based materials range from MDF, Plywood, Glass, Acrylics - any sheet based system.
Linear based materials like Aluminium profiles, Edgeband, gaskets - any profile based system.
Create your own collection of components or make collections for a client. BoxUp Pro comprises of a wide array of collection of dynamic components for kitchen design. It can be applied as reference, as a base to build your own.
The plugin includes 14 new functions to Dynamic Component, that allows and streamlines the process for creating more complicated component collections.
Go through the following video tutorial for online demonstration of the plugin.

~~~~~~~~~~~~~~~~~~~~~~~~~~~~
Published By
Rajib Dey
www.sketchup4architect.com
~~~~~~~~~~~~~~~~~~~~~~~~~~~~

Wednesday, February 20, 2019

"The most underused SketchUp Tip: Outliner Tool”

SketchUp’s most underused tool is Outliner tool that will save the time and also stay arranged while working in SketchUp and has some hidden features.
In this article we are going to discuss about benefits of using the Outliner Tool in SketchUp that can save both time and stay organized.
Justin Geis: Justin Geis is the founder of The SketchUp Essentials and started using SketchUp while he was working as a general contractor in 2008 and after using it he found that SketchUp is extremely powerful that he just started to use it in his personal works also. Then he started The SketchUp Essentials as a place where he could share his ideas of using SketchUp easily through some tutorials and tips to help other users controlling the power of 3D Modeling in everyday lives
ustin Geis is the founder of The SketchUp Essentials and started using SketchUp while he was working as a general contractor in 2008 and after using it he found that SketchUp is extremely powerful that he just started to use it in his personal works also. Then he started The SketchUp Essentials as a place where he could share his ideas of using SketchUp easily through some tutorials and tips to help other users controlling the power of 3D Modeling in everyday lives.

Outliner Tool:

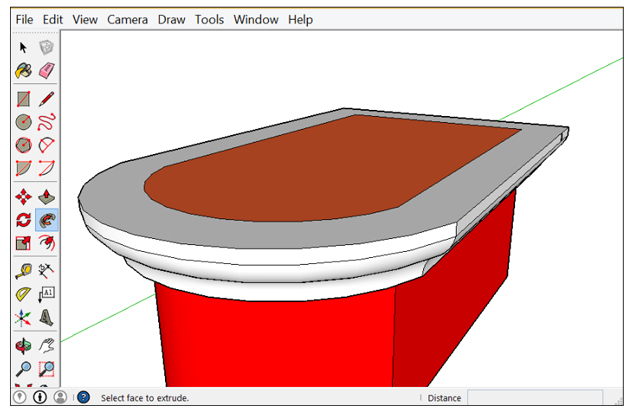
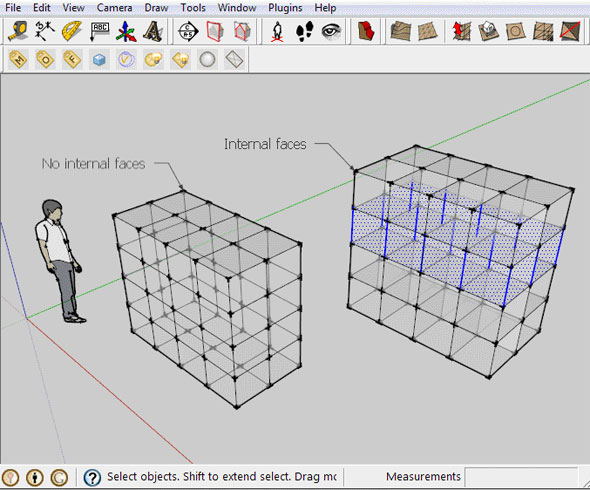
This tool works in very simple way, whenever a group or component is created within the SketchUp Model it automatically will be visible in the Outliner and also user can see the name of the component in the outliner. This tool also works with a created box like if a user creates a box, selects it and makes it a group; then it will automatically shows up in the outliner. The noticeable thing is that a group will arrive with a single box next to the Outliner without any brackets and if a component is created constraining a set of brackets then may an associated name will be created with it. An object can be renamed in the outliner through two easy steps- 1) by right clicking on it and selecting the option “rename” or 2) users can go to the entity info for the object and can rename it there.
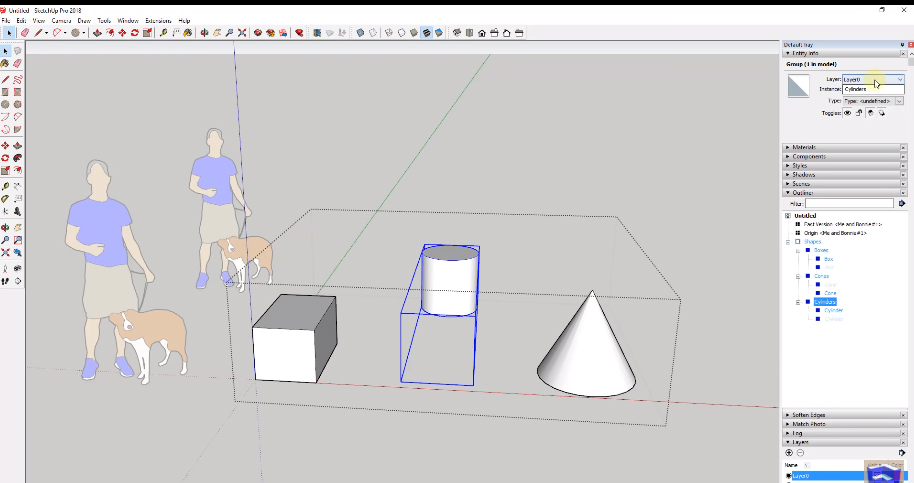
The outliner also helps to show individual objects, nested objects, meaning groups inside groups etc.; that means creating a copy of the box and group it one can get a new group within the outliner that can be extended and minimized. This will make easier to get to nested objects and allows to keep a really pact view; if users create different shapes and want to give name the individual shapes, then at first the shapes need to group by shape type, next group all of them in to a group called “Shapes”. All groups can be named in the same way to keep remainder of contains and can get them easily in the time they needed. But components will show in a little different way like they will have brackets around the component definition and this the name of all copies of this components will share, more than that each one of these individual components can have its own unique “Instance name” which is the name of the individual object.
These are the features that can get in the previous versions of SketchUp but in the new version of SketchUp 2018 one of the features which is that the section cuts now can show up in the outliner so the users can use the outliner to arrange the section cuts which is very important as it is the only way users can have multiple section cuts active instantly and can have them inside different groups. Besides that, users can also adjust and view different visibilities inside the outliner which can hide the geometry but still be grayed out in the outliner. To unhide the hidden geometry, users just simply need to right click on it and select the option “unhide”; it is important to know that geometry on a layer that is turn off will not show up in the outliner until it is turned on again. Users can also move and change groupings for objects within the outliner with just clicking and dragging; users can also explode already created groups by right clicking and selecting the “explode” option.
The most underused SketchUp Tip: Outliner Tool
~~~~~~~~~~~~~~~~~~~~~~~~~~~~
Published By
Rajib Dey
www.sketchup4architect.com
~~~~~~~~~~~~~~~~~~~~~~~~~~~~

Tuesday, February 19, 2019

Demo of sketchup slicer plugin

In this sketchup tutorial video, the demonstration is given for sketchup slicer plugin. Slicer plugin is developed by TIG.

With the Slicer Plugin for Sketchup, it is possible to cut your model into pieces. Just choose any solid object and slice it up into pieces. If any hole exists in your model, the plugin will not work. The plugin is very effective for repairing your model.

For application, just select a group of geometry and choose the axes to be sliced along together with the spacing and thickness of your slices.

Slicer facilitates the users to slice a model along the X,Y, and Z axes, together with custom axes. Export those slices to like a CNC router to develop these models in real life.

Besides, slicing your model, but if the flatten object is chosen, slicer will actually set all the different pieces it produces as components. These pieces can be exported to a CNC router if it is required to generate your objects in real life.

The extension can be downloaded from sketchUcation store.

To get more clear ideas, go through the following video tutorial.

Video Source TutorialsUp

~~~~~~~~~~~~~~~~~~~~~~~~~~~
Published By
Rajib Dey
www.sketchup4architect.com
~~~~~~~~~~~~~~~~~~~~~~~~~~~

Monday, February 18, 2019

"Methods to design moving parts in SketchUp for 3D Printing ”

SketchUp is famous for its 3D printing models and objects but the method of creating design moving parts in SketchUp for 3D printing is a matter of practice.

3D printing or additive manufacturing is way of making three dimensional solid objects from a digital life. The creation or making of a 3D printed object is achieved using additive processes and in this process, an object is made by laying down successive layers of material till the object is created. Each of these layers can be visible as a thinly sliced horizontal cross-section of the eventual object. So basically 3D printing is the opposite of subtractive manufacturing which is cutting out a piece of metal or plastic with for specimen a milling machine.

SketchUp is just made for 3D printing and designing in SketchUp is cool as 3D printing is something that moves is cooler and unique than that. In this article we are going to discuss about a few features that can be include by the users to make their creations more than just interestingly shaped hunks of immobile plastic. Aidan Chopra and Rebecca Huehls this time comes up with new tricks about 3D printing in SketchUp.


Captive Joints in SketchUp:


A Captive Joint is basically a movable connection that comes out from the previously assembled and working 3D printer. Captive joints are mechanically simple links, ball joints and chain links but they are very powerful. A 3D printer can quickly made objects with hundreds of captive joints that may take a lot of time to build by hand. As there are many poseable action figures, clothing and chainmail which are the examples of simple captive joints assembled into complex structures.

Creating Captive Joints in SketchUp:


Though SketchUp is an easy tool of creating 3D objects though making a captive joint needs many trial and error. Users need to do experiments to get the perfect mixture of clearances and shapes. Here are some rules to keep in mind while working on captive joints:

  • Components should be used to build structures with captive joints as they let the users to modify all the joints automatically.
  • Designing on captive joints depend on using of the specific 3D printing technology; SLS-based 3D printers can build captive joints with millimeters across while FDM printers make strong joints.
  • As a structure is only as strong as its weakest part so a joint should be made a little mixture of fine and hard structure.
  • As 3D printing is cheap and with captive joints one is pushing the limits of technology so objects need to be tested before work

    SketchUp Pins:
    SketchUp pins are small, round cinch fittings that are pressed into the right place to create a connection and they can be a flexible replacement for hardware. As pins like bolts come in exact size and shape as per the need of users and they can also print more while running out.


    • While designing the pins, users need to make them one flat side as it will give them a way to build the pins without using support material but keep the tongues horizontal to create platform.
    • Making pins into components let them modify easily at once it is needed to do.
    • Designing a project with pin joints, create an effort to standardize around a small number of pin sizes as it will keep things clean and simplifies assembly.
    • Loose to Groups: This helps to gain the geometry by ungrouping it and organizing it in something useful.

    Methods to design moving parts in SketchUp for 3D Printing


    ~~~~~~~~~~~~~~~~~~~~~~~~~~~
    Published By
    Rajib Dey
    www.sketchup4architect.com
    ~~~~~~~~~~~~~~~~~~~~~~~~~~~

Friday, February 15, 2019

Shaderlight 2019 launched with support to sketchup 2019

The latest version of Shaderlight Pro is compatible with Sketchup 2019, macOS Mojave dark mode, a new 4K UHD output resolution preset and more.

Shaderlight is an interactive rendering software plug-in to SketchUp that facilitates the users to generate superior quality images, easily and quickly.

With this new version, the users can efficiently keep control render their SketchUp models, along with the capability to animate your SketchUp scenes and render to the cloud.

New features in Shaderlight 2019

Shaderlight 2019 comprises of an extensive range of workflow improvements together with the capacity to render transparent materials in chalk renders.

Given below, some exclusive features of Shaderlight 2019

• Transparent objects will now be transparent in chalk renders.
• Shaderlight’s render settings are saved separately for every SketchUp scene.
• Shaderlight render window now provides support to macOS Mojave’s dark mode.
• Shaderlight resisits a computer from going into sleep mode at the time of rendering.

• Shaderlight will now suspend App Nap for the plug-in even as a render is on the go on macOS.
• A 4K UHD output resolution preset in included.
• Shaderlight warns while applying the ‘Quit Shaderlight’ menu option on macOS at the time of rendering.


Note: The customers who brought Shaderlight on or after November 21st 2018 can upgrade to Shaderlight 2019 at free of cost. Contact sales@toolfarm.com.

To purchase this newest version of shaderlight, click on the following link www.artvps.com

Shaderlight 2019 launched with support to sketchup 2019

~~~~~~~~~~~~~~~~~~~~~~~~~~~
Published By
Rajib Dey
www.sketchup4architect.com
~~~~~~~~~~~~~~~~~~~~~~~~~~~

Thursday, February 14, 2019

"SketchUp Talk: About Mastering SketchUp with Matt Donley”

SketchUp team has been focusing on making their website and tools easier to use for their users, the also started a page called SketchUp Talk where people will find relative matters.


About SketchUp:


SketchUp or Google SketchUp is mainly a 3D modeling computer program that is used for a broad range of drawing applications used by architects, interior designer, landscape architects, civil and mechanical engineers, film and video game designers also. SketchUp can be getting as a freeware version named SketchUp Make and a paid version with many more extra benefits called SketchUp Pro. SketchUp is software from Trimble Company and there is an online library of free model congregations and 3D Warehouse to which users can add other models; besides that, the program has drawing layout functionality with variable ‘styles’, supports third-party ‘plug-in’ programs hosted on the Extension Warehouse to supply other abilities and enables placement of its models in Google Earth.

As SketchUp users are most of architects, designers, builders, makers and engineers etc. who works hard to give a nice shape to our physical world, they need great tools to do the work. SketchUp is in mission to bring their best to produce some great tools for drawing as drawing is the key thing of the SketchUp users. They draw to search ideas, to identify the things and to show other people their work that they do with love and love to build; SketchUp understands it truly and trying to improve their software day by day.

About SketchUp Talk:


It is a platform for the people who want to keep updated with SketchUp knowledge themselves while they are not working with their computers; this platform offers them the recent talk about different objects. Every SketchUp professional uses this platform to publish their wordings, thinking and new updates about different tools in SketchUp.

This time Matt Donley has taken part in the SketchUp Talk about the methods which help him to become a master in SKetchUp. Matt Donley is one of the brains who are behind SketchUp.com; this is an online training resource for SketchUp users around the World. Besides being a SketchUp professional, he is a carpenter and visual artist who was drawn to SketchUp for its easy handling capability, use and the endless ways it can be applied to many projects.

This time in SketchUp Talk session, Matt has shared his journey from being a tradesman to online trainer where he has become familiar with the SketchUp team and writing and publishing his book “SketchUp to LayOut for Architecture.”

This episode of SketchUp Talk, Caroline, Aaron and Matt discuss on the following topics:

  • The average SketchUp week for Matt
  • Building and launching an online training program
  • How Matt uses SketchUp to find discrepancies in design
  • Writing and publishing a book with Nick Sonder
  • How the SketchUp team met Matt Donley


SketchUp Talk: About Mastering SketchUp with Matt Donley

~~~~~~~~~~~~~~~~~~~~~~~~~~~~
Published By
Rajib Dey
www.sketchup4architect.com
~~~~~~~~~~~~~~~~~~~~~~~~~~~~

Wednesday, February 13, 2019

Chaos Group launched V-Ray Next for SketchUp

Chaos Group just launched V-Ray Next for SketchUp to accelerate the speed and simpleness of SketchUp’s premier external renderer.

This new version supports SketchUp 2016 & 2019 versions. SketchUp 2019. Sketchup 2019 combined with V-Ray Next offers effective solution for designers who aspire striking photorealistic visuals.


V-Ray Next technology in this new renderer for SketchUp comprises V-Ray Scene Intelligence to automatically examine a 3D scene for what it requires at the start of a renderer moving some of the work that an artist might perform in advance.


It applies the new Adaptive Dome Light (ADL) for more precise, image-based environmental lighting that is up to 7x quicker. The ADL is remarkably fast while working with interiors, and eliminates the need to include Portal Lights at windows and openings.


A new NVIDIA AI denoiser is also implanted in V-Ray Next for SketchUp, and the process becomes simple for locating the perfect camera exposure; as soon as the scene loads Auto White Balance and Exposure return the exact settings.


Rapid Performance: V-Ray Next for SketchUp is 30-50 percent quicker across the board. Extra growths originate from the ADL, updated materials and superior GPU rendering. With V-Ray Next, the process becomes quicker to generate a photorealistic image from SketchUp. The GPU renderer along is more than 200 percent faster. It can also speed up effects in rendering like fog and atmosphere effects.


In V-Ray Next for SketchUp, a new Scene Interaction Tool now offers direct entry to any level of the SketchUp hierarchy, facilitating the designers to collaboratively modify the materials and lighting when an object is chosen. The V-Ray Toolbar is also added to given new access to top tools and other simplifications and UI enhancements.


A new asset management system also exists to allow the users to locate and track V-Ray assets with a custom library that can be distributed across SketchUp projects. Any setting change will now lead to a live preview that allows the designers to get accross with lights, materials, textures, all in one place.


Other important features :-


• New Lighting Analysis Tools – It becomes simpler to visualize a scene’s real-world illumination values in lux or foot-candles.
• New Metalness Material Properties – With the inclusion of the standard V-Ray Material, the compatibility becomes better with Substance Designer and PBR materials.
• Color Correction Curves – Modify texture colors right in SketchUp devoid of going back to an image editor.
• Material ID & MultiMatte Render Elements – Render 2D masks of 3D objects for quick adjustments in Photoshop and other image editors.
• Superior V-Ray Scenes and Materials Exchange – Fluid asset transfers from other V-Ray applications (Rhino, Revit and 3ds Max).


To download a 30 day free trial version, click on the following link
 www.chaosgroup.com/vray/sketchup

Chaos Group launched V-Ray Next for SketchUp

~~~~~~~~~~~~~~~~~~~~~~~~~~~~
Published By
Rajib Dey
www.sketchup4architect.com
~~~~~~~~~~~~~~~~~~~~~~~~~~~~

Tuesday, February 12, 2019

"Five ideas to innovate Floor plans and Elevations ”

The SketchUp Hub has arranged many courses and tutorials for designers to upgrade their capabilities and here are five tips to innovate Floor plans and elevations.

About SketchUp Hub:


Anita Brown has established the SktchUp Hub 3D Visualization and here are a range of courses for helping Interior Designers and students, creating exact floor plans and elevations with a professional touch for the extreme benefit of their business or studies. The SketchUp Hub’s total vision is to authorize Interior Designers especially women providing right technical abilities for making exact drawings and creative illusions at professional standards. Besides that, SketchUp Hub creates an available, engaged and fully supported learning environment for presenting the development of STEM related skills to a female driven industry.

In the month of January this year, the Sketchup Hub had announced their first ever 5 Day Challenge where they had challenged designers and SketchUp users to create an awesome kitchen design with the help of Free SketchUp download. The event was a big successful one and many people showed their wonderful skills where the best got the winner prize and made a place for his/her design. After that the SketchUp Hub has focused on designing the Interior sides of houses with elevations, these elevations are actually some kind of visual tools that allow Interior Designers to transfer perfectly their vision for a space, specifically they can work on the design of a wall and other items within nearly view.

Previously there was a course arranged by the SketchUp Hub called the SketchUp Bundle Course which included some individual courses, free downloadable templates etc. Clicking on the course title helped the users to know more about the learning outcomes of every course; but this Bundle does not had the SketchUp Pro license so they have to download or purchase the software separately. Each course is aimed at Interior Designers, Interior Design students, Interior Decorators, Interior Architects, Interior Stylists and Home Staging Professionals without any previous or limited knowledge of SketchUp. Designers who have earlier taken part in the video tutorials for this SketchUp Bundle Course and also took part in their 5 Days Challenge got a beautiful watercolor illustration of a dreamy design scheme for their computer wallpaper that they had created earlier.

Creating this wonderful wallpaper or working hard on the new skills and techniques for designing a new catalogue of precise and professional technical floor plans and elevations doesn’t matter at all as they will never give any benefit to the Interior Design business by gathering dust etc. There are some techniques to help designers in upgrading the work method and quality, like according to the professionals, to survive in this digital age and making the business firm and running one needs to stand out, inspire, engage and provide value to:

  • Increase the visibility of the brand
  • Grab attention of the Target Audience
  • Increase Sales

Though applying these things in producing the plans and illustrations needs a lot of commitment, determination, skill and practice which are taught in SketchUp Hub’s courses. The motto of these courses is to maximize the exposure of users, showcasing their new skill-set and the uniqueness of the regarded brand.

Five ways to create Most of the SketchUp Plans:


  • 1. Combine all the plans or illustrations into the recommended website content, for either adding visual appeal or a lovely chunk of creativity or for helping demonstrate the benefits of their service.
  • Including floor plans or elevations (either technical or illustrated) in the online portfolio will help to demonstrate the process of integrating SketchUp plans and elevations into the design process, also help to make benefits and communicate with the designs.
  • Creating engaging content and providing value to the target audience with included plans or drawing in blog posts will provide benefit to the design.
  • Interior designers as business owners should always handy to use social media for increasing visibility of the brand and to drive traffic for increasing sales.
  • Designers should never miss the opportunity to communicate and promote their brands.

Five ideas to innovate Floor plans and Elevations


~~~~~~~~~~~~~~~~~~~~~~~~~~~~
Published By
Rajib Dey
www.sketchup4architect.com
~~~~~~~~~~~~~~~~~~~~~~~~~~~~

Monday, February 11, 2019

Some of the best and user-friendly SketchUp Plugins

In extension warehouse, there exist different types of sketchup extensions or plugins and among them, some are most popular. In this sketchup article, you will be familiar with some of the most popular sketchup plugins due to their extensive FPS toolbox.

1. Selection toys: Selection toys belong to a vital extension for all modelers and for any type of modeling to facilitate the users to filter objects in and out of a earlier selection. The users will be able to both select and deselect only edges, groups, components or entities which contain some specific properties like hidden, soft or smooth etc.

This extension can be used for several purposes like concealing bounding edges, optionally employing materials and more.

2. Selection Memory: This extension allows the users in recalling the selections created in SketchUp in order that people never miss any selection for any model or size.

3. Weld: This extension includes the loose edges into a soft curve to be chosen in a single mouse click. This extension can be utilized to avoid unnecessary popping up edges at the time of working with Push/Pull tool on traced geometry. In fact, much long arrays require additional usage of the extension and weld is best fit for this.

4. Eneroth Camera Memory: This extension can acquire camera views from one model to another that facilitate recalling the users without difficulty. It will be perfect for working among versions of models and copying scenes. When the both models are open, it acquires the view from the first model and select “Put to Memory” option and in the working model, the users will be able to choose “Retrieve from memory” point out the view.

5. Fredo Scale: Orientate the selection box around a series of objects and interactively employ several geometric transformations, like Scaling, Tapering, Stretching, Plane Shear, Twisting, Bending and Rotation.

6. Architect Tools: It belongs to a series of tools which can easily deal with large models containing buildings and terrain whereas the “flatten selection” tool allows to track the edges easily. There are two other tools like the “Contour Tool” and the “Project Down Tool”.

7. DROPGC: It is a shortcut for dropping objects to a contoured surface and DropGC develops the PathCopy extension and fall cleanly onto a piece of terrain.

8. ZORRO: This extension can be utilized to cut the fat and simplify the process to chop off geometry around the edges of the model that don’t require entering into components.

9. Wire Tool: This tool facilitates the users to draw physically perfect wires and ropes (catenary curves) among two points with only two clicks.

10. Instant Terrain: It is used to produce simplified terrains over complex terrains, drape terrain meshes over objects. Any objects will work: Faces, Groups, Components, Terrain Meshes; devoid of exploding them.

11. Loose to Groups: This allows the users to obtain the geometry by ungrouping it and organizing it in something useful.

Some of the best and user-friendly SketchUp Plugins

Read more
~~~~~~~~~~~~~~~~~~~~~~~~~~~~
Published By
Rajib Dey
www.sketchup4architect.com
~~~~~~~~~~~~~~~~~~~~~~~~~~~~

Thursday, February 7, 2019

"11 easy to use & helpful SketchUp Plugins ”

SketchUp Warehouse is full of different useful extensions that are used in modeling in SketchUp by users but there are 11 extensions which are used frequently.

About Extension Warehouse: It is an online resource with various plug-ins developed made especially for SketchUp and these extensions help to add some special tools and features to SketchUp. These extensions can be found for any particular application like drawing or 3D printing and some industry specified tools for architecture, interior design, construction and many more. So basically in this Extension Warehouse people can do the following things:


  • Users can search extensions by name or as per the functionality.
  • They can also install various extensions with a single click of a button.
  • Or users can also control all the extensions from easy-to-use location in the My Extension page.
The organization named Fat Pencil Studio uses SketchUp for their all works and among all the other benefits of SketchUp, the plugins which are generally known as SketchUp extensions make the work so great to do. There are lots of extensions or plugins in SketchUp which are used for different reasons and works but the team has chosen 11 great plugins which are best to use for their vast FPS toolbox.

This article will cover the plugins and their functions; the plugins or extensions are: Selection Toys, Selection Memory, Weld, Eneroth Camera Memory, Fredo Scale, Architect Tools, Dropgc, Zorro, Wire Tool, Instant Terrain and Loose to Groups.

  • Selection toys: Selection toys is a vital extension for all modelers and for any kind of modeling that allows the users to filter objects in and out of a previous selection. Users can both select and deselect only edges, groups, components or entities that have particular properties such as hidden, soft or smooth etc. the people of Fat pencil Studio, use this extension very much in a variety of ways like for hiding bounding edges, optionally applying materials and more.
  • Selection Memory: This extension helps users in remembering the selections made in SketchUp so people will not miss any selection for any model or size.
  • Weld: This extension adds the loose edges into a soft curve that can be selected in one click; Fat Pencil Studio uses this tool to prevent extra popping up edges while working with Push/Pull tool on traced geometry. Actually much long arrays will need an extra application of the extension and Weld is expert on this.
  • Eneroth Camera Memory: This is a wonderful extension that captures camera views from one model to another allowing remembering the users easily; basically it is a great idea while working between versions of models and wants to copy scenes. When the both models remain opened, it captures the view from the first model and choose “Put to Memory” option and in the working model, users can select “Retrieve from memory” to bring up the view.
  • Fredo Scale: It helps to sale normally with the help of native tools in SketchUp.
  • Architect Tools: This is a set of tools that comes in easy working on large models with buildings and terrain while the “flatten selection” tool helps to tracing the edges easily. There are two more tools like the “Contour Tool” and the “Project Down Tool”.
  • DROPGC: It is a shortcut for dropping objects to a contoured surface and DropGC will create the PathCopy extension and fall cleanly onto a piece of terrain.
  • ZORRO: It is a wonderful tool to cut the fat and makes it easy to chop off geometry around the edges of the model which don’t need to enter into components.
  • Wire Tool: It works greatly on drawing catenary curves.
  • Instant Terrain: It hangs a continuous, triangulated surface over everything; selecting into surface and using Selection Toys will garb the lines only.
  • Loose to Groups: This helps to gain the geometry by ungrouping it and organizing it in something useful.


11 easy to use & helpful SketchUp Plugins

~~~~~~~~~~~~~~~~~~~~~~~~~~~~
Published By
Rajib Dey
www.sketchup4architect.com
~~~~~~~~~~~~~~~~~~~~~~~~~~~~

Some new and exciting features of sketchup pro 2019

New features for 2019, SketchUp Pro & LayOut: Now dashed lines are included in layer to facilitate the users to streamline your drawings with compelling drawing communication.

With the Tape Measure tool, it is now possible to view exact measurement information where the modeling takes place. It allows the users to model more precisely and more effectively where the work is performed.

LayOut: New for 2019, LayOut will notify the users which files are already open to get rid of producing several versions.

In both SketchUp and LayOut, significant enhancements are made to .dwg import and export feature. Now, the users can get support for AutoCAD 2018 file format, better accuracy and consistency whereas reducing the loss of data. Now, it is possible to import and export with materials for superior BIM interoperability and workflows.

The handshake among SketchUp and LayOut becomes better by producing an “Export for SketchUp” feature for .dwg exporter that transmits all LayOut entities together with any SketchUp viewport data to the model space. Now any filled shape made in LayOut will be bypassed to SketchUp since face ready to be Push/Pulled.

Trimble Connect: New BIM BFF, Trimble Connect will offer efficient workflows & cloud collaboration. As a 3D modeling sharing and document management tool, Trimble Connect purposely highlights the projects associated with building design and construction. As a SketchUp (Shop, Pro, Studio or Enterprise) subscriber, you can avail unlimited storage space.

Now, it is possible to apply Trimble Connect to back-up, control versions, and distribute the SketchUp files. Now the users can work efficiently among desktop and web.

SketchUp for Web: For all SketchUp users, there will be a ‘live preview’ for image exports. Sign-in to SketchUp for Web, open a model and go to File > Export > PNG. Now, orient or reconstruct any model as per your choice to capture a snapshot at your preferred image size/aspect ratio. This image export can be utilized with scenes to dial-in a composition that facilitates the users to deliver crucial info in your models.

Style editing has been included as a feature in Shop, Pro and Studio subscriptions.

To get more detail, visit the sketchup blog (https://blog.sketchup.com)

Some new and exciting features of sketchup pro 2019

~~~~~~~~~~~~~~~~~~~~~~~~~~~~
Published By
Rajib Dey
www.sketchup4architect.com
~~~~~~~~~~~~~~~~~~~~~~~~~~~~

Wednesday, February 6, 2019

"The works of Stack Rock Group: A team of landscape designers”

The Stack Rock Group is focused on delivering wonderful projects to the world and in their every project they are using SketchUp that makes their work easier.

Trevor Ball is a designer and partner at Stack Rock Group, around 10 years earlier he was given free reign to choose a 3D modeler for making architecture designs and he chose SketchUp. After that in these 10 years he has become the lead 3D designer, Trevor and his team use SketchUp for all of their visualization projects. He has given an interview to Caroline Early where he has shared a lot about his company and his work, this article is just a little description of that conversation.

A little about Stock Rock Group: It is an eccentric and creative Landscape Architecture firm based in Boise, Idaho and they are creative idealists who can see every kind of possibilities. They usually set foundation of project with skillful and right questions that help their clients to clarify their personal and business goals, needs, wants and desires etc. Usually the group guides general contractors, construction managers, homeowners, landscape and building contractors, building architects, real estate developers, corporations, institutions, municipalities, wineries and vineyards through their individual attention and detail excursion for every project. Their collaborative, thoughtful process helps clients to grow their businesses, project sustainability and grows many more positive impacts on their environment.

Stock Rock Group is also called a “SketchUp Firm” as all the landscape architects knows that it is very necessary to express their designs to clients in a decent and culinary way for which they use SketchUp in all their 3D projects for strong visualization. Modeling in 3D also helps their clients to understand fully about the site which gives them the feeling about the final project and also allow the architects to make any further change in the project. SketchUp helps them to import the linework of every concept and model them quickly that helps them to meet the deadlines and client meetings.

Reason to become total SketchUp techie: Trevor calls himself ‘total SketchUp nerd’ as he has been working with it since ten years, everyday and he loves SketchUp’s native commands as it gives him the ability to customize toolbars, help to find numerous groundbreaking extensions. According to him, SketchUp has any kind of extension for users for any field and the SketchUp Community forums have some of SketchUp Sages that will answer any asked questions by the users in a record time plus there is also other helpful users and SketchUp team members.

The team at Stock Rock Group: Though Trevor and his helpers is a part of a small team which is an 11 members team currently at Stack Rock Group and based in Boise, Idaho but has a growing office in Salt Lake City where they design projects all over the country like from California to Florida and everything in between. All the members know that they have the chance to make this firm exactly the place they want it to be, for which they are very serious and focused on their works. Moreover that, they don’t believe in finding the area f improvement rather they like to improve in every bit of their work. This little team is so dedicated and talented that it can handle a lot of projects around Boise like from small backyard planting, parks to medical and college campus, luxury residential properties, corporate campuses etc. and many more.

Some projects handled by the team: One of their main commercial projects was the HP campus located in Boise which is the first Sustainable SITES Initiative certified corporate campus in the world. SITES is the United States’ Green Building Council sustainable rating system for landscapes. This campus is above 200 acres where are 46 acres of moistened turf grass; 36 acres of active farmland etc. This project is like an investment in the local ecosystem services and as a sustainable model for site users and the community that become a huge success.

They are continuously focused on taking care their current clients and working on new projects; also unfinished with VR and alternatives rotes for rendering.

SketchUp or Google SketchUp is mainly a3D modeling computer program that is used for a broad range of drawing applications used by architects, interior designer, landscape architects, civil and mechanical engineers, film and video game designers also.

SketchUp can be getting as a freeware version named SketchUp Make and a paid version with many more extra benefits called SketchUp Pro. SketchUp is software from Trimble Company and there is an online library of free model congregations and 3D Warehouse to which users can add other models; besides that, the program has drawing layout functionality with variable ‘styles’, supports third-party ‘plug-in’ programs hosted on the Extension Warehouse to supply other abilities and enables placement of its models in Google Earth. As SketchUp users are most of architects, designers, builders, makers and engineers etc. who works hard to give a nice shape to our physical world, they need great tools to do the work. SketchUp is in mission to bring their best to produce some great tools for drawing as drawing is the key thing of the SketchUp users. They draw to search ideas, to identify the things and to show other people their work that they do with love and love to build; SketchUp understands it truly and trying to improve their software day by day.

Source: blog.sketchup.com/article/stack-rock-group-team-landscape-designers

The works of Stack Rock Group: A team of landscape designers

~~~~~~~~~~~~~~~~~~~~~~~~~~~~
Published By
Rajib Dey
www.sketchup4architect.com
~~~~~~~~~~~~~~~~~~~~~~~~~~~~