Wednesday, January 30, 2019

"Modeling a bag of chips: Native Commands vs. Extensions ”

Designing a simple pack of chips might sound easier using extensions but it can be also done by using Native Commands; here Aaron used both processes to know the easier one.

Aaron Dietzen this time comes with his new useful creation of importing and exporting via SketchUp Shop which is the newest thing for SketchUp users. This article will describe the whole process according to Aaron and his video tutorial where he used two different processes to design a simple pack of chips and there are also tutorial links given below.


About Aaron Dietzen:


Aaron Dietzen is mainly seen in various SketchUp Live or any of the Skill Builder videos or been on the SketchUp forum, that means Aaron is fond of SketchUp and serving as a SketchUp employee for two years with more than ten years in the software. He is more than just a simple Trimble employee; he is a true SketchUp fan. He spends his free time in designing things in SketchUp and loves adventurous works.

This time Aaron has decided to model something which is a little off the beaten path like a bag of chips using two kinds of tool; native and extensions.

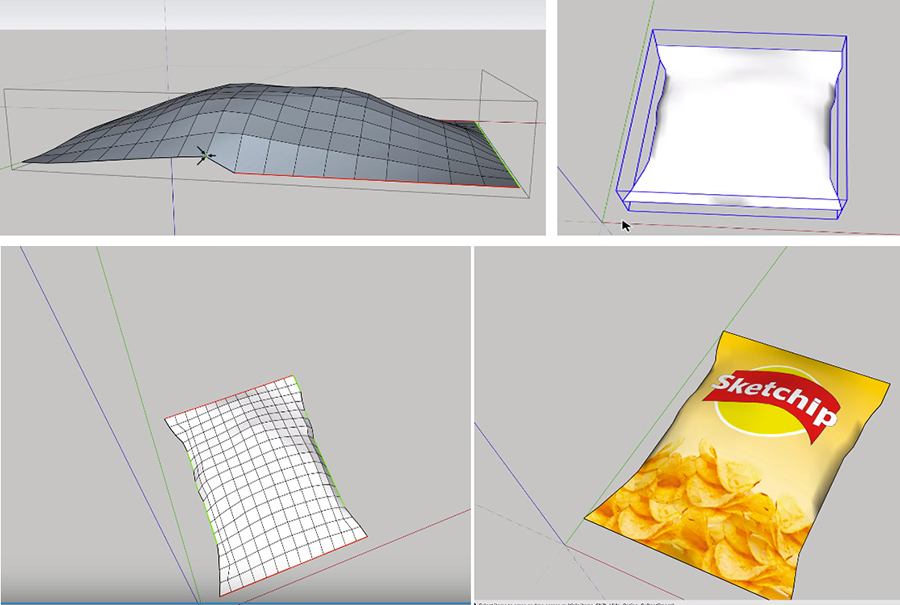
Modeling a Bag of Chips using Native SketchUp commands:


The Sand box toolset is a great set of tools helping in modeling things like sandboxes, landscapes etc. and this time this toolset is used to draw a simple bag of chips. So in the beginning of the model, Aaron opened the SketchUp pro window and at the left side there is the Sandbox toolset; he took the Grade command to draw rectangles representing a bag of chips; next he took the Smooth Tool and as a circle worked on it. Using the Smooth Tool can help to lift the ground base either up or down; he just lifts up the middle portion to give it a loaded packet; next he worked on the edges, actually he at first made the half of the bag and next made exactly other half. These halves are lined perfectly aligned with each other and shaped well; he just copied the half used the move tool and using group tool he flipped the other one. The two halves connected properly without leaving any space between them; it should be keep in mind that a bag of chips is not truly rectangular shape so using sandbox toolset anyone can easily lift or align any corner or line or center to any direction perfectly. To give the sides the exact shape of the chips bag; he used select tool, move them towards center and used smoothing line, clicked triple to make it a whole group. Then he used the paint bucket tool, used Import tool and imports an image of formerly created chips bag and placed it.

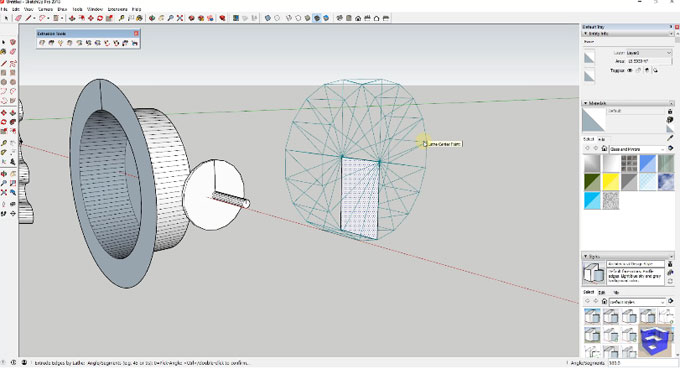
Modeling a Bag of Chips using bunch of extensions:


This time Aaron has modeled the similar packet of chips but used some extensions also like: Soap Buble and Skin from Josef L, Vertex Tools from Thomthom and Fredo Tools from Fredo6. At first he started to draw a regular rectangle shape using normal Rectangle tool; next he selected the geometry and Click on the Generate Skin Button from the Soap Skin option; it actually create a new geometry upon the existing one on which he worked on. Then he selected Grade and clicked the Buble button he entered pressure towards enter that pushed the center of the object, the n he made the exact copy of this half and moved it aside. Next he flipped the other one and placed it upon the previous one; here the edges are aligned perfectly as the Soap Skin option does it already. Now he used Vertex tools to make the crumbles on the sides, smoothened the thing and can paint the whole model using many existed extensions an even can give a name also.

Modeling a bag of chips: Native Commands vs. Extensions

~~~~~~~~~~~~~~~~~~~~~~~~~~~
Published By
Rajib Dey
www.sketchup4architect.com
~~~~~~~~~~~~~~~~~~~~~~~~~~~

Tuesday, January 29, 2019

FlexTools - FlexPack Pro – The newest extension in the extension warehouse

FlexTools - FlexPack Pro is the newest sketchup extension that offers responsive 3d modeling with dynamic windows, doors, panels and more.

Flex components are developed to accelerate the speed of designing and user-friendliness. Each component can be customized as per your design requirements.

1. Place a Flex component onto a wall component - an opening is formed (with WallCutter).
2. Move it - The opening is modified consequently.
3. Scale it - All the elements of the component are maintained with their exact proportions.
4. Adjust - The setting of the component can be changed anytime.
5. Save your preferred components with ComponentFinder


There are several design options to explore with.

This sketchup plugin is available in extension warehouse.

Watch online demonstration of the plugin by going through the following video tutorial.


Video Source Yoni Frandzel
~~~~~~~~~~~~~~~~~~~~~~~~~~~
Published By
Rajib Dey
www.sketchup4architect.com
~~~~~~~~~~~~~~~~~~~~~~~~~~~

Monday, January 28, 2019

"Transforming Houses: Ori and the Shape-Shifting Future of Dwelling ”

SketchUp user and Architectural Visualist, Alejandro Soriano has been working with SketchUp from a long time and has discussed about his works and interest in a current interview.

This article is dedicated on Alejandro Soriano and his awesome creations, here are some details about the creator and his creations. It is a description of the interview between Alejandro Soriano and Charlotte Shepard.

In every city, where the areas are typically metropolitan based people face problems during the living and have to adjust, so Ori, Inc. is working on giving a new form of living in comfort.

Aristodimos Komnions is a well known SketchUp user; before joining SketchUp he worked as an Architect-Engineer and Urban Designer for more than ten years. He likes to find new ways of working in every field and is fascinating to imagine the future in a brand new way. So he has taken an interview of the CEO of Ori, Inc; it is a startup dedicated on smart furniture that increases the use of small flats and restricted spaces through shape-shifting practically. Hasier Larrea is the engineer, mastermind and present CEO of Ori who has shared his thoughts with Aris about working with SketchUp on the projects.

This article is the brief description of the conversation between them; Hasier has discussed and shared a lot about his works.


A little about Ori, Inc.:


“Ori” the word derives its name from the word “Origami”, is a Japanese art of folding paper for creating beautiful and extraordinary things; Ori is a prefix for something magical to come; this company is fully informed about lack of interior space, especially in high-density metropolitan innovation places around the world. Places have become too expensive to be stagnant and unresponsive. Ori is inventing something incredible through the help of technology and design that will create lively environments that act and feel as they are virtually bigger.

Something about Haiser and their work:


Hasier Larrea, present CEO of Ori is also a mechanical engineer, designer and an eager SketchUp user who has a different thought about managing the living space in the urban area. In his words, urban space has become too valuable to be motionless and unresponsive so it is the right time to authorize people to live large in a small footprint by carrying the robotics world into architecture. Their first launching product is just one little example of a world where furniture will have different roles; in 2017, they had used beta pilots in ten cities across North America and now they are going to deliver commercial systems starting at Boston, New York and DC.

Experience using SketchUp:


Hasier has learned SketchUp while he was doing his internship in a small design firm in China that developed and fabricated new store ideas for European companies in Shanghai. His first SketchUp model was the store of a German Kitchenware Company and after that he just fell in love with SketchUp, with its smooth process, its tools, easy to handle things everything.

While designing he focuses on speed of repetitions and for him it is a main metric in prototyping phases; one can learn more in 5 minutes with a prototype than in 5 weeks of discussions and brain will help to produce much more quickly. SketchUp has helped him in two ways: he can now quickly sketch important concepts of new Ori systems and import models of their existing detailed Ori systems and show them in the context of architectural plans. They mostly use SketchUp for the earliest concept designs in the context of 3D apartments and use those models for internal discussions around whether the concept is right or not.

Haiser is a big fan of “Pencil Sketch with Darker Traced Lines” to make some quick models; they also used AutoCAD for furniture manufacturing, SolidWorks or Onshape for mechanical engineering. His favorite tools for quickly prototyping of a new concept are Arduino for electronics, Processing for software development and SketchUp for 3D design.

The future thoughts:


In Ori, everyone is desire to help people seeing them space in a different way and prove that more square footage doesn’t need more functionality and they have created a lot of space in the world that can solve the housing challenge.


Transforming Houses: Ori and the Shape-Shifting Future of Dwelling

~~~~~~~~~~~~~~~~~~~~~~~~~~~
Published By
Rajib Dey
www.sketchup4architect.com
~~~~~~~~~~~~~~~~~~~~~~~~~~~

Friday, January 25, 2019

How to model and design a villa scoda with sketchup 2017 and V-ray 3.4

In this exclusive sketchup v-ray tutorial, you will learn some useful methods to model and design a villa scoda with sketchup 2017 and V-ray 3.4. The post production is done with Photoshop CC.

The tutorial covers the following topics :-

Modeling, Material, Vray settings and Landscape.

The V-Ray settings dialogue box applied the tabs which extend and contract maintaining the settings a little more convenient to navigate. Here, a vital button is “Load Defaults” button. It will get everything to the default V-Ray settings when the program was initially set up. Another important one is the “Load” button that facilitates you to load past settings to save your huge time.

In this tab, the “Override Materials” check box should be activated to override all materials in the model and substitute them with a single material color. It is useful for clay model renderings.

Besides, there are other crucial tabs like camera tab, environment tab, VFB channels tab, output tab, indirect illumination GI.

To watch the complete tutorial, go through the following video.


Video Source SketchupTutorials

~~~~~~~~~~~~~~~~~~~~~~~~~~~
Published By
Rajib Dey
www.sketchup4architect.com
~~~~~~~~~~~~~~~~~~~~~~~~~~~

Thursday, January 24, 2019

"Review of a new SketchUp Guide: The Definite Guide to Getting Started ”

Both SketchUp Beginners and Professionals will get a complete guide in SketchUp by following a guide book named “The Definite Guide To Getting Started” by Alex Oliver.

Alex Oliver is the Founder & Lead Instructor for SketchUp School which become a place where professionals go to learn and now more about SketchUp and wants to learn it. This institution established on 2005 and since then Alex and his team have taught SketchUp to over 25000 professionals around the world through SketchUp School’s online Video Course Library and have reached millions more through their popular YouTube Channel named “SketchUp School”. Recently Alex and his team jointly published a book named “The Definite Guide to Getting Started” which is a guide for professionals with detailed descriptions about way of working with SketchUp.

This article is the little overview of this exciting book; though it is a bit fat book to read but I must say it is full of interesting and useful topics on SketchUp and will definitely be a helpful guide to work with SketchUp.

A little about the book: The book is divided into two parts; the title of the first half is “Everything you need to know to get started” and the second half is titled as “Short Intros to Popular Professional Topics”.

The first half or Part I is classified into four wide chapters; among those chapters Chapter 1 is full of points which will definitely make you release the importance of SketchUp, Chapter 2 describes the method of choosing the right version of SketchUp as per your system, Chapter 3 is full of some necessary SketchUp tutorials for every beginner, while Chapter 4 will introduce readers with some advanced features of SketchUp that will help them to move in some critical part of SketchUp which are described in Part 2.

Part II is little longer than the first half as it consists of seven chapters. Among them Chapter 5 will show the process to create Photorealistic Renderings with other extensions; Chapter 6 discuss about the method to create design presentations and construction document with the help of SketchUp Pro and LayOut; Chapter 7 will help to create Estimates, takeoffs etc. with SketchUp’s reporting tools; Chapter 8 is about creating models for 3D printing; Chapter 9 and 10 will help to use SketchUp in a CNC Workflow and Woodworking Projects, and the last Chapter help to know the experience of projecting a SketchUp Model in VR/AR.

SketchUp or Google SketchUp is mainly a 3D modeling computer program that is used for a broad range of drawing applications used by architects, interior designer, landscape architects, civil and mechanical engineers, film and video game designers also.

SketchUp can be getting as a freeware version named SketchUp Make and a paid version with many more extra benefits called SketchUp Pro. SketchUp is software from Trimble Company and there is an online library of free model congregations and 3D Warehouse to which users can add other models; besides that, the program has drawing layout functionality with variable ‘styles’, supports third-party ‘plug-in’ programs hosted on the Extension Warehouse to supply other abilities and enables placement of its models in Google Earth. As SketchUp users are most of architects, designers, builders, makers and engineers etc. who works hard to give a nice shape to our physical world, they need great tools to do the work. SketchUp is in mission to bring their best to produce some great tools for drawing as drawing is the key thing of the SketchUp users. They draw to search ideas, to identify the things and to show other people their work that they do with love and love to build; SketchUp understands it truly and trying to improve their software day by day.

Source: www.sketchupschool.com

Review of a new SketchUp Guide: The Definite Guide to Getting Started

~~~~~~~~~~~~~~~~~~~~~~~~~~~
Published By
Rajib Dey
www.sketchup4architect.com
~~~~~~~~~~~~~~~~~~~~~~~~~~~


Tuesday, January 22, 2019

How to convert sketchup scenes into layout viewports

Sketchup is applied to make scenes and styles to arrange a model to proper layout. In this exclusive sketchup video tutorial, you will learn how to utilize those scenes to generate viewports in layout as well as align your model efficiently among scenes.
With layout, it becomes easier to accomplish all the view-related tasks (styles, viewpoints, section planes, scenes, layers etc. from inside LayOut and to apply SketchUp primarily for the “raw” modeling.
There is another useful command like center scene inside viewport to simplify the task.
As soon as you get the scenes in your model set, inside Layout go to File>Insert and navigate to your sketchup file in the browser. Click on your blank paper in Layout and a new viewport will be seen. It is possible to modify the viewport to your scene by right clicking on the new viewport and scroll through to the scenes in the menu.
To learn the detail process, go through the following video tutorial.

Video Source SketchUp

~~~~~~~~~~~~~~~~~~~~~~~~~~~
Published By
Arka Roy
www.sketchup4architect.com
~~~~~~~~~~~~~~~~~~~~~~~~~~~

Saturday, January 19, 2019

Make a professional kitchen design with easysketchup kitchen design plugin

John Atkinson develops easysketch kitchen design plugin. This sketchup plugin is compatible with SketchUp 2015, SketchUp 2016, SketchUp 2017, SketchUp 2018.

This plugin can be used to generate professional kitchen design concept in sketchup. After being set up within SketchUp, it is possible to obtain an expansive library of kitchen components from the EASYSKETCH window.

In order to create a new kitchen design, set your designs options through drop down menu. Apply the filterable search to include a cabinet to your drawing. Units will be filtered based on your search criteria, as for instance “drawer” will filter unit with drawers, “oven” will filter units for ovens. To include the selected unit to the drawing space, click on the unit and it is automatically arranged at the existing cursor position.

The most striking feature of EASYSKETCH is to create design modifications rapidly. Right-click on a unit to obtain the EASYSKETCH sub menus where some vital shortcuts exist to parameters like Carcass material, Door handle, Frontal material, Worktop material other design options.

Planned content updates include new handle packs, worktop supplier swatches, door styles and pre-configured units groups. New content can be added simply from the Plugins>EasySketch>Manage Content window inside SketchUp.

This sketchup plug can be accessed from the extension warehouse.

For online demonstration, go through the following video tutorial.


Video Source John Atkinson

~~~~~~~~~~~~~~~~~~~~~~~~~~~
Published By
Rajib Dey
www.sketchup4architect.com
~~~~~~~~~~~~~~~~~~~~~~~~~~~

Thursday, January 17, 2019

s4u Transformer - The newest sketchup extension

It is an online resource with various plug-ins developed made especially for SketchUp and these extensions help to add some special tools and features to SketchUp. These extensions can be found for any particular application like drawing or 3D printing and some industry specified tools for architecture, interior design, construction and many more. So basically in this Extension Warehouse people can do the following things:

• Users can search extensions by name or as per the functionality.
• They can also install various extensions with a single click of a button.
• Or users can also control all the extensions from easy-to-use location in the My Extension page.


S4u Transformer is another extension from SketchUp Extension Warehouse which is used by users to select groups or components like Scale, Move, Rotate, Color etc. anyone can either trial or purchase it from the following link: extensions.sketchup.com.

How to use: Here are the steps to select groups or components for Transformer.

1. Setting Base (origin of Groups, components): At first users need to click on interact Menu, and then click on Press Down Arrow or Click Right mouse for change.
2. Setting Axis: users have to click on Interact Menu or on Right mouse for change. Left arrow is for Green axis; Right Arrow is for Red axis and Up arrow is for Blue axis.

3. Transformer: a) Scale: Set scale mode option is used to set Distance, Ratio, Fixed Length. Input value by Key Number and Enter. Extend Function option is used to Extend scale follow axis. b) Move: Input value by Key Number and Enter. Extend Function is used to Move lowest, Move Highest and Move Height. c) Rotate: Input value degrees by Key Number and Enter. d) Color: Input Value color Hue (HSL) by Key Number and Enter.
4. Dynamic Transformer: a) Liner: Dynamic follow Distance from origin of object to Center of circle. b) Linear: Dynamic follow Distance from Origin of Object to Line. c) Points: Dynamic follow Distance from Origin of Object to Points. d) Random: Dynamic Random. e) Set: Set parameter dynamic.
5. Reset: a) Reset scale option to reset scale of Objects; b) Reset Rotate option for reset Axis of objects and c) Reset Transformer to reset scale and axis or Objects.


s4u Transformer

~~~~~~~~~~~~~~~~~~~~~~~~~~~
Published By
Rajib Dey
www.sketchup4architect.com
~~~~~~~~~~~~~~~~~~~~~~~~~~~

Tuesday, January 15, 2019

Tips to create column in sketchup quickly

In this sketchup tutorial, you will learn some useful tips to create the model of a column by applying various sketchup plugins like Curviloft, JHS Power Bar, True Bend, Fredo Scale, Sketchy FFD.

The details of these plugins are given below :-

Curvilotft – This sketchup plugin is used to make surfaces from curves or contours by lofting & skinning.
Loft by attaches individual contours, open or closed, with smooth splines.
Loft along Path attaches contours, along a specified rail curve.
Skinning makes surfaces confined by 4 or 3 contiguous contours.
JHS Power Bar - This tool comprises of a series of powerful extensions from other developers, like TIG, Thom Thom, Rick Wilson, Christina Eneroth, and more.


Some of the useful functionalities of the tool set are given below :-

Softening and unsoftening hidden geometry.
Extrude a face whereas still keeping it upright.
Fll in faces on coplanar edges for a selected set of geometry.
Offset a single edge object in SketchUp.
Extrude an individual line into a 3D shape.
TrueBend – It is used to bend instances to a specified degree, without changing the original length of the reference segment. Presently the reference segment refers to the bottom front of the boundingbox.
Fredo Scale – This plugin allows you to orientate the selection box around a set of objects and internationally employs a number of geometric transformations, like Scaling, Tapering, Stretching, Plane Shear, Twisting, Bending and Rotation.
Sketchy FFD – This sketchup pluign is used to include a control cage to an object that facilitates the mesh to be maneuvered through control points.


To learn the complete process to make column in sketchup, go through the following video tutorial.

Video Source Tutorials Up

Tips to create column in sketchup quickly

~~~~~~~~~~~~~~~~~~~~~~~~~~~
Published By
Rajib Dey
www.sketchup4architect.com
~~~~~~~~~~~~~~~~~~~~~~~~~~~

Thursday, January 10, 2019

Budgetime 1.0 – The newest sketchup extension

Budgetime belongs to a low-tech BIM tool that facilitates the users to automatically, easily and perfectly measures times and costs of a construction project.

This sketchup extension is compatible with SketchUp 2017, SketchUp 2018.

The design of your project will be enhanced with BIM LowTech since time spent on design and consultation with the Budgetime platform will be decreased significantly.

Given below, some exclusive characteristics of the plugin

Computation of times and costs of a construction project
Bills of Materials
Quantity of Materials


Get access to a collaborative database of price ratios.

Relationship among companies, project managers and building owners.

The plugin is available in extension warehouse extensions.sketchup.com

To watch online demonstration of the plugin, go through the following link.


Video Source Budgetime

~~~~~~~~~~~~~~~~~~~~~~~~~~~
Published By
Rajib Dey
www.sketchup4architect.com
~~~~~~~~~~~~~~~~~~~~~~~~~~~


Tuesday, January 8, 2019

A position is vacant for Architectural Project Manager/Architectural Designer in USA

Chandler Pierce Architect, a New York City-based firm having more than 25 years of experience in the practice of architecture, is inviting applications for the position of Architectural Project Manager/Architectural Designer having 2-4 years of working experience in architecture or interior construction.

The prospective candidate has to mainly deal with an important client at the job site and working on projects that require high-end renovation and new construction. The suitable candidate should contain a sound aspiration to learn carefully and practical experience in different facets of architecture. The candidate should have the capability to draft quickly, assess to organize tasks, and offer an adjustable work style.

DUTIES & RESPONSIBILITIES:

a. It is full time work. A standard office week is M-F and 40 hours.
b. Travel to and deal with showroom job sites in most important US cities.
c. Practical working knowledge to create designs and ideas materialize.
d. Start off and execute in various tasks like architectural design, project management, researching, and drafting in a quickly manner.
e. Organize construction documents, NYC permit sets, and give general support to team-members.
f. Be competent, organized, and detail oriented at the time of presenting strong design and drafting skills.
g. Ability to handle construction projects from preliminary design stage through to final execution without any support.
h. Confidently and efficiently collaborate with the construction team on job sites and provide solution to construction dilemmas when they occur.


REQUIREMENTS:

1. Entitled to work in the United States.
2. An Undergraduate degree along with a Graduate degree in Architecture is preferable.
3. Strong communication (both verbal and written), listening, and follow up skills.
4. Fluent in written and spoken English.
5. Well versed with handling clients.
6. Knowledge of building materials and construction practices
7. Good knowledge in Vectorworks/AutoCAD, Rhino, SketchUp.
8. Mac savvy.
9. Friendly behaviour.


To get more clear ideas, go through the following video tutorial.

It is mandatory to have knowledge in Revit, 3D modeling, drafting by hand or Adobe Suite. Added advantages will be given for the candidates who have good experience with Vectorworks.

BENEFITS: Competitive salary with health care benefits, IRA, vacation time, holiday pay and personal time off/paid sick leave.

Process for sending application: To apply, send email to architalent2019@gmail.com with subject line “Architectural Project Manager”. Please include cover letter, resume, (2) references and work samples. In the (1) page cover letter, briefly answer the following:

a. What experiences do I have to offer Chandler Pierce Architect?
b. What do I hope to experience at Chandler Pierce Architect?
c. Where do I see myself in 5 years?


A position is vacant for Architectural Project Manager/Architectural Designer in USA
Read more
~~~~~~~~~~~~~~~~~~~~~~~~~~~
Published By
Rajib Dey
www.sketchup4architect.com
~~~~~~~~~~~~~~~~~~~~~~~~~~~

Monday, January 7, 2019

Design a staircase instantly with s4u stair plugin

In this exclusive sketchup video tutorial, you will learn step-by-step process to design a staircase with the use of s4u stair plugin.

This plugin is developed by Huynh Duong Phuong Vi. It is compatible with SketchUp 2016, SketchUp 2017, SketchUp 2018.

With this plugin, it is possible to create stairs from faces. This plugin allows you to create different types of stairs like simple, slab, zigzag, steps, extrude, treads, slope, slope simple and slope solid.

To speed up the process, apply the following shortcuts :-

Ctrl (Alt on Mac) + Select Point > Set Heigth Stair
Ctrl (Alt on Mac) + Select Face > Set Landing
Tab > Reverse Direction Stair
Double Click on Screen ( or Right Click) > Set Parameter
Double Click on Face > Set Index,Landing.
Double Click on Face (1 Selected Face)> Change Start Edge


The plugin is available in extension warehouse extensions.sketchup.com

To get more clear ideas, go through the following video tutorial.

To watch online demonstration of the plugin, go through the following link.


Video Source Tutorials Up

~~~~~~~~~~~~~~~~~~~~~~~~~~~
Published By
Rajib Dey
www.sketchup4architect.com
~~~~~~~~~~~~~~~~~~~~~~~~~~~

Saturday, January 5, 2019

Demonstration of extrusion tools sketchup plugin

This is another useful sketchup video tutorial presented by the renowned sketchup trainer Justin Geis. In this video tutorial, he shows how to apply TIG’s extrusion tools to generate faces from edges by extruding them along an arc. The plugin comprises of a set of useful tools.
These tools can be used for extruding on the basis of the edges, rails, and more. The plugin makes the process simple to extrude edges into meshes.
The purpose of this exclusive sketchup extension is to produce faces and objects in sketchup with extrusions.
One can download the plugin by clicking on the following link. sketchucation.com
To get more clear ideas, go through the following video tutorial.
Video Source TheSketchUpEssentials
Demonstration of extrusion tools sketchup plugin

~~~~~~~~~~~~~~~~~~~~~~~~~~~
Published By
Rajib Dey
www.sketchup4architect.com
~~~~~~~~~~~~~~~~~~~~~~~~~~~

Thursday, January 3, 2019

Download Ambient Occlusion Style 1.0

Ambient Occlusion Style 1.0 is the newest paid sketchup plugin that is available in extension warehouse. This plugin is developed by Rafael Rivera.

This sketchup plugin is compatible with SketchUp 2016, SketchUp 2017, SketchUp 2018.

This sketchup plugin can be applied to create fake ambient occlusion in SketchUp with various colors for concave and convex edges which are adjusted in the material editor. By default, the concave material is dark to create the edge look like a shadow and the convex edges are painted white to provide a highlight effect.

Once the tool is operated all the convex edges are concealed but another tool button is arranged to simply switch concealed geometry on and off so as to unhide the convex edges as per your requirement.

Besides, three pages are built with various edge widths in order that your favorite can be selected easily.

This sketchup extension is available in extension warehouse with free trial version.

Go through the following video tutorial to learn the functionality of the plugin.


Video Source CompoGames

~~~~~~~~~~~~~~~~~~~~~~~~~~~
Published By
Rajib Dey
www.sketchup4architect.com
~~~~~~~~~~~~~~~~~~~~~~~~~~~