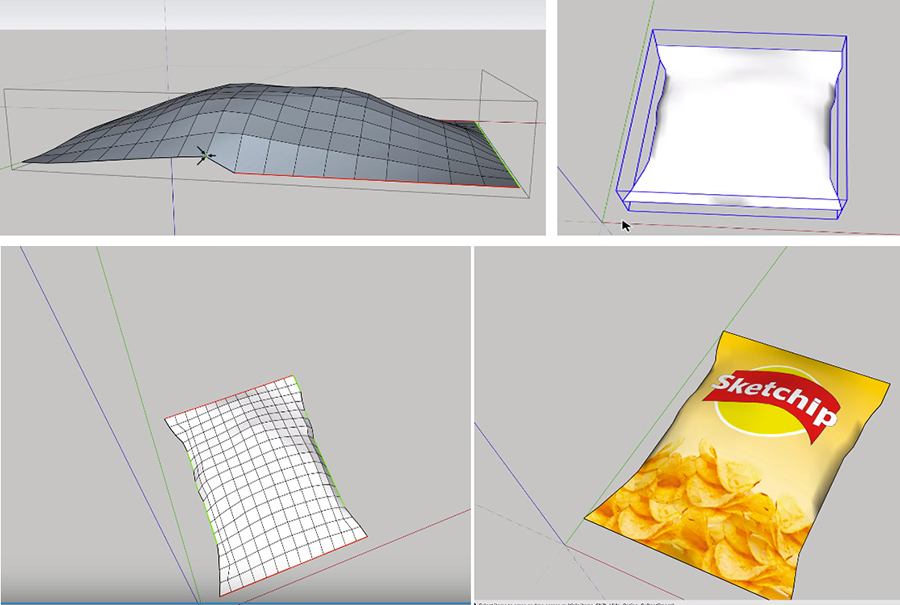
Designing a simple pack of chips might sound easier using extensions but it can be also done by using Native Commands; here Aaron used both processes to know the easier one.
Aaron Dietzen this time comes with his new useful creation of importing and exporting via SketchUp Shop which is the newest thing for SketchUp users. This article will describe the whole process according to Aaron and his video tutorial where he used two different processes to design a simple pack of chips and there are also tutorial links given below.

Aaron Dietzen this time comes with his new useful creation of importing and exporting via SketchUp Shop which is the newest thing for SketchUp users. This article will describe the whole process according to Aaron and his video tutorial where he used two different processes to design a simple pack of chips and there are also tutorial links given below.
About Aaron Dietzen:
Aaron Dietzen is mainly seen in various SketchUp Live or any of the Skill Builder videos or been on the SketchUp forum, that means Aaron is fond of SketchUp and serving as a SketchUp employee for two years with more than ten years in the software. He is more than just a simple Trimble employee; he is a true SketchUp fan. He spends his free time in designing things in SketchUp and loves adventurous works.
This time Aaron has decided to model something which is a little off the beaten path like a bag of chips using two kinds of tool; native and extensions.
Modeling a Bag of Chips using Native SketchUp commands:
The Sand box toolset is a great set of tools helping in modeling things like sandboxes, landscapes etc. and this time this toolset is used to draw a simple bag of chips. So in the beginning of the model, Aaron opened the SketchUp pro window and at the left side there is the Sandbox toolset; he took the Grade command to draw rectangles representing a bag of chips; next he took the Smooth Tool and as a circle worked on it. Using the Smooth Tool can help to lift the ground base either up or down; he just lifts up the middle portion to give it a loaded packet; next he worked on the edges, actually he at first made the half of the bag and next made exactly other half. These halves are lined perfectly aligned with each other and shaped well; he just copied the half used the move tool and using group tool he flipped the other one. The two halves connected properly without leaving any space between them; it should be keep in mind that a bag of chips is not truly rectangular shape so using sandbox toolset anyone can easily lift or align any corner or line or center to any direction perfectly. To give the sides the exact shape of the chips bag; he used select tool, move them towards center and used smoothing line, clicked triple to make it a whole group. Then he used the paint bucket tool, used Import tool and imports an image of formerly created chips bag and placed it.
Modeling a Bag of Chips using bunch of extensions:
This time Aaron has modeled the similar packet of chips but used some extensions also like: Soap Buble and Skin from Josef L, Vertex Tools from Thomthom and Fredo Tools from Fredo6. At first he started to draw a regular rectangle shape using normal Rectangle tool; next he selected the geometry and Click on the Generate Skin Button from the Soap Skin option; it actually create a new geometry upon the existing one on which he worked on. Then he selected Grade and clicked the Buble button he entered pressure towards enter that pushed the center of the object, the n he made the exact copy of this half and moved it aside. Next he flipped the other one and placed it upon the previous one; here the edges are aligned perfectly as the Soap Skin option does it already. Now he used Vertex tools to make the crumbles on the sides, smoothened the thing and can paint the whole model using many existed extensions an even can give a name also.

~~~~~~~~~~~~~~~~~~~~~~~~~~~
Published By
Rajib Dey
www.sketchup4architect.com
~~~~~~~~~~~~~~~~~~~~~~~~~~~
No comments:
Post a Comment