Showing posts with label Product Connect plugin for Google SketchUp. Show all posts

Sunday, May 18, 2014

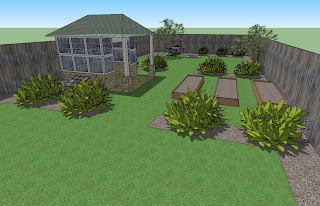
Landscape Designing in Sketchup

 was recently contacted by the owner of a landscape design build company in Long Island. He wanted to know my thoughts on using Google SketchUp as opposed to other types of landscape design software. What I told him about this terrific 3D design software would apply to both professionals and homeowners. SketchUp is that easy, not to mention fun!

SketchUp provides the ability to draw in 3D so that a design or concept can be easily visualized. For the homeowner, drawing this way requires no intricate design abilities, while the landscape designer or architect has more sophisticated choices. They can draw directly in 3D or draw in 2D with such programs as AutoCad and turn it into a 3D design. The way it is done is that the AutoCad 2D drawing can be imported into SketchUp. That then becomes the base design for accuracy. All of the dimensions and locations are maintained in the 3D design.

When I first started out with this software, I did not get the basics of following the 3D “planes”. For some reason I missed it, but it’s actually very easy. SketchUp provides you with three colored lines that are guidelines. You must draw your lines parallel to these lines in order for everything to work. As you draw, your line will become the same color as that plane if you are doing it correctly. As an example, draw a vertical line. Vertical planes are blue. If your line is blue, you are good to go. If it is black, you must adjust the direction until it turns blue. Easy!

I’ll focus here on landscaping, since landscape design is what I do, yet SketchUp is great for interior design, architecture, mechanics and more. You can draw patios, walkways, swimming pools, ponds, houses and so on. Along with being able to draw these objects directly, you can also just add components into your design, such as plants, cars, people, etc. There are companies where you can purchase these or you can go to Google Warehouse where there are many components that are free.

Here are some of the things that I find not only helpful in creating a 3D design but fun too:
  • Create a patio and show it with different paving materials. Not sure if you want brick or bluestone? Look at it both ways.
  • Placeplants in the design at actual sizes. Although Plants will never be exact,they will be close enough for you to get an idea of what the planting design will look like.
  • Cast lighting at different times of day and year. You can enter your location, choose a date and time, and see how the light is cast along with shadows.
  • Show slopes and changes in elevation. This is trickier to learn how to do. However, it is an excellent SketchUp feature to help see your land and grading modifications if it is not flat.
 
You can try SketchUp for free or purchase the professional version. If you’ve never used it, you might try the free version first. However, do read up on the SketchUp Pro to see if there are features that are important to you. The free version is probably adequate for homeowners while professionals would probably benefit from the SketchUp Pro.

Susan Schlenger is a landscape designer who offers design services online to homeowners in all areas of the U.S. To learn more about her online design services, SketchUp, and get advice on all areas of landscape design, please visit  Online Landscape Design. New Jersey residents should visit Landscape Designer
   
Landscape Designing in Sketchup  

Landscape Designing in Sketchup 
~~~~~~~~~~~~~~~~~~~~~
Published By
Arka Roy
www.sketchup-ur-space.com
~~~~~~~~~~~~~~~~~~~~~ 

Friday, May 16, 2014

Nomeradona teaches how the UV mapping works in Vray SketchUp

Nomeradona teaches how the UV mapping works in Vray SketchUp 

I want to share my latest tutorial: How to create Pool water in Vray SketchUp. I do hope in this tutorial, you will not only learn about the Vray pool water material, but also how the UV mapping works in Vray SketchUp. I will also touch base about "effected material" in clay rendering.

Here is the model I will be using in this tutorial "Barcelona Pavilion" design of course by Mies Van Der Rohe. This was modelled by Fernando Perez Alvarado.

Nomeradona teaches how the UV mapping works in Vray SketchUp 

We are using this model in our September 2011 Challenge at Sketchup Vray Artist Facebook Group. If you have Facebook account and want to view some of the entries and join this group, Click HERE. Be mindful, this group was intended originally for the Filipinos who are using SketchUp; therefore from time to time, local dialect is used. But don't worry, the members are accommodating; if they knew you are a non-Filipino, they are more than willing to respond and talk with you in English.

Here is the setup view of the model that I will be using. I will render in clay rendering, only the water and pebble materials will not be effected by the override material function. If you want to do clay render in Vray SketchUp, go to the global switches in the Vray options and tick override materials.

Nomeradona teaches how the UV mapping works in Vray SketchUp 
Step 1: The Diffuse Layer 

1.1. Here is the displace map that I will be using here. It is a seamless texture I made with Pixplant. You can copy this image and use it personally. 

Nomeradona teaches how the UV mapping works in Vray SketchUp  

1.2. Here I applied the map in my water material using SketchUp

Nomeradona teaches how the UV mapping works in Vray SketchUp  

1.3. Once satisfied with the mapping scale, you can turn the opacity to zero (0)- meaning it is full transparent. Vray SketchUp will use the UV map of the top diffuse layer. So if we add displacement height, the displaced map will follow the UV of this layer. There are two ways how to adjust the map's opacity.

a. by SketchUp Material Editor 

Nomeradona teaches how the UV mapping works in Vray SketchUp 

b. by Vray Material Editor. White color in the transparency slot means 100% transparent. 

Nomeradona teaches how the UV mapping works in Vray SketchUp 

Step 2: The Reflection Layer

I added Fresnel Map on the reflection layer, with an Index of Refraction (IOR) value of 1.33 

Nomeradona teaches how the UV mapping works in Vray SketchUp  

Step 3: The Refraction Layer

For me this is one of the most important layer that anyone should focus when dealing with water material. Under refraction, I will share the three main items for this material: Tranparency, IOR and Fog Color. 

Nomeradona teaches how the UV mapping works in Vray SketchUp  

3.1. IOR Value.. in the IOR value (see the image above), I used 1.33. This is the IOR value of water.

3.2. Fog Color. Fog color controls the color basically of your water material. If you want an effect of pristine water for resort pools, then you might want to use light turquosie or light blue color tints. If you want a bit murky water, then use ochre to brownish shades.

The color multiplier, controls the thickness effect of the color. higher value makes the color more intense. For me my multiplier will vary from .01 to .03. If you want the shadows to pass through then you need to tick, affect shadows. If you want the color to pass through (like in stained glass) then you need to tick affect alpha.
ok let say, I will choose this fog color (RGB 184,174, 124)

vraysketchup 

Here is the render. Note: In this render I have added displacement, and grayish transparency color

vraysketchup 

If I want greenish color, I might choose this color

vraysketchup 

Here is the render using greenish color.

vraysketchup 

3.3. Transparency color.

Usually, it so hard to see what is happening below the surface, especially when using high displacement value and reflective valuer. If you want to see the material below, in this case the pebble rocks, you should learn how to adjust this. I have seen water that looks like metal or sea water, because this one was 100 percent white.

Here is an example. This one looks like seawater. (This render has displacement value of 1.0 and transparency color of white)

vraysketchup 

In the Barcelona Pavilion, the pebble surface is quiet near to the water surface, therefore the pebbles will be surely noticed. TO see the texture at the bottom, first you need to make the displacement lower and second you need to use medium to dark gray color in the transparency rollout. Below, I adjusted the transparency color with an RGB value of 81,81,81.

vraysketchup 

Here is the render (without displacement)

vraysketchup 

Step 4: Displacement
 
To create waves and ripples, all we need to do is to add displacement map. Be sure your face geometry for your water is grouped. If not, no displacement will occur. Here I used the same dmap , I used in the diffuse layer.

vraysketchup 

Examples of displacement settings. Note: Vray uses inches in displacement. 1 means 1 inch.
Displacement amount 0.1

vraysketchup 

Displacement amount 0.5


Displacement amount 1.0


Bonus: Effected by Override Material

If you want the material not to be effected when overriding material (for clay rendering) all you have to do is untick "effected by Override Material" under option.


See some of my WIP renders in this challenge using this tutorial. DAY 1, DAY 2. I have not updated it.

I hope this is useful.
Nomeradona

~~~~~~~~~~~~~~~~~~~~~~~
Published By
Arka Roy
www.sketchup-ur-space.com
~~~~~~~~~~~~~~~~~~~~~~~


Wednesday, May 14, 2014

Background Modification in Sketchup

Background Modification in Sketchup 

Here are the tips on how to change the background in SketchUp (not for render).
Usually when we want to present our SketchUp drawing to our client, it’s only a sky, isn't it? SO, with this way, we can change / customize our background so at least it will make our scene more real although it’s only a sketch without rendered.

If you want to render the scene (vray or podium or anything else render engine), then you should use HDRI or customize on Photoshop.

So, here is the step by step: 

1. Show the Styles window by accessing menu Window -> Style.

2. In window Style, choose tab "Edit", then choose "Watermark" from the menu

3. Click "(+)" icon then select a bitmap whatever you want to show for your background image, usually its a sky image or something else. The bigger the image size will make more smooth.

4. then, you will get a dialog question window, choose "Background". Then, "Watermark1" on the option can changed/renamed to whatever u want.

5. The next dialog, let the settings to the default, just click "Next".

6. Next dialog, choose "Positioned in the screen", then move the slider in the "Scale" to the right, This means our bitmap will strecthed fully. Thats why i suggest you use bigger image size so you will get smoother result.

7. Then, on the bullet icon, this means how the image repetition start. In this case, i select the bottom center. But you can select/try your own based on your image. Then, click "Finish"

Done.. ! ^_^ .. the parameter i mention above is not absolute, you can take your time to experience .. i hope this is useful for you ..

Background Modification in Sketchup  

Background Modification in Sketchup   

~~~~~~~~~~~~~~~~~~~~~
Published By
Arka Roy
www.sketchup-ur-space.com
~~~~~~~~~~~~~~~~~~~~~