Thursday, September 29, 2016

A position is vacant for Illustrator/3D Sculptor in Melbourne

Headstart is one of the biggest toy companies in Australia that sells products under recognized brand names like Marvel™, Disney™, Star Wars™, Marvel™, TMNT™ and their own patented brands.

The company is inviting application for an instigated, smart and experienced Illustrator with a sound knowledge in producing character designs. The Applicant should have good knowledge working with Adobe software. The candidate has to send report to Product Development Manager as well as draw characters and illustration elements that represent the expanding stable of brands of the company.

The candidate should possess the following qualifications, experience and knowledge:

• Sound illustration skills
• ZBrush Skill is essential
• Superior polly sculpting
• Soft and hard surface modelling
• Character rigging in Zbrush
• Earlier working experience with toys or an identical field where generating characters are considered as an advantage
• Excellent knowledge in using Adobe Software (In Design, Photoshop, Illustrator, Acrobat)
• Strong consideration to detail
• Exceptional time management skills
• Capability to perform under stringent deadlines
• More than 5 years of working experience
• Knowledge in using vray, or keyshot will be an added advantage
• Capability to capture a 2D image to a solid 3D model
• Great drawing skills, sound knowledge in anatomy & stylised character design

If you are selected for an interview, you have to present a sample of your portfolio along with your own artwork, hand sketches, illustration, story boards, finished products, etc.

Apply online (www.seek.com.au)

A position is vacant for Illustrator/3D Sculptor in Melbourne

~~~~~~~~~~~~~~~~~~~~~~~~
Published By
Rajib Dey
~~~~~~~~~~~~~~~~~~~~~~~~
Thursday, September 22, 2016

How to render an image into a VRImage file

Render to VRImage is a tool helpful for v-ray users to inscribe the V-Ray raw image data directly into their hard drive, facilitating them to save memory of ram. This feature will be effective while rendering a high resolution image without crashing the memory.

Go through the following instructional video to learn how to render an image into a VRImage file. The video tutorial will be applicable to V-Ray for Rhino and V-Ray for SketchUp.


~~~~~~~~~~~~~~~~~~~~~~~~
Published By
Rajib Dey
~~~~~~~~~~~~~~~~~~~~~~~~
How to create photorealistic scenery with trees and plants – An exclusive tutorial by Paul Mort

Paul Mort presents an exclusive 3D tutorial on producing naturalistic scenery with trees and plants.

To make this, the following three most recognized 3d modeling program is used :-

Gimp 2 (a graphics package). On can download and apply this program at free of cost. Just go to www.gimp.org to obtain the most updated version.

SketchUp Make 2016. This program can also be downloaded at free of cost from www.sketchup.com. Finally, download SketchUp2xplane plugin to transform objects from SketchUp to the native X-Plane format (.obj). The most updated version is 1.70 and is accessible from https://marginal.org.uk/x-planescenery/tools.html

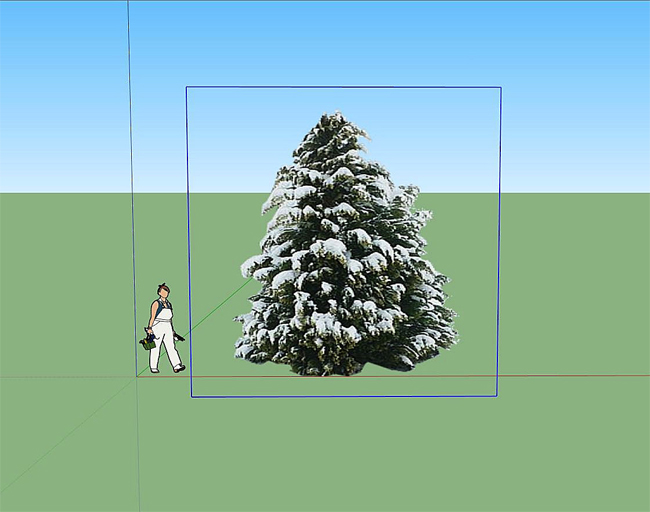
The following object is taken with a transparent background. This image will be imported into SketchUp. Now, left click on the image to get the blue lines which mark its edges. Therefore, illustrating the background (of that specific image) is really transparent (Figure 1).

How to create photorealistic scenery with trees and plants – An exclusive tutorial by Paul Mort
Image Courtesy: flightsim.com

The most vital feature about the image is that in order to efficiently transform it to X-Plane, it should contain 512x512 in pixel size. In order to resize the image smoothly, search through Google for square images to utilize. It will provide the exact aspect ratio to apply.

By importing the image into SketchUp, one can obtain .png image (resized to 512x512) containing a transparent background.

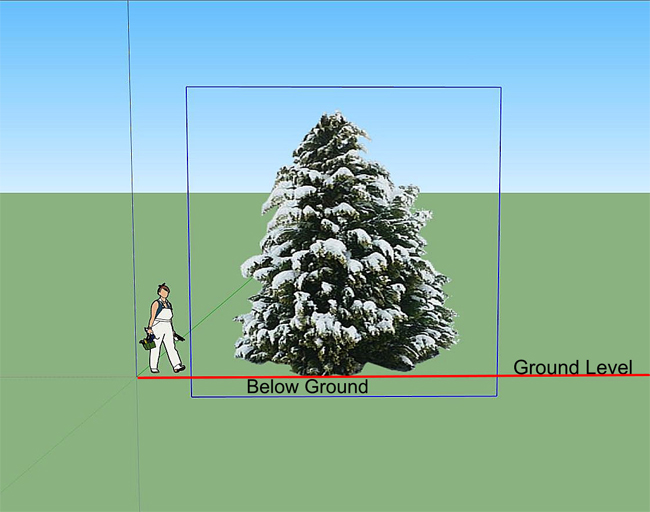
Now you have to know how to place the image in sketchup perfectly. Take red axis as ground level, so image should be modified unless it is positioned on top of this line. A small portion below ground is acceptable as it is completely transparent in this case. To take the benefit, all the unnecessary grass and earth adjacent to the base of the tree are removed instantly. It is performed by just dropping the tree slightly underneath the red axis, making the grass and earth vanish (Figure 2)!

How to create photorealistic scenery with trees and plants – An exclusive tutorial by Paul Mort
Image Courtesy: flightsim.com
~~~~~~~~~~~~~~~~~~~~~~~~
Published By
Rajib Dey
~~~~~~~~~~~~~~~~~~~~~~~~
Wednesday, September 21, 2016

Reduce your time significantly to create 2D, 3D drawings & 3D renders with WIC3D

Wicona, the leading solution provider in Aluminum façade, has recently launched a new software tool that can significantly minimize the necessary time for generating 2D and 3D drawings and 3D renders.

WIC3D is based on digital drawing platform that can be applied from the initial phases of schematic design. The designers will be able to discover alternative façade solutions. It can function with the description, analysis and visualization of architecture and facilitates project stakeholders to evaluate the influence of various façade choices and changes.

The user-friendly tool allows architects, engineers and fabricators to draw initial design concepts and ideas instantly and efficiently as well as integrate Wicona’s extremely engineered curtain walling, window, door and solar shading systems.

WIC3D is a perfect modeling software for designing, visualizing, documenting, and communicating façade solutions.

WIC3D can generate perfectly scaled drawings and at the same time enhance exactness and save time. The façade designs are demonstrated both internally and externally facilitating proportions, configurations and options for being evaluated and developed.

The modeling tool is specially created to interface with most recognized CAD systems to import and export 2D and 3D design drawings.

WIC3D offers the following functionalities:

▪ 3D visualizations generated with Google SketchUp can be imported into WIC3D to create and demonstrate 3D renders highlighting WICONA façade systems where necessary in the 3D construction.
▪ 2D elevation drawings can be delivered into WIC3D to be applied as a template to produce 3D renders. These can then be exported to be applied with all leading CAD software together with AutoCAD®, Bentley®, ArchiCAD and ADT.
▪ It is also possible to export 3D renders to be applied with Google SketchUp or in 3ds format to be applied with AutoDesk 3ds Studio Max.

One can access WIC3D through the Wicona WIC3D website for a free 30-day trial (www.wic3d-wicona.com) and there is a demonstration video to view.

To get more information, send mail to info.wiconauk@wicona.com or call 0845 602 8799.

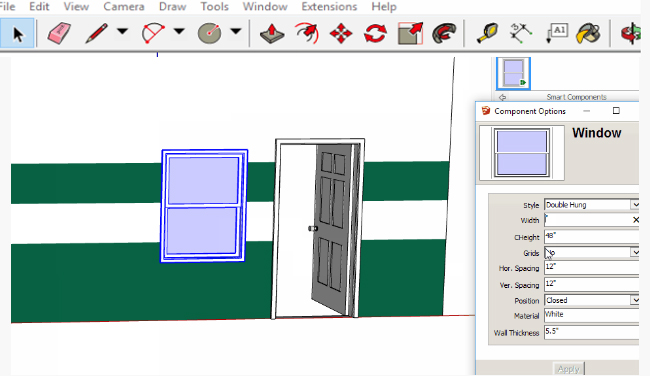
Reduce your time significantly to create 2D, 3D drawings & 3D renders WIC3D
Image Courtesy: www.youtube.com
~~~~~~~~~~~~~~~~~~~~~~~~
Published By
Rajib Dey
~~~~~~~~~~~~~~~~~~~~~~~~
Tuesday, September 20, 2016

Some useful sketchup tips to turn any sketchup model into 360 panoramas

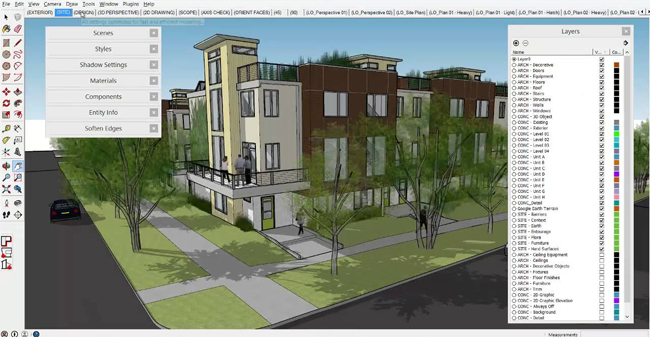
MasterTuts comes with another useful sketchup vray tutorial that teaches you how to generate panoramic 360 renders with vray for sketchup. By going through this tutorial one can easily transform any prevailing sketchup model into 360 panoramas.

If you want to produce 360 degree image, apply the following steps :-

Open your model and arrange the camera in Vray.
Open the Vray Optional Editorial, then choose Camera.
Shift the camera from Standard to Spherical,
Override FOV to 359.9 degree. (as 360 often don’t function with Vray for Sketchup. It turns the image either white or black.)


~~~~~~~~~~~~~~~~~~~~~~~~
Published By
Rajib Dey
~~~~~~~~~~~~~~~~~~~~~~~~

Friday, September 16, 2016

Face Cutter 2.1 for Sketchup

Neil B. has developed Face Cutter for sketchup. This newest sketchup extension is compatible with SketchUp 2015, SketchUp 2016 as well as windows platform.

This tool is very useful while positioning a gluing component to multiple faces. All faces equivalent to the z axis of the component are cutout, along with interior of wall.

Faces are only cut according to the depth of the component. As for instance, a window containing a 6" jamb, would cut the interior face of a 6" wall, whereas a window containing a 4" jamb does not perform the task. If dynamic components are edited by modifying Component Options, the faces should be 'recut' according to the modifications in component size or shape.

This tool also performs well while nesting components within the components or groups. This version is unable to cut faces which contain a diverse parent than the component. As for instance, a face in a different group than the component. There is auto mode option to cut faces automatically if hole cutting components are included.

Link for download extensions.sketchup.com

Face Cutter 2.1 for sketchup
Image Courtesy: extensions.sketchup.com

~~~~~~~~~~~~~~~~~~~~~~~~
Published By
Rajib Dey
~~~~~~~~~~~~~~~~~~~~~~~~

Wednesday, September 14, 2016

How to utilize LayOut in SketchUp Pro

LayOut application in SketchUp Pro is very useful for sketchup users. With LayOut the sketchup users can generate 2D drawing and documentation through SketchUp Pro. In LayOut there are several 2D vector drawing tools having similarities with SketchUp. By applying these vector drawing tools the sketchup users can accomplish various activities like inferencing, axis locking, snapping, copy arrays, and other comfy drawing habits while producing drawing in 2D. The sketchup users can also set up custom views of their SketchUp models and create baller presentations.

The sketchup users can access 8 hours free trial of LayOut with each download of SketchUp (SketchUp Make and SketchUp Pro). This video performs through a bunch of LayOut's conveniet bits, along with vector drawing.


~~~~~~~~~~~~~~~~~~~~~~~~
Published By
Rajib Dey
~~~~~~~~~~~~~~~~~~~~~~~~

Monday, September 12, 2016

How to use IRender nXt for adding haze & blur after rendering your sketchup model

This is another useful presentation from DutchSims4Master. In this sketchup tutorial video, one can learn how to apply IRender nXt to include blur or haze to your sketchup model once the rendering is completed for your image.

Haze is one time of atmospheric effects which are used to include realism to your rendering works. Haze is generally added to exterior renders. In order to produce haze, it is necessary to mask an extra layer to give various effects like mist, fog, vapor over the images.

IRender nXt contains depth Blur. It is accomplished as a Post-Processing edit, as soon as the rendering is finished, in the nXt Image Editor. It is possible to blur the foreground (rendered image), background, or both.

The most updated version is IRender nXt 7.0. IRender nXt 7.0 highlights SketchUp Renderings with Option Styles, View Wizard, ArchVision RPCs etc.

IRender nXt is an effective plugin for rendering superior quality images with high resolution right inside SketchUp. IRender nXt completely supports Sketch Up materials, lighting, and components to perform rendering interior, exterior, daytime or night-time scenes efficiently.

IRender nXt 7.0 simplify the process for designers to generate render-ready SketchUp models and instantly adjust render settings by providing light sources, reflective properties, translucency, refraction and other rendering features.

Version 7.0 can significantly enhance the rendering workflow with user-friendly controls for render settings. IRender nXt 7.0 is specifically designed to facilitate the designers to create excellent renderings in a quickest possible way.

To get the complete features of IRender nXt 7.0, visit the following link www.renderplus.com


~~~~~~~~~~~~~~~~~~~~~~~~
Published By
Rajib Dey
~~~~~~~~~~~~~~~~~~~~~~~~

Wednesday, September 7, 2016

Some useful sketchup tips to illuminate the exterior in sketchup & vray hdri maps

This tutorial is specifically designed for sketchup vray users. V-Ray for SketchUp stands for a rendering engine that contains Global Illumination (GI) to facilitate the users arranging the lighting for whole scene easily. The tutorial highlights the process for illuminating the exterior in sketchup and vray hdri maps easily. V-Ray for SketchUp supports High Dynamic Range values, also called HDRI (High Dynamic Range Image).

The VRayHDRI map is applied to deliver high dynamic range images (HDRI) and map them onto the background.

HDRI maps can produce attractive surroundings as well as make variation in lighting and scenes. Besides, HDRI can enhance exposure and white balance.

With the HDR file format, users will gain more control on dark to bright. The HDR refers to very special image file format. It is generally starts with professional 360 degree photography, then converts to 96bit full scene image with professional HDR software. HDR allows the users to apply this full scene image as your render light source. It can also be utilized as the background rendering.


~~~~~~~~~~~~~~~~~~~~~~~~
Published By
Rajib Dey
~~~~~~~~~~~~~~~~~~~~~~~~

Tuesday, September 6, 2016

Brief overview of CutList Bridge 4

CutList Bridge stands for a SketchUp Ruby extension. It outspreads the attributes of components to comprise such things as the material type applied in its milling, the species or material name, re-sized dimensions, shop method tags, the sub-assembly to which it fits in and much more. These attributes are assigned to the component and preserved in the model file. These attributes can be exported to either: a .cwx file to be opened in CutList Plus fx version 12.3 or higher; or to a comma separated value file (.csv aka CSV) and consequently imported to Microsoft Excel, Open/Office Calc or any spread sheet application that supports CSV importing. Either of these methods will generate a cut list but CutList Plus fx will also create a materials list, improved cutting diagrams and project costing.

One of the vital features of CutList Bridge is that it preserves all components’ material and milling attributes in the SketchUp model file. The user requires just one file of a design and does not need to coordinate other files if modifications of design are occured. The CWX, CSV, CutList Plus fx, Excel or OpenOffice Calc files are recreated in about four mouse clicks.

CutList Bridge User's Guide

To get more information on CutList Bridge 4, go through the User's Guide (www.srww.com).

Some vital features:

Consistently links SketchUp and CutList Plus fx: CutList Plus fx is an extremely purposeful cut list creator, costing tool, proposal generator and inventory manager for woodworking shops. SketchUp is a robust 3D drawing tool specifically designed for furniture and architectural cabinet design and photorealistic rendering. CutList consistently connects these two applications.

All cut list attributes are passed in SketchUp and kept with the model file With CutList Plus, the user has to re-enter dimensions and other component attributes like material type, material name, notes and banding by hand. Attributes which are automatically produced from the design’s 3D model, preferably fit in the design file. CutList Bridge facilitates the user to pass in and preserve all attributes with the model file and offers features for editing and exporting. Attributes are automatically created from the 3D model. CutList Bridge also manage component dimensions and grain direction corrections and export them automatically.

Components copied from another model is arranged with their attributes when a component is copied from another model where attributes are already allotted and pasted into the current model, the component’s attributes will be pasted with the component. It is suitably when the user contains a standard set of components which are used over a number of models. It only functions with the Edit/Copy and Edit/Paste tools. It will not be functional if the user arranges an attributed component in a library folder and choose it with the Components dialog box; nor does it work if you import a .skp file.

To get more information, visit extensions.sketchup.com


~~~~~~~~~~~~~~~~~~~~~~~~
Published By
Rajib Dey
~~~~~~~~~~~~~~~~~~~~~~~~

Sunday, September 4, 2016

Download a trial verison of ConDoc Tools for Sketchup Pro

Generate construction documents automatically with ConDoc Tools for Sketchup Pro.

ConDoc refers to a plugin that accelerates the process for producing construction documents as well as automates design packets, and radically advances your project organization by applying SketchUp Pro and LayOut. ConDoc is developed to facilitate architects and designers to enjoy a continuous workflow process, simplify all of the complicated phases associated with document formation. Besides, it allows you to get total control in all phases of your project devoid of applying other software programs.

ConDoc includes the following features :-

1. Arrange your model with the ConDoc system
2. Wide array of line weights, 2d dynamic hatches
3. Capability for drafting 2D details
4. Avail 2D Cad within sketchup
5. Distribute work among team members easily
6. Generate lightweight editable models
7. Automate the process for managing layers, styles, mixing shadows, camera setting, section planes etc.
8. Generate illustrative design packets and transparent sets of construction documents with a slew of line weights & dynamic hatches

Download a trial version: condoctools.com

ConDoc Tools for Sketchup Pro
Image Courtesy: 1080.plus
~~~~~~~~~~~~~~~~~~~~~~~~
Published By
Rajib Dey
~~~~~~~~~~~~~~~~~~~~~~~~

Friday, September 2, 2016

Demonstration of Lumion 6 & how to download a crack version

This sketchup presents the brief demonstration of Lumion 6. One can also learn how to download a complete crack version of Lumion 6.

The most updated version is Lumion 6.5. This newest version consists of an improved render engine that is compatible with Windows 8 and 10. Get access to additional graphics card memory in windows 10 for greater scenes.

Given below the detailed lists of other advanced features :-

Transparent Trees: Now the trees and plants become more crystal clear to avoid foliage from obstructing what will be demonstrated.

Panorama Mode: Besides, existing photo and video modes, there is a dedicated Panorama mode in this latest version.

In Panorama mode, it is possible to distribute your panoramas online with MyLumion or render a VR output to be watched with a VR headset. Lumion 6.5 allows to render outputs for other VR devices.

Use Materials rapidly: The process becomes easier for allocating or revising materials. The delay among material assignments is lowered that leads to a more fluid experience in the material section.

Duplicate items by moving them vertically: Earlier the objects are replicated by pressing the Alt key at the time of moving objects horizontally. Now the objects can be replicated by pressing Alt and moving them vertically.

Instant Object Settings: There is a new property window to easily and speedily edit properties of objects. As for instance click a tree and promptly modify its transparency.


~~~~~~~~~~~~~~~~~~~~~~~~
Published By
Rajib Dey
~~~~~~~~~~~~~~~~~~~~~~~~

Usefulness of the protractor tool within Sketchup

The protractor tool inside SketchUp facilitates the sketchup users to generate construction lines for making the drawing and inferencing process smooth and uncomplicated. The sketchup users can predetermine the protractor perfectly with various effective techniques.

Watch the following live demonstration.


~~~~~~~~~~~~~~~~~~~~~~~~
Published By
Rajib Dey
~~~~~~~~~~~~~~~~~~~~~~~~