Friday, August 31, 2018

A new update is available with Shaderlight 2018

Cambridge, UK-based Shaderlight Ltd, has made an update to Shaderlight 2018, its most recognized photo-realistic rendering plugin for Trimble’s SketchUp modeling program.

The users who have a Shaderlight 2018 license can avail this update at free of cost.

With this update, the users will be able to make proper adjustments of environment rotation. The inclusion of a numeric entry field will facilitate the users to easily obtain a perfect match of the lighting environment and background image among various SketchUp models.

The users will get a warning while closing throughout a rendering process, to resist losing the development of a long-running render they are unaware. Shaderlight will now notify the users if they try to close the render window when a render is ongoing.

Lastly, a new Keep Shaderlight “always on top” option is obtainable in the program’s settings to retain the application window over other windows among sessions.

The newest version of Shaderlight is totally compatible with SketchUp 2018. The program supports both Windows and Mac platform. Shaderlight 2018 Pro is 299.USD.

To avail a free 14-day free trial version, click on the following link www.artvps.com

Go through the following video tutorial to gather more information about the Shaderlight.

Video Source Shaderlight

~~~~~~~~~~~~~~~~~~~~~~~~~~
Published By
Rajib Dey
www.sketchup4architect.com
~~~~~~~~~~~~~~~~~~~~~~~~~~
Friday, August 24, 2018

AddOrthoScenes (1.0.2) for sketchup 2018

Smustard Team has developed AddOrthoScenes, the newest sketchup extension available in extension warehouse. This sketchup extension is compatible with SketchUp 6, SketchUp 7, SketchUp 8, SketchUp 2013, SketchUp 2014, SketchUp 2015, SketchUp 2016, SketchUp 2017, SketchUp 2018.


The extension can be used to include scene orthographically by providing x,y,z offsets.
AddOrthoScenes facilitates the users to generate new scenes depending on the existing view by arranging the number of scenes to be produced and the x, y, and z offsets for every new scene. The initial offset is from the existing active view, and in the case of several new scenes arranged, each supplementary offset of the scene is relative to the last scene produced by the plugin.
It is suitable for generating scene-based tutorials or anything else that is required to illustrate a progression of steps. It is also very effective for producing fly-by type animations, where two scenes allocate a camera angle (concerning the global drawing axes) but contain various station points.
The AddOrthoScenes menu item appears in the View menu.
This sketchup extension is available in extension warehouse.extensions.sketchup.com)
Go through the following video tutorial to gather more information about the plugin.
Video Source Smustard Plugins


~~~~~~~~~~~~~~~~~~~~~~~~~~~
Published By
Rajib Dey
www.sketchup4architect.com
~~~~~~~~~~~~~~~~~~~~~~~~~~~

Tuesday, August 21, 2018

SketchUp-Collab – The newest sketchup extension

AMC Bridge develops SketchUp-Collab, an exclusive sketchup pluigin that creates bi-directional connection among SketchUp® and Autodesk® A360. This sketchup plugin is compatible with SketchUp 2017, SketchUp 2018.

SketchUp-Collab shows how to handle documents (preserving, registering, recovering) in A360 directly from SketchUp. Besides, Resource Settings and Property Mappings for SketchUp in A360 can also be retained.

The primary features of the plugin are given below :-

* Sign in/out A360 with SketchUp
* Make a project in A360 with SketchUp
* Upload a file from SketchUp to A360
* Preserve a SketchUp file in A360
* Recover a file from A360 to SketchUp
* Register Document Hierarchy to A360


Go through the following video tutorial to gather more information about the plugin.

Video Source AMC Bridge

~~~~~~~~~~~~~~~~~~~~~~~~~~~
Published By
Rajib Dey
www.sketchup4architect.com
~~~~~~~~~~~~~~~~~~~~~~~~~~~

Friday, August 17, 2018

Prospect 2.3 – The newest Navisworks Plugin (Beta)

IRISVR launched Prospect 2.3, the newest Navisworks Plugin (Beta).

Now it becomes easier to check Navisworks models in VR with a single mouse click, accomodate multiuser QA/QC meetings, and coordinate with trades remaining in the office or job site.

Move through Doorways Intuitively


Rather than opening all the doors in your native desktop model prior to launching VR, you will be able to move through doors from within VR by simply pointing to where you prefer to go.

Conceal Any component, Regardless of Layer State


It facilitates you to conceal or unhide any component in your model. Either you require to refocus your design discussion, curate a specific viewpoint, or evaluate the MEP system behind your walls, this feature is here to allow –– layer or no layer!

Superior Section Cutting in Scale Model Mode

Now, one can view the section cuts in Scale Model Mode by arranging a black cap on your section plane. Now, it’s becomes easier to view what and where you’re cutting.

Mute Meeting Participants in Multiuser

A new Mute function is accessible for the host of any Multiuser Meeting. It facilitates the Host to efficiently manage the conversation when there are various guests in the meeting. The host can also mute themselves if their background noise creates problem for participants.

Additional 2.3 Updates


• Superior processing times will facilitate to import new files quickly and with more consistency.
• Navigation in No Headset Mode now facilitates you to check where you're going with a contextual cursor.
• Now only Multiuser Meeting Hosts will have the ability to Bring Alongparticipants.

Go through the following video tutorial, to get more updates about Prospect 2.3.

Video Source
 IrisVR

Prospect 2.3 รข€“ The newest Navisworks Plugin

~~~~~~~~~~~~~~~~~~~~~~~~~~~
Published By
Rajib Dey
www.sketchup4architect.com
~~~~~~~~~~~~~~~~~~~~~~~~~~~

Thursday, August 16, 2018

How to apply realistic lighting with vray 3.6 for sketchup

In this construction video tutorial, you will get some useful tips to apply realistic lighting with Vray 3.6 for Sketchup.

The video focuses on the following topics :-

1. Use Shortcuts, 2. Create lights inside components, 3. Mesh Light Tips, 4. Emissive Material Tips

5. Use Lens Flare, 6. Isolate your Lights, 7. Organize your lights, 8. Use Correction Controls, 9. Use Light Textures, 10. Lighting Resources

Shortcut for rectangular light: Suppose, you are going to produce a rectangular light and for this purpose choose first point (hold shift to manage direction). By default, the rectangle light only glares on the front face of the plane. Sometimes, it is required to flip the light once it is generated to keep it to point in the exact direction. By applying this shortcut, you just click on a point and hold down shift and click on the second point to form it. Now, a blue arrow will be visible and it shows the direction to which the light is pointing to, just shift the mouse to the other side to flip the light, click again to finish.

Shortcut for dome light: By default, there is an elementary HDRI loaded while generating it. But, when you hold shift and click, then it does not contain any texture. You can hold control and click to load the texture while placing the light.

Shortcut for spot light: Generally, just click wherever it is required to generate a spot light, then shift and twirl the light and at the end make modifications in the settings. But, applying the shortcut, just hold shift and click on a starting point. Now, it becomes possible to shift the mouse to modify the direction of the spotlight. You can also get the option to modify the angle of the cone. Besides, you can select the penumbra angle also. It is also possible to fix the direction and view the impact of the spotlight comfortably.

To get more shortcut details, watch the following video tutorial.

Video Source Architecture Inspirations

~~~~~~~~~~~~~~~~~~~~~~~~~~~
Published By
Rajib Dey
www.sketchup4architect.com
~~~~~~~~~~~~~~~~~~~~~~~~~~~

Tuesday, August 14, 2018

UV bim Report – The newest sketchup extension

UV bim Report (v1.0.2) is newest sketchup extension available in the extension warehouse. This sketchup extension is compatible with SketchUp 2015, SketchUp 2016, SketchUp 2017, SketchUp 2018.

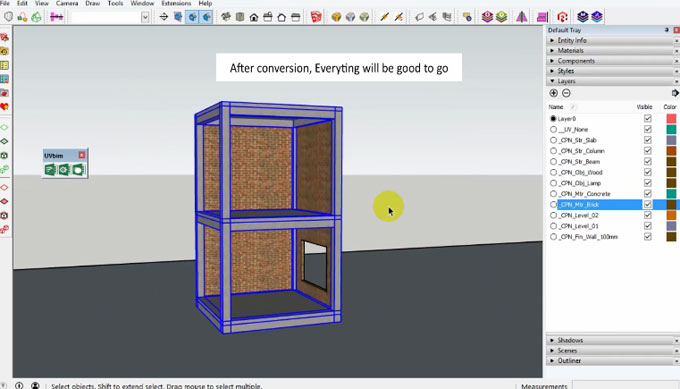
This extension can be used to takeoff quantities from skp and transferred to csv. The objective of the extension is to export all essential information for quantity surveyor or BoQ (bill of quantity).

The extension is suitable for Architecture, Construction, Engineering, Interior Design.

To download the plugin, click on the following link extensions.sketchup.com

Go through the following video tutorial for online demonstration of the extension.

UV bim Report รข€“ The newest sketchup extension

~~~~~~~~~~~~~~~~~~~~~~~~~~~
Published By
Rajib Dey
www.sketchup4architect.com
~~~~~~~~~~~~~~~~~~~~~~~~~~~

Thursday, August 9, 2018

SentioVR: Sketchup to Virtual Reality (VR) walkthroughs – The newest sketchup extension

SentioVR: Sketchup to Virtual Reality (VR) walkthroughs is the newest sketchup extension available in extension warehouse. The extension supports sketchup 2017 and sketchup 2018.

With this extension, it is possible to demonstrate any 3D models in VR easily.

By simple click of the mouse, one will be able to produce 360 tours or 3D walkthroughs and involve your clients within your designs. No coding or installations are necessary. SentioVR simplify the method simple to upload your 3D content, generate walkthroughs and display in VR devices like Oculus Go or Samsung Gear VR. The SentioVR Sketchup plugin facilitate the users to proceed inside your Sketchup models (Windows/Mac) inVR devices with simple mouse clicks.

Given below, some exclusive features of this sketchup extension :-

• Upload your Sketchup models to your account directly through plugin
• Quickly view your 3D models in Virtual Reality: Oculus GO & Samsung Gear VR
• Control and demonstrate your content from any location, anytime with your unique access code


For a live demonstration, go through the following video tutorial.

Video Source: SentioVR

~~~~~~~~~~~~~~~~~~~~~~~~~~~
Published By
Rajib Dey
www.sketchup4architect.com
~~~~~~~~~~~~~~~~~~~~~~~~~~~

Monday, August 6, 2018

Rendering Optimization in VRAY Sketchup

I have encountered these following questions "My client wanted me to print A0 size paper with nice quality, how can I do it?" Today I receive this from one of the follower with my Nomeradona Facebookpage "Nomeradona, I am working on a Google SketchUp 3D Floor Plan, and trying to Render it in Vray. I am able to Render it at (800x600), but I run out of ram, when I tried to output the (4000x3000 dpi) file size. Are there any tricks you can recommend to reduce the file size or increase rendering optimization?"

In this case, what shall we do? The good news is there is a very simple solution in Vray Sketchup 1.49.01 and here is this using the output vrimage.

This is an old Sketchup file which I did almost four years ago. Let me just use it to quickly show you the trick

Step 1: The output size

I have rendered before more than 8000px width x 4000px spherical panorama render which I used for this Virtual reality post. CLICK HERE to view this post. So far this was the maximum size I have tried. Anyhow in this particular render, I will make an output of perhaps half of this.

Step 2: IR passes
Since the image is huge, you don't need that high min/max rate. I lowered my min/max rate to -5,-3


Step 3: VRImage output. 

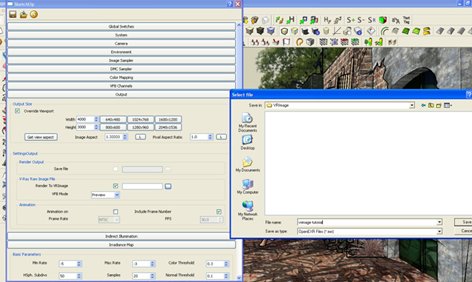
Locate the output roll-out window and under the setting output, tick the box "Render to VRImage". Once selected save it in exr root file to any folder that you want.

Step 4: Preview Image. 
Vray SketchUp will now begin to write the data in your hardrive. The Vray frame buffer will appear and you will see on the very top it reads "preview of the file output size that you have entered".


Once done, the image file will be written to the assigned folder that you have chosen.

Open Photoshop and load the exr file

Step 5: Converting the Gamma 2.2 to Gamma1.0
Vray SU by default uses gamma 2.2. When we open the file in Photoshop you should not be surprise why it's too bright. In order to convert the Gamma 2.2 to 1.0, select image/ adjustments/exposure.


Enter the value 0.45.45 ( 1.0 divided by 2.2)

Here it is..


I hope this is useful!
Nomeradona

How to render extra huge output image without crashing in Vray SketchUp


~~~~~~~~~~~~~~~~~~~~~~~~~~~
Published By
Rajib Dey
www.sketchup4architect.com
~~~~~~~~~~~~~~~~~~~~~~~~~~~

Thursday, August 2, 2018

How to model & render a villa with vray 3.4 for sketchup 2017

In this tutorial, you will learn how to use vray 3.4 for sketchup 2017 for modeling and rendering a villa. You will also learn various things like how to model the landscape, create road with sandbox tool, add light, add grass with skatter and add trees with laubwerk.

Details about sandbox tool, skatter plugin and laubwerk plugin are given below :-

Sandbox Tools - The Sandbox Tools (help.sketchup.com) extension employs the concept of a sandbox that belongs to a surface to be formed and manipulated with sandbox tools. A sandbox in SketchUp (and in other 3D modeling tools) is generally defined as a triangulated irregular network or TIN in terrain Modeling terminology. The sandbox tool is used to model terrain and design landscape.

Skatter Plugin – This plugin (getskatter.com) can be used to render huge amounts of vegetation, instantly populate city blocks, generate parametric assemblies, crowds, carpets etc. all right inside SketchUp.

Laubwerk – This sketchup plugin (extensions.sketchup.com) can make your models realistic with superior quality vegetation. It allows the users of V-Ray or Thea for SketchUp getting access to a wide-ranging library of render-ready, realistic, procedural 3D plants.

To learn the complete process for modeling & rendering a villa, go through the following video tutorial.


Video Source: KG Studio

~~~~~~~~~~~~~~~~~~~~~~~~~~~
Published By
Rajib Dey
www.sketchup4architect.com
~~~~~~~~~~~~~~~~~~~~~~~~~~~