Showing posts with label 3D STL. Show all posts

Thursday, August 9, 2018

SentioVR: Sketchup to Virtual Reality (VR) walkthroughs – The newest sketchup extension

SentioVR: Sketchup to Virtual Reality (VR) walkthroughs is the newest sketchup extension available in extension warehouse. The extension supports sketchup 2017 and sketchup 2018.

With this extension, it is possible to demonstrate any 3D models in VR easily.

By simple click of the mouse, one will be able to produce 360 tours or 3D walkthroughs and involve your clients within your designs. No coding or installations are necessary. SentioVR simplify the method simple to upload your 3D content, generate walkthroughs and display in VR devices like Oculus Go or Samsung Gear VR. The SentioVR Sketchup plugin facilitate the users to proceed inside your Sketchup models (Windows/Mac) inVR devices with simple mouse clicks.

Given below, some exclusive features of this sketchup extension :-

• Upload your Sketchup models to your account directly through plugin
• Quickly view your 3D models in Virtual Reality: Oculus GO & Samsung Gear VR
• Control and demonstrate your content from any location, anytime with your unique access code


For a live demonstration, go through the following video tutorial.

Video Source: SentioVR

~~~~~~~~~~~~~~~~~~~~~~~~~~~
Published By
Rajib Dey
www.sketchup4architect.com
~~~~~~~~~~~~~~~~~~~~~~~~~~~
Tuesday, July 31, 2018

How to generate a sketchup model from different CAD drawings

In this sketchup video tutorial, you will be familiar with the method that is required to develop a model out of different CAD drawings.

To simplify the modeling process, the following free sketchup extensions are applied :-

Tools on surface (Fredo6) – With this sketchup extension, it is possible to draw on any type of surface, either it is flat or curved.

To download this extension, click on the following link sketchucation.com

To download the extension, click on the following link asav.xyz/2v6sL3K

JointPushPull (Fredo6): This sketchup extension is also developed by Fredo6. It can be used to extrude different faces simultaneously.

To download this extension, click on the following link sketchucation.com

Solid Inspector v2 (thomthom) – This sketchup extension can be applied to examine why a specific group or component is not a solid.

To download the extension, click on the following link extensions.sketchup.com

CleanUp v3 (thomthom): This sketchup plugin facilitates the users to configure parameters to purify the sketchup drawing.

To download the extension, click on the following link extensions.sketchup.com

To learn the complete method, go through the following video tutorial.

Video Source Alejandro Soriano Visualization

~~~~~~~~~~~~~~~~~~~~~~~~~~~
Published By
Rajib Dey
www.sketchup4architect.com
~~~~~~~~~~~~~~~~~~~~~~~~~~~

Monday, July 30, 2018

Live demonstration of PlaceMaker

This sketchup video tutorial provides brief demonstration on PlaceMaker for sketchup. Placemaker is an extension for sketchup that is ideal for urban design.
To use this plugin, you have to first geo reference your location and click on placemaker and choose a place and select any area of that place and import to sketchup.
PlaceMaker imports data from OpenStreeMap and converts it into a functional site reference model ideal for rendering or exporting into other applications.
Given below, some exclusive features of the plugin
Aerials: Import DigitalGlobe High resolution aerials directly into SketchUp to employ them as your base.
3D Buildings: Add 3D building massing models to choose locations and cities.
3D Roads and Paths: Set 3D roads, walks, paths and water into your model. All objects are modeled and render ready.
Trees and Forests - New in v2!: Import whole forests with one click and place on terrain
Model on Terrain: PlaceMaker will model and drape buildings, 3D roads and paths directly onto terrain.
To get more clear ideas about PlaceMaker, go through the following video tutorial.
Video Source procadsys


~~~~~~~~~~~~~~~~~~~~~~~~~~~
Published By
Rajib Dey
www.sketchup4architect.com
~~~~~~~~~~~~~~~~~~~~~~~~~~~

Monday, July 23, 2018

Profile Builder 3 is just launched with some exciting features

Profile Builder is a powerful extension for sketchup that is bundled with a flexible series of parametric modeling tools for SketchUp to accelerate the modelling speed significantly.

The plugin makes the models smarter and adjustable to design changes.

The new version of profile builder i.e. version 3 is just released. It is compatible with sketchup 2016 and higher versions.

This new version contains 40 new features and following improvements :-

Span Assembly parts for generating great assemblies.

With hole tool, parametric holes and openings can be created.

Auto-assemble feature generates quick assemblies with a single mouse click.

Fix the height of an assembly

Path Mode
Build along Multiple Paths
Smarter Profiles and Paths
Live Profile Editing
Build Discontinuous


The users of version 2 can avail a discount coupon for upgrading to version 3.
To purchase a license, click on the following link profilebuilder4sketchup.com
Go through the following video for the live demonstration of the plugin.
Video Source mind.sight.studios

~~~~~~~~~~~~~~~~~~~~~~~~~~~
Published By
Rajib Dey
www.sketchup4architect.com
~~~~~~~~~~~~~~~~~~~~~~~~~~~

Tuesday, July 3, 2018

FrameModeler for sketchup

FrameModeler is the newest sketchup extension that is compatible with SketchUp 2018.

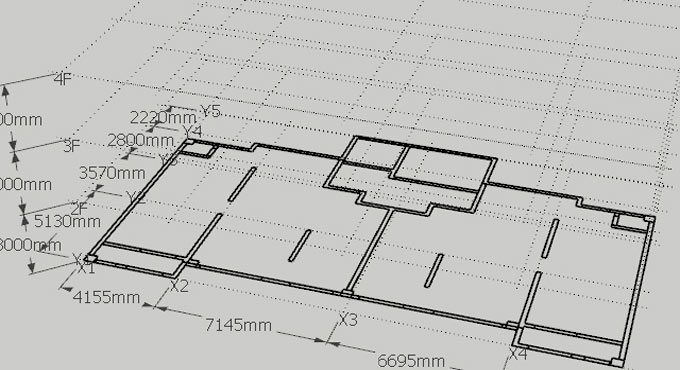
This user-friendly architecture tool is compatible with elementary architecture components like column, beam, wall, slab, grid etc. and can be set by the users with their fingertips.

FrameModeler works out the area and volume of the material similar to excluding intersected faces and edges.

• Information Export Tool
Export Excel data
• Select model data from ModelInfo
• Update Model Condition
Excluding intersected faces and edges, updating grid position.


Download the extension from extension warehouse extensions.sketchup.com

FrameModeler for sketchup

~~~~~~~~~~~~~~~~~~~~~~~~~~~
Published By
Rajib Dey
www.sketchup4architect.com
~~~~~~~~~~~~~~~~~~~~~~~~~~~

Wednesday, May 30, 2018

Quick tips to use extrude tools sketchup plugin

This sketchup video demonstrates the functionality of an exclusive sketchup plugin called extrude tools. Get some useful tips on how to use this plugin efficiently.
This plugin combines diversified toolset which can be used for Extruding Edges into meshes etc.
The plugin is now compatible with sketchup 2018.
The most vital point about Extrude Tools is that it facilitates the users to extrude lines, in spite of faces.
To download this plugin, click on the following link sketchucation.com
Go through the following sketchup video tutorial to learn the tips to improve your modeling skills with extrude tools.


~~~~~~~~~~~~~~~~~~~~~~~~~~
Published By
Rajib Dey
www.sketchup4architect.com
~~~~~~~~~~~~~~~~~~~~~~~~~~

Tuesday, May 22, 2018

ColorHex – The newest sketchup extension

Rafael Rivera has developed ColorHex, an exclusive sketchup extension available in extension warehouse.

This sketchup extension is well matched with SketchUp 2017, SketchUp 2018 as well as windows platform.

The plugin can be used to paint any sketchup models based on #Hex color values by applying a series of toolset.

Brief description of tools:

Hex Brush Tool: The Hex Brush Tool paint faces through #hex color values. The users will be able to click & drag the mouse to incessantly arrange paint to the SketchUp model.

Hex Sample Tool: The Hex Sample Tool will opt for the color value of face entity to paint with.

Hex Input Tool: The Hex Input Tool facilitates the users to put in a #hex color value to paint.

Hex Magic Wand Tool: The Magic Wand Tool picks connected faces with the equivalent color.

The plugin can be downloaded from extension warehouse extensions.sketchup.com

ColorHex – The newest sketchup extension

~~~~~~~~~~~~~~~~~~~~~~~~~~
Published By
Rajib Dey
www.sketchup4architect.com
~~~~~~~~~~~~~~~~~~~~~~~~~~

Tuesday, January 30, 2018

Demo of 3D Offset, the newest sketchup extension

Wisext released 3D Offset, the newest sketchup extension that is used to offset various faces at several distances. The users can now offset surfaces in 3D.

The extension is compatible with SketchUp 8, SketchUp 2013, SketchUp 2014, SketchUp 2015, SketchUp 2016 and SketchUp 2017.

In order to apply it, just press a single button to begin the tool. Choose or deselect the faces and put the distances segregated by "-". Get the preview the offsetted faces. Press Enter to generate them.


Now, go to window tab and click on default tray and check all the trays on the right hand side are selected.
To get more updates, go through the following link www.wisext.com
Watch the following video tutorial to get online demonstration of the extension.

~~~~~~~~~~~~~~~~~~~~~~~~~~
Published By
Rajib Dey
www.sketchup4architect.com
~~~~~~~~~~~~~~~~~~~~~~~~~~

Wall Thickness for 3D Printing

Wall thickness is necessary when you give your 3D model in print; otherwise, the 3D printer may not understand the thickness and thinness of the walls of your designs and print your model wrongly. So, it is the unwritten rule of designing 3D model in SketchUp to add wall thickness to your design. Paper-thin surfaces are strictly avoided for 3D printable models.

Setting the correct wall thickness needs your knowledge and proficient skills in designing. 3D printing materials and 3D models are two different subjects. The right wall thickness makes your 3D model print flawless, and it appears the same as you expect.

Choose the perfect wall for your 3D printing:

3D designing is an interesting field that grows rapidly in the world. This has made the craze for 3d printing materials used for various purposes. So, it is necessary to learn how to print a 3D model properly the way the design shows. In the designing software, you no need to work on the thickness surfaces to make your model. But when it comes to printing, it is an obligatory thing to add wall thickness. It helps 3D printer understand how thick of the surfaces are and print accordingly.

Wall thickness is defined as the distance between one surface and its opposite sheer surface. There are a few things that have an impact on choosing how much thickness you want for the surfaces. Materials would definitely come first in the list. The other factors that show a direct connection with the design are alignment, size and overall design.

A guide to proper 3D printing with the wall thickness:

Printing materials play definitely an important role, and depending on which, you can opt for the minimum thickness of your wall. It needs a basic knowledge of different printing materials. If your design needs strong materials like high detailed stainless steel or titanium, you can keep your wall thickness indeed thick as the materials allow you to do so.

The other factors are also there to watch on your 3D printing issue. Structure and design of your 3D models can be the decider of the wall thickness of the surfaces. For example, a print of vertical wall with 5mm2 wall surface needs 0.3mm wall thickness while a vertical wall with the 100mm2 wall surface needs 1mm thickness. If you are printing a horizontal wall with 100mm2 areas, then the wall thickness must be of 2mm. To set a proper wall thickness, you have to be correct while setting inputs like the size of the surface, the alignment (horizontal and vertical).

The materials like ceramics which are fragile need different attention from the strong and hard materials. The larger the model is, the stronger the structure must be – this is considered to be the general rule while printing on the comparatively fragile surface. For example, the ceramic model of 50 mm x 50 mm x 50 mm needs a minimum thickness of 3mm. a ceramic object with 100 mm x 100 mm x 100 mm has 6mm thickness for printable.

The other factors attached with 3D printing:

While preparing your model for 3D printing, you have to be very cautious while dealing with each factor of your design. The essential details are 

• It is common to give the primary attention on the wall with minimum thinness. But problems arise with the wall of maximum thickness. Thicker parts produce stress more than the thinner ones, resulting in a crack or break in the materials.
• To avert breaks on your print, it is always recommended to have an extra thickness of 5mm wall.


Your every design surface needs a recommended wall thickness to keep your model perfect for printing. It is an extraordinary process where you can visualize your virtual 3D models in real. So, having wall thickness is as much necessary as having a correct designing idea.
Article Source: i.materialise.com

Wall Thickness for 3D Printing
~~~~~~~~~~~~~~~~~~~~~~~~~~
Published By
Rajib Dey
www.sketchup4architect.com
~~~~~~~~~~~~~~~~~~~~~~~~~~