Sunday, July 31, 2016

How to generate realistic velvet material in V-Ray for SketchUp

This is another excellent tutorial for sketchup vray users from MasterTuts. The tutorial will introduce you with the processes for generating realistic velvet material in vray for sketchup.

Usually, the users can apply reflection and refraction to generate a material for an object. But sometime, some texture maps are utilized to generate these materials. The users can apply texture map for superior rendering.

All these materials are available in Material Editor in V-ray for sketchup. There are three parts in material editor.

A. Material Workplace - It demonstrates all the selected materials. Click right to add, import, export, rename, pack, remove, and choose the objects with existing materials like attributing present materials to the chosen objects, removing materials (which are not applied in the scene), and attaching layers with reflections, refractions to the materials.

B. Material Preview - The Update Preview button facilitates the users to view the adjusted materials.

C. Options for material control - The options are modified with the added scene materials in section A.


~~~~~~~~~~~~~~~~~~~~~~~~
Published By
Rajib Dey
~~~~~~~~~~~~~~~~~~~~~~~~
Thursday, July 28, 2016

How to apply sketchup to design the exterior of a summer house with pool

Victor Ruiz presents this exclusive sketchup video tutorial that briefly shows how to create the exterior design of a summer house with pool by using sketchup. Sketchup Pro is used to complete the tutorial.

Reference article : How to model a pool with sketchup www.sketchup-ur-space.com


~~~~~~~~~~~~~~~~~~~~~~~~
Published By
Rajib Dey
~~~~~~~~~~~~~~~~~~~~~~~~

Wednesday, July 27, 2016

How to measure your model in Sketchup Mobile Viewer

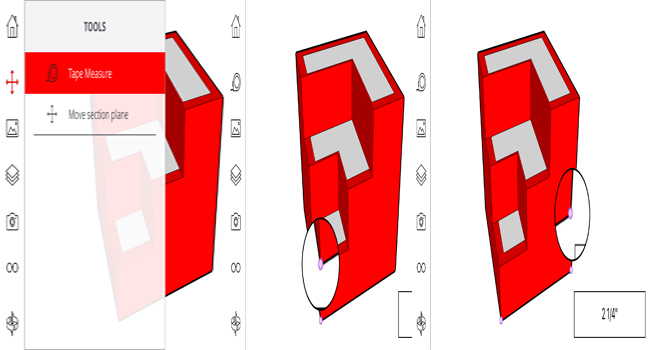
New in SketchUp Mobile Viewer 3.0 you can pick points within a model and display measurements simply, by clicking a start point and end point as displayed below.

With the new feature in sketchup mobile viewer 3.0, it is possible to choose points inside a model and show measurements without any difficulty with the selection of a start point and end point as exemplified below :-

If you press and hold, a magnifying loop will be visible to facilitate selecting the exact point.

The tape measure tool is situated in Tools Menu

To start operation, tap the screen or press & hold to select point 1
To finish the process, tap the screen or press and hold to select point 2


How to measure your model in Sketchup Mobile Viewer

~~~~~~~~~~~~~~~~~~~~~~~~
Published By
Rajib Dey
~~~~~~~~~~~~~~~~~~~~~~~~
Monday, July 25, 2016

How to generate colorful glass with refraction layer in vray sketchup

This is a useful presentation from MasterTuts that shows the users some tricks to generate a material in v-ray for sketchup by applying refraction layer.

Refraction indicates the modification of direction of a ray of light in moving at an angle from one medium to another. In V-Ray the refraction layer is applied to generate glass or translucent materials.

Generally the refraction layer is located beneath the Diffuse layer and the diffuse layer obstructs the effect of the Refraction layer. To view the refraction effect, Just apply transparency in the diffuse layer.


~~~~~~~~~~~~~~~~~~~~~~~~
Published By
Rajib Dey
~~~~~~~~~~~~~~~~~~~~~~~~
SketchUcation published the newest D’oh book for sketchup

The D'oh Book for SketchUp is a publication from SketchUcation Community members that contains some handy tips and tricks to make your sketchup workflows superior.

In 2009 Miguel Lescano initiated a topic highlighting his disconcerting exposure in applying sketchup. Later on It was known as the ‘The D’oh Thread’ and in the intervening years it was a undisclosed place on the internet to distribute your disconcerting SketchUp moments.

The book accumulates killer tips and techniques in apply SketchUp.

This book is specifically designed for everybody that publish their D’oh moments for others to be guided by.

There are no chapters, sections and logical pattern. Just get the book and open any page to gather knowledge on anything ranging from tips and techniques to hidden easter eggs. By exploring this book one will be familiar with something new about sketchup.

If anybody wishes to share his/her own D’oh, just send an email to support@sketchucation.com a to get D’oh published in future publication.

To read the book online, go through the following link sketchucation.com

SketchUcation published the newest D’oh book for sketchup

~~~~~~~~~~~~~~~~~~~~~~~~
Published By
Rajib Dey
~~~~~~~~~~~~~~~~~~~~~~~~
Thursday, July 21, 2016

Guidelines to apply FFD in Sketchup

This sketchup video shows the demonstration of sketchy FFD. It is an exclusive sketchup extension that includes a control cage to an object facilitating the mesh to be operated through control points.

In order to set up the extension, just place the script in your plugin directory.

Guidelines to use:

• Make a group containing all the geometry to be deformed. This group will consist of only faces and/or lines.

• Click right on the group and choose one of the options in the FFD submenu. Either 2x2 or 3x3 or NxN FFD. Based on the size of the model, it may take few seconds. Finally one can get a new group that includes only control points

• Open the control point group and move the control points according to your choice. While moving the points, the object will deform.


~~~~~~~~~~~~~~~~~~~~~~~~
Published By
Rajib Dey
~~~~~~~~~~~~~~~~~~~~~~~~

How to design a luxurious villa (contemporary house) with Sketchup

DutchSims4Master contributes this exclusive sketchup speed build video where he briefly shows how to design a modern luxurious villa (a contemporary house) with sketchup. IRender nXt renderer is used for lighting and rendering of the model.

Render Plus Software is the developer of IRender nXt. It is a simplified & robust extension for generating superior quality renderings out of SketchUp models. It's most suitable rendering extension for architects, interior designers and anyone else to obtain superior quality renderings of their SketchUp models with seamless SketchUp integration, lighting and material settings.


~~~~~~~~~~~~~~~~~~~~~~~~
Published By
Rajib Dey
~~~~~~~~~~~~~~~~~~~~~~~~

Wednesday, July 20, 2016

How to design a realistic kitchen with vray sketchup

This sketchup vray tutorial sheds light on designing realistic kitchen set with vray sketchup. Hendi Suhendar is the contributor of this tutorial.

The model of kitchen is created with sketchup pro and rendering & lighting is done with vray. The model contains walls, doors, windows, cabinets and other fixtures. Lots of components are downloaded from 3D warehouse.


~~~~~~~~~~~~~~~~~~~~~~~~
Published By
Rajib Dey
~~~~~~~~~~~~~~~~~~~~~~~~

Saturday, July 16, 2016

How to design a british house in sketchup – An exclusive speed build tutorial

This speed build sketchup video is based on designing a general british house with sketchup through step-by-step processes. This sketchup video is presented by Jordan Wright.

Window+ is compatible with sketchup 2016.

It is very simple to design your house in sketchup with impressive floor plans and 3d models. Sketchup is very comprehensible for 3d modeling. You can start designing as soon as the software is installed. Sketchup contains diversified 3d and solid object design power. Sketchup is also mostly recognized for its precision and customization power.

While designing a house, it is recommended to start drawing an outline of your floor plan on paper. If you draw it on paper, you will obtain a point of reference when you go for digital sketching. If you have a graph paper, draw the outline on it, rather than white or notebook paper. Graph paper contains 1/4" inch boxes which are ideal while drawing to scale. Each 1/4" inch box will exemplify 1 square foot.


~~~~~~~~~~~~~~~~~~~~~~~~
Published By
Rajib Dey
~~~~~~~~~~~~~~~~~~~~~~~~

Friday, July 15, 2016

Window+ is a powerful sketchup extension to create & edit windows in building models

Francis Mc Shane, the renowned architect and writer of various ruby plugins, has introduced Window+. It is a useful sketchup extension for formation & editing window. This sketchup extension is specifically designed for building designers to simply generate and edit nice looking, well proportioned rectangular windows.

Window+ is compatible with sketchup 2016.

By applying Window+, the designer will be able to instantly produce any rectangular window layout as well as size the profiles to fit the detailed profiles out of the manufacturer's data. This process will make the windows look similar to the real windows, particularly when the paint bucket tool inside sketchup is applied to add a finish. The users can also pull out various BIM object data like profile length and glass area.

Window+ originates earlier free sketchup extension alias WinDoor. Window+ is completely rewritten on the basis of feedback on WinDoor with superior and more powerful algorithms for the smooth formation and editing of all windows. With this extension, the sketchup modelers can easily add windows to their building models.


~~~~~~~~~~~~~~~~~~~~~~~~
Published By
Rajib Dey
~~~~~~~~~~~~~~~~~~~~~~~~

Friday, July 8, 2016

How to apply render and lighting effects to a interior scene with vray sketchup

This is an exclusive vray sketchup tutorial specifically designed for beginner and advance sketchup users. By going through this tutorial one can learn how to render a interior scene with vray sketchup.

Vray is very popular among designers as it can create photo-realistic outputs with IES, Spotlight, Rectangular and Emissive lighting.

Another useful guidance from Chaos Group for rendering an interior scene docs.chaosgroup.com


~~~~~~~~~~~~~~~~~~~~~~~~
Published By
Rajib Dey
~~~~~~~~~~~~~~~~~~~~~~~~

Thursday, July 7, 2016

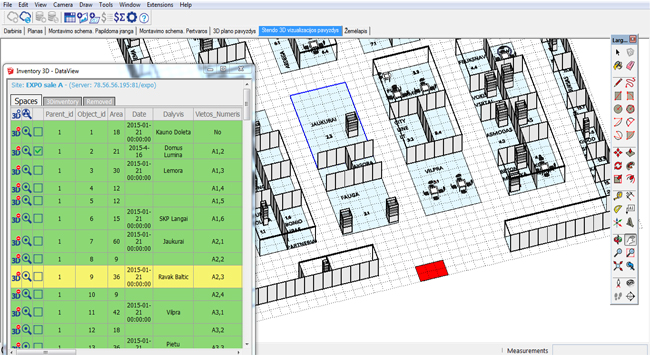
Inventory3D for Excel – The newest sketchup extension

Inventory3D for Excel is a useful sketchup extension that is compatible with SketchUp 2014, SketchUp 2015, SketchUp 2016.

Inventory3D for Excel facilitates the users to perorm graphical 3D 'inside-plan' inventory, design, bill-of-materials measurement and facilities maintenance with the use of Excel spreadsheets database.

Along with Inventory3D a sample model functioning with an Excel database and its tutorial are set up under '...SketchUp\Plugins\Luno_Inventory3D\luno_tutorial_example' folder Complete scale application of Inventory3D system incorporates 3D engineering, BOM estimates and mobile operations into corporate ERP, CRM.

Established system application models useful for telecom carriers, tower companies, photovoltaic systems providers, organizers of expo shops, furniture production companies and interior design.

To get more updates and quotation on:

• Inventory3D extension compatible with Oracle/MS SQL/MySQL/Sybase database integration
• Inventory3D.Mobile application well suited with Android, iOS, Windows Mobile
• Consolidation of Inventory3D system into corporate ERP, CRM and system customization.

Visit, http://www.inventory.best

Inventory3D is a multi-purpose tool that offers new scopes for floor planning and space management as well as locating more rapidly and more timely examination of ERP assets inside SketchUp. Inventory3D offers an easy to use but strong innovative tool that connects data records from objects indexed in a database to the graphical representation of the mentioned objects in the 3D space of SketchUp.

If you want to view any model in a diverse scenario, just save and export the SketchUp model, then load it up to suitable virtual reality applications, like Google Earth. It is also possible to view the model with Augmented Reality tools in the jobsite or import it to CAD in 2D or 3D.

Inventory3D for Excel – The newest sketchup extension
Image Courtesy: extensions.sketchup.com
~~~~~~~~~~~~~~~~~~~~~~~~
Published By
Rajib Dey
~~~~~~~~~~~~~~~~~~~~~~~~

Wednesday, July 6, 2016

How to use IES light in vray sketchup to a sketchup scene (pool)

This sketchup video briefly explains how to crate & apply IES light in Vray sketchup to a sketchup scene developed with Sketchup Pro 2016.

Process for applying IES Lights :-

• Click on the IES light icon to include a V-Ray IES light to any sketchup scene.

• In order to choose the location of the IES light, click on the scene

• Click right on the IES light then choose V-Ray for SketchUp and "Edit light"

• In order to load an IES file from the hard drive of your computer, click on "File"

• At this moment, the setting of the IES light can be modified to obtain the desirable effect. As for instance, while applying the Physical Camera, the power should be enhanced. The filter color option can also be adjusted to manage the color of the light.

• Render your scene.


~~~~~~~~~~~~~~~~~~~~~~~~
Published By
Rajib Dey
~~~~~~~~~~~~~~~~~~~~~~~~

Tuesday, July 5, 2016

Learn to generate IES lights in v-ray for sketchup

MasterTuts briefly demonstrates how to generate IES lights in V-ray for sketchup through this online sketchup video. One can learn how to model with stunning tips, configuration and rendering.

The VRay IES Light refers to a V-Ray specific light source plugin that is applied to produce physically perfect area lights. Besides, it can be utilized to load and render real-life light distribution profile files.

IES alias Illumination Engineering Society is a standard digital file in ASCII format that computes the dispersal of light alias the intensity of the light and its shape. Lamp manufacturers produce these files for simulating their lights perfectly. It now becomes possible to include IES profiles (for precision of light).

The icon is situated in the V-Ray main toolbar.


~~~~~~~~~~~~~~~~~~~~~~~~~~
Published By
Rajib Dey
~~~~~~~~~~~~~~~~~~~~~~~~~~

Monday, July 4, 2016

How to create an easy mirror with V-ray Sketchup

Edit Geek Studios come up with an exclusive sketchup tutorial that briefly shows how to create mirror for a material in Vray sketchup.

In order to create the material, go to V-ray material panel and right click for developing material standard and rename it. A reflection layer is also included to create the material.

It is suggested to set reflection in white and refraction to black as well as fresnal reflections are off.


~~~~~~~~~~~~~~~~~~~~~~~~
Published By
Rajib Dey
~~~~~~~~~~~~~~~~~~~~~~~~

Friday, July 1, 2016

How To Transmit Landscape & Interior Designs From Sketchup To Revit By Using Dynamo

It is possible to easily connect your landscape or interior designs in SketchUp with your model in Revit with the use of the Flux plugins (flux.io/downloads) for SketchUp and Dynamo. You can get rid of recreating your sketchup model in Revit manually.

Given below the detailed processes for executing the same :-

Step 1: Generate a point in SketchUp
Revit develops families on the basis of point coordinates. So, you have to connect a point in SketchUp containing each tree to identify its location.

In order to make a point in SketchUp, draw a circle and delete the center, then right click on the edge of the circle for choosing “Find Center.” A point will be visible at the midpoint of the circle. The circle edge can be removed and the point can be applied directly.

Step 2: Connect the point with the base of the tree
Suppose to have a slew of trees modeled as components in your SketchUp scene, edit one of the components to include a point to the base of the tree.

Step 3: Transmit your trees to Flux
Now that each tree contains a reference point at its base, dispatch the trees to Flux.

Step 4: Draw Out the points in the Flow
Inside the Flow, dispersed the points from the trees by maintaining the following philosophy. The Get block is arranged to Lacing > Longest. Put in the output into a new data key so that it can be accepted in Dynamo.

Step 5: Obtain the points in Dynamo
Apply the Flux nodes to acquire the points from Flux.

Step 6: Generate a Family Instance at each point
Supply the points directly to the “point” input of the FamilyInstance.ByPoint node. Choose a tree Family Type out of the dropdown menu of the Family Types node and supply it into the other input of the FamilyInstance.ByPoint node.

Your trees will be shown in Revit.

This workflow can be easily rectified for other Planting and Furniture families by choosing a dissimilar Family Type in the Dynamo dropdown menu.


How to transmit landscape & interior designs from sketchup to Revit by using Dynamo

~~~~~~~~~~~~~~~~~~~~~~~~
Published By
Rajib Dey
~~~~~~~~~~~~~~~~~~~~~~~~

How to optimize scale tool of sketchup – Some handy tips by Daniel Tal

Daniel Tal, a professional speaker and a registered landscape architect as well as a 3D modeling and visualization expert, has written an exclusive article on scale tool of sketchup. In this useful sketchup article, he introduces some sketchup tricks to optimize the functionalities of scale tool.

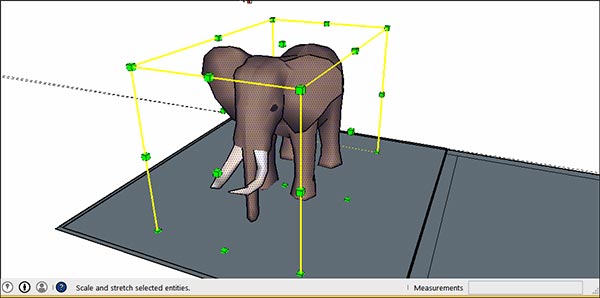
Sketchup’s scale tool facilitates the users to modify the size or proportions of any object.

Sometimes, it become difficult for the sketchup users to maintain the scaling reasonableness and this article will help the users to resolve the issue.

When the users try to resize geometry inside their model and preserve its proportions, they either apply the Tape Measure tool or the Scale tool.

If you face problem for handling the scale direction, the best method is to rearrange the drawing axes to your selection. To execute this, choose Tools > Axes from the menu bar. Using the Axes tool cursor, click corner as per your choice to line up the drawing axes. Then change the cursor in order that it snaps the edge to which your inferred axis will be lined up and click to approve the change. (The inference is red, green, or blue on the basis of the direction, the cursor is changed).

In this exclusive article, Daniel Tal mainly focuses on Back Edge, Modifying the Camera View, Scaling Single Surface.

To get the complete article, go through this link

scale tool sketchup

~~~~~~~~~~~~~~~~~~~~~~~~
Published By
Rajib Dey
~~~~~~~~~~~~~~~~~~~~~~~~