Showing posts with label sketchup texture. Show all posts

Thursday, June 7, 2018

How to resolve the issue while modeling in groups & components in sketchup

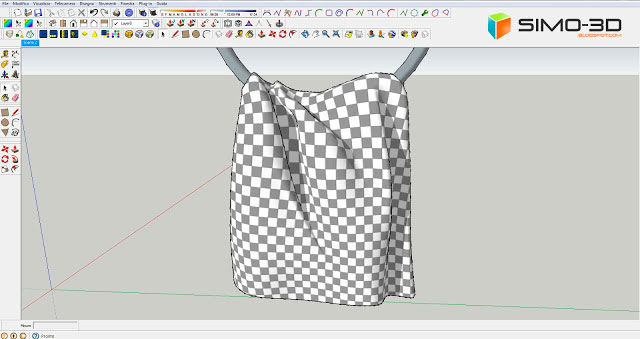
In this sketchup video tutorial, you will get some nice tricks which will be very helpful while modeling inside of groups and components.

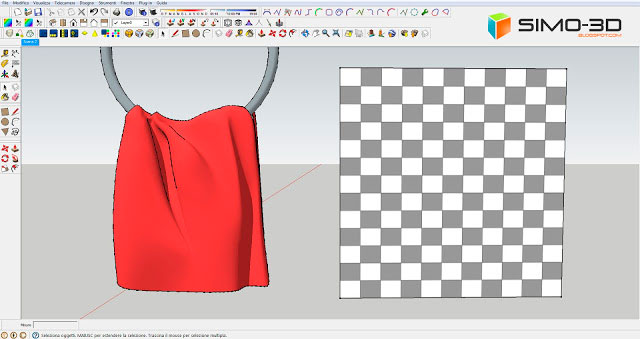
Groups and components play an important role to make the model clean and valid. But sometime, problem arises when the geometry is invisible at the time of editing when the remaining part of the model gets in your way. By applying these tricks, it is possible to get a clear view while editing components. It becomes easier to edit inside of a group or components.

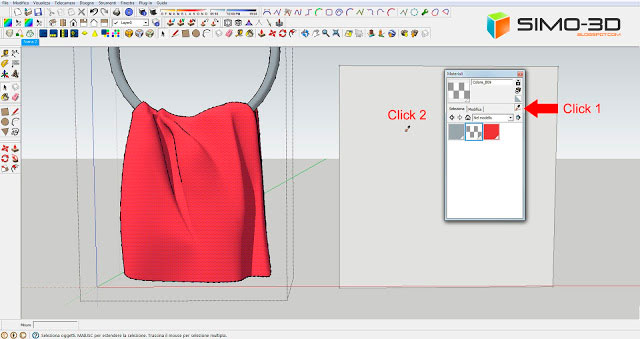
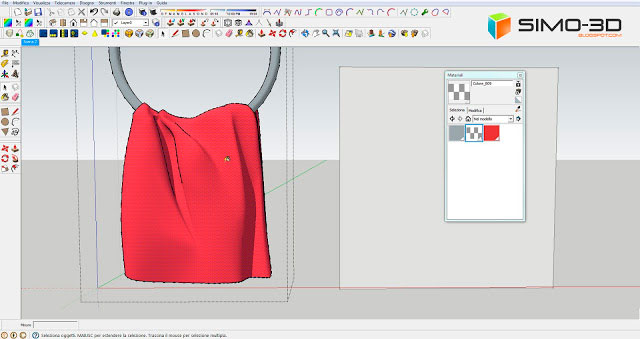
To start with, go to window tab and from the drop down menu click on modeling info option and then click on components tab. Here, couple sliders are available. Under editing display, there are two sliders namely Fade Similar Components and Fade Rest of Model. Under Component Axes, there is one check box called show component axes. Make necessary changes in the sliders to resolve the issue.

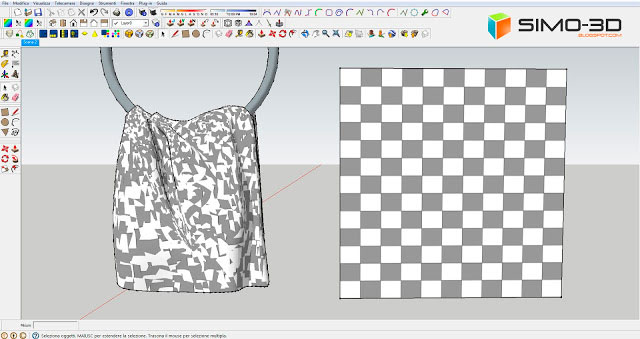
There is another option. Go to view menu and from drop down lists click on component edit and select either hide rest model or hide similar components.

To learn the tips in detail, go through the following video tutorial.

Video Source Sketchup


~~~~~~~~~~~~~~~~~~~~~~~~~~~
Published By
Rajib Dey
www.sketchup4architect.com
~~~~~~~~~~~~~~~~~~~~~~~~~~~

Sunday, January 1, 2017

How to Make Seamless Textures with Just 1 Click in V-Ray for SketchUp

This tutorial is presented by one of the most leading sketchup youtube cahannel Mastertuts.

In this lesson you will learn how to produce Seamless Practices in two realistic modes using Gimp and Photoshop. This is one of the techniques that have been used to generate images quickly, unlike the techniques used in the full V-Ray course for SketchUp where we probe a little deeper into creating complex custom textures like bricks and ceramic floors.


~~~~~~~~~~~~~~~~~~~~~~~~
Published By
Rajib Dey
~~~~~~~~~~~~~~~~~~~~~~~~

Thursday, December 1, 2016

GKWare Cab Maker, kitchen, vanity version v1.0.60 is launched

This exclusive sketchup plugin is used to generate cabinets for kitchens, vanities, bookcases, entertainment centers etc. There are reasonable sizes for the cabinets which can be used substantially. Besides, there exist different types of styles and textures to be selected. It is possible to include supplementary textures as per your choices. Cab Maker provides support for user definable profiles, cabinet libraries and handles.

Imperial (fractional inches or decimal inches) or metric (mm) Face Frame or Frameless. Overlay or Inset.

This sketchup plugin is compatible with Mac OS X, Windows, SU 7, SU 8, SU 2013, SU 2014, SU 2015, SU 2016 and SU2017 and available in English, French, German, Russian, Portuguese and United Kingdom.

A toolbar alias "GKWare CabMaker is available for the plugin. Beside, a submenu under the plugins menu called "GKWare CabMaker" and menu option below that known as "CabMaker" also exists. A hot key can be inserted to the menu item.

After resolving all the disputes, then press the "Enter" key or select "Create" from the "Cabinets" Tab. The mouse will be converted to a "Door" cursor. Click the exact position to implant the cabinet and drag to notify Cab Maker what direction is required for the cabinet to face. Base cabinets default to an elevation of 0 and Upper cabinets default to the height over the floor as specified on the "Defaults" Tab.

To get more updates, click on the following link sketchucation.com


~~~~~~~~~~~~~~~~~~~~~~~~
Published By
Rajib Dey
~~~~~~~~~~~~~~~~~~~~~~~~

Wednesday, August 17, 2016

How to produce a realistic wood flooring with vray for sketchup

MasterTuts presents another useful tutorial for sketchup vray users. The video briefly shows how to generate a pragmatic wood flooring with texture mappings in vray for sketchup.

Sometimes texture maps are used to produce different materials like stone, wood, painting, package, sticky back paper and textile. Texture can also enhance the quality of rendering. UV Dirt Mapping is another useful feature in vray for sketchup to manage the size and scale of the textures to describe the appearance of the dirty area.

Link to the normal map website cpetry.github.io/NormalMap-Online


~~~~~~~~~~~~~~~~~~~~~~~~
Published By
Rajib Dey
~~~~~~~~~~~~~~~~~~~~~~~~

Monday, May 2, 2016

How sketchup is used to generate curved road texture

Egypt Sketchup Community demonstrates an exclusive sketchup tutorial to teach the users how to generate curved road texture with sketchup. This video is made with Sketchup Pro 2016.

There are various sketchup plugins & other tools like 1001bits toolset, shape bender, follow me and keep, Bezierspline tool to make the process smooth.

Download Sketchup 2016 Pro


~~~~~~~~~~~~~~~~~~~~~~~~
Published By
Rajib Dey
~~~~~~~~~~~~~~~~~~~~~~~~

Sunday, March 13, 2016

How to design a forest home with sketchup

This useful speed build sketchup video provides deep insight into creating a forest home effortlessly.This sketchup tutorial is intended for beginner’s sketchup users. Various sketchup textures are used in developing the building model.


How to design a forest home with sketchup

We want to feature this page: sketchup4architect.com/sketchup-plugins

~~~~~~~~~~~~~~~~~~~~~~~~
Published By
Rajib Dey
~~~~~~~~~~~~~~~~~~~~~~~~

Thursday, March 26, 2015

Plugin for Sketchup : Sketchuv of Smustard

Plugin for Sketchup : Sketchuv of Smustard
In a previous post we saw how to map a texture on a model using spherical or cylindrical plug "UVTOOLS", but if our firm has a more complex shape like that of a tent, a blanket or a towel full of wrinkles?

In this case we need:

plugin "Sketch Uv "of Smustard that you can download HERE

and the program "Roadkill UV Tools" that you can download HERE

Nell 'bottom image 3d model of our next towel with the texture you want to apply.

Plugin for Sketchup : Sketchuv of Smustard

We click in the window of the material Sketchup, the instrument indicated by the red arrow then on texture (see image below), and finally.

Plugin for Sketchup : Sketchuv of Smustard

our towel (see image below).

Plugin for Sketchup : Sketchuv of Smustard

the result will be ... a pretty crap!

Plugin for Sketchup : Sketchuv of Smustard

After highlighting our model we click on the instrument of the plugin "Sketch Uv " depicted from the bottom on the toolbar then

Plugin for Sketchup : Sketchuv of Smustard

the model with the right mouse button and then on "Export UVs"

Plugin for Sketchup : Sketchuv of Smustard

This will open a window where we will see the file path that we are exporting.

Plugin for Sketchup : Sketchuv of Smustard

At this point we open the program "Roadkill UV Tools" we have previously installed and load the saved file.

Plugin for Sketchup : Sketchuv of Smustard

Press "E" and highlight the model in the left pane where we see what it looks like (in the right we will see it as if it was open) then press the "W" (with the "Alt" key pressed we can run with the mouse 3d model at will). Go to "File" in the toolbar and click on "Save".

Plugin for Sketchup : Sketchuv of Smustard

We close "Roadkill" and go back to Sketchup on our model, now with the right mouse button, click on "Import UVs".

Plugin for Sketchup : Sketchuv of Smustard

This is the result. Just only adjust the size of the texture directly in the material of Sketchup.

Plugin for Sketchup : Sketchuv of Smustard

With the plugin "SketchUV" We can also place a texture on a spherical, cylindrical or flat clicking on it with the right mouse button directly from the menu without using "Roadkill".

~~~~~~~~~~~~~~~~~~~~~
Published By
Rajib Dey
~~~~~~~~~~~~~~~~~~~~~

Wednesday, March 11, 2015

How to Import Sketchup Textures & Create Custom Materials

How to Import Sketchup Textures & Create Custom Materials
Sketchup features a pretty nice array of materials designed into it, however it most likely doesn’t have everything you’re searching for. During this sketchup tutorial, the user will learn the way to import your favorite sketchup textures and switch them into new materials that you simply will use in your models.

1. If you haven’t already, the primary factor you’re reaching to wish to try and do is use a sketchup texture to use.

SketchupTexture – A good place for a lot of free textures.

CGtextures – This won’t to be my go-to before user found SketchupTexture. These textures don't seem to be all super clean, however it’s actually associate in nursing awful library to seem through.

2. Click on the Paint Bucket tool. Doing this can appear the Materials window.

Sketchup features a pretty nice array of materials designed into it, however it most likely doesn’t have everything you’re searching for.
Image Courtesy: designerhacks.com


Alternatively, you'll be able to move to the Window tab and choose Materials from the drop-down list.

Sketchup features a pretty nice array of materials designed into it, however it most likely doesn’t have everything you’re searching for.
Image Courtesy: designerhacks.com


3. Within the Material window click the produce Material button.

Sketchup features a pretty nice array of materials designed into it, however it most likely doesn’t have everything you’re searching for.
Image Courtesy: designerhacks.com


4. The produce Material window can then pop-up. To import your sketchup textures, click the Import Image within the Texture Editor section. Once your texture image is uploaded, you’ll see a preview of it within the higher left corner. You’ll be able to use the colour Editor Section to regulate your material’s color while not having to edit it in Associate in nursing external program and re-import it. If the texture starts to look weird once for the victimization the colour picker, attempt checking the change choice within the Texture Editor section.

Change turns your texture to black and white so puts the colour overlay on prime. If you import your texture and it’s too tiny or large, use the feel Scale & Lock within the Texture Editor section to regulate the size of your sketchup texture.

When you mess things up unfortunate, there’s forever the Reset Color.

Sketchup features a pretty nice array of materials designed into it, however it most likely doesn’t have everything you’re searching for.
Image Courtesy: designerhacks.com


5. Click OK.

Your custom material can currently show up within the sketchup material library.

6. Select it, grab the Paint Bucket tool, and have at it

Sketchup features a pretty nice array of materials designed into it, however it most likely doesn’t have everything you’re searching for.
Image Courtesy: designerhacks.com


~~~~~~~~~~~~~~~~~~~~~
Published By
Rajib Dey
~~~~~~~~~~~~~~~~~~~~~

Wednesday, December 31, 2014

New 3d challenge Arch-Viz Modern Office Building Render Contest by Sketchup Texture

Sketchup Texture is organizing its latest 3D challenge Arch-Viz Modern Office Building Render Contest for December 2014 – January 2015. This 3d challenge is based on a 3d model of a modern office building that is designed, modeled and rendered by Quốc Hữu Trần, a young architect from Vietnam.

Modern Office Building refers to a project that aptly depicts the architectural trends of current years which involve cement, metal armatures, transparency, glass windows "plein air" effect, simple geometric shapes through a stylish optical lightness.

Synopsis: Each contestant has to produce a digital image for making an environment with the help of the model provided. The images can be created with any scene, either: natural, industrial, urban, ecological realistic or imaginary. You have to generate the right surroundings focusing on the best features of this modern office building.

You are allowed to restore all the textures as per your choice, but not allowed to modify the appearance as well as the architectural structure of the project. You are eligible to include any personal detail vegetation, background, peoples, creating atmosphere you want, so as to provide a distinctive mark of your creativity.

Guidelines: Each contestant has to abide by the following rules and regulations:-
  • All members belonging to sketchup texture’s Facebook public Group 3D Challenge, are eligible to take part by registering at the site SketchupTexture Club . Registration is free.
  • Any type of software and rendering engine can be used in the competition.
  • Only uploaded Works to the site of sketchup texture club are considered as valid. The final renders can only be uploaded to the site.
  • The contestants can also upload their "work in progress" inside the group 3D Challenge, facilitating all to admire the work process behind the image accordingly transforming the challenge into a great platform for confrontation and learning for all.
  • At the time of uploading your 3d artwork inside the group 3D Challenge, you should specify what rendering engine has been used.
  • In case your "work in progress " is published in another group or social network, you must label: SKT 3D challenge arch-viz international render contest.
  • Each contestant can render maximum 3 final images.
  • Minimum image resolution is 1600 x 900 or 900 x 1600. You are not allowed to upload any image to the site which contains a lower resolution by default.
  • Each art work should contain the logo ‘3D CHALLENGE’ that was included in the download.
  • The last date for submitting entries is Saturday January 31, 2015 at midnight Italian time.
Prizes: To each competitor will receive only one prize-
First prize : 1000 U.S. dollars
Second prize : 500 U.S. dollars
Third prize : 250 U.S. dollars
2 awards (special mention) : 150 U.S. dollars for each one

SPECIAL MENTION: The sponsors solely take the decision for choosing 2 works amongst all the competitors for the best creativity and visual impact and each one, will be rewarded with a prize of 150 US dollars.


For getting more updates, visit www.sketchuptextureclub.com

New 3d challenge Arch-Viz Modern Office Building  Render Contest by Sketchup Texture

~~~~~~~~~~~~~~~~~~~~~
Published By
Rajib Dey
~~~~~~~~~~~~~~~~~~~~~

Wednesday, January 15, 2014

Some useful tips for sketchup modelers while creating a sketchup model

Tip 1: While creating models for a small detailed object as for instance a light bulb filament or zipper pull, it becomes very difficult for sketchup users to find the perfect geometry or it becomes very complicated to maneuver the object inside the larger model.

To get rid of such issues, just follow these steps - Initially model the object at a bigger range like fifteen times the real scale. After completing it, create a group of the object and reduce it 15 times to the actual scale.

Tip 2: While dealing with an outsized site plan, the sketchup users often face problem to control sketchup models on screen as the models become unmanageable. There are several methods to cope up with the situation - keep away from multifaceted visual styles, turning off shadows as well as concealing groups and components on layers at the time of working. But if the sketchup users hide particular objects from view, they may not be able to complete the model successfully. So the users should follow some useful tips to maintain the objects to be detectable on screen and at the same time navigate the model as actively as per their requirements.


As for example the sketchup user deals with a site model and it necessitates that the users can view the exact location of numerous trees while starting the modeling process. If the user applies even fairly comprehensive 3d trees, the modeling process becomes very slower. Model an uncomplicated, low-polygon “popsicle" tree component and utilize that like a placeholder for the trees. Apply this low-poly model as a proxy and position it toward the exact location of the trees.

Once all the modeling process will be completed and scenes are placed, just right click on one of the popsicle tree components and opt for “reload” to explore more detailed 3d tree that fits in the final view. And if the detailed tree is already positioned on the site plan someplace in the file, click on the Components dialogue and select the home icon for viewing the list of components available in the existing file. With any "popsicle” tree Component selected, get the list within the detailed tree model, right-click over it and choose “Replace Selected”. In this case, just ensure that the component axis is identical for both proxy and detailed model.

The sketchup users can apply these tips for any kind of circumstances.

~~~~~~~~~~~~~~~~~~~~
Published by Tuhin Maity
Sketchup Designer
http://www.sketchup4architect.com/
(Most efficient CAD Drafting Services (raster to vector) using CAD, MicroStation, VectorWorks, etc)

Monday, July 2, 2012

Sketchup Material Library -Free Download

Sketchup Materials are collection of texture for your model. It is essential paints that have a color. Sketchup Material Library contains different wood texture, wall texture, sand texture and metal texture. On the basis of rating and review all the impassive sketchup material have been enlisted here.


One can easily create Sketchup material from image files like .jpg, .gif using the material browser. There are few Sketchup Plugin which already comes with the product like IRender and RPS 3D PDF.


The different collection of texture in Sketchup Material library has much standard collection of bricks, lava, sky, stars, burn wood, aluminum, walls and much more.