Wednesday, April 30, 2014

Debugging SketchUp Extensions Now Easier

Debugging is now no more a trouble for SketchUp Ruby extension developers. With a Ruby Debugger for SketchUp 2014, debugging has got easier.

The Ruby community enjoys debugging with Integrated Development Environments (IDE) like RubyMine, NetBeans and Aptana RadRails which usually rely on different gems to be installed for remote debugging. Getting these gems to work within SketchUp’s embedded Ruby is usually difficult. But now, at 3D Basecamp 2014, an open source Ruby debugger framework has been announced which currently supports Windows only but it is expected to support Mac soon. Installing it is very simple:
  • Copy SURubyDebugger.dll from GitHub into the SketchUp installation directory: C:\Program Files (x86)\SketchUp\SketchUp 2014.
To launch SketchUp with the following command line arguments must be followed:
  • SketchUp.exe -rdebug "ide port=1234"
  • The port must match the remote debugger port setting configured in the IDE.
  • SketchUp will start up and appear to be frozen while waiting for the debugger to show up.
  • Launch remote debugging in the IDE, SketchUp should continue running. It is required to observe breakpoints hit when Ruby code execution attains the specified lines.
If the user is not familiar with installing and configuring the IDEs, some step-by-step instructions can be attained from the GitHub repository wiki. The source code for this project hosted under our GitHub account is https://github.com/SketchUp/sketchup-ruby-debugger.

Debugging SketchUp Extensions Now Easier  

~~~~~~~~~~~~~~~~~~~~~~~
Published By
Arka Roy
www.sketchup-ur-space.com
~~~~~~~~~~~~~~~~~~~~~~~ 


Monday, April 28, 2014

SketchUp Plugins 2014


SketchUp 2014 was released with various new features and offers infinite 3D models that are easier to find and use. Besides, users can avail a wide array of time-saving tools for documentation. The core tools of SketchUp that comprise of plugins, groups, components, the Ruby API, enables users to use the data embedded in models.

SketchUp plugins 2014 are user friendly and helps in simplifying the work procedure of designers, architects and other SketchUp users. The new, improved SketchUp 2014 comes with an enhanced 3D Warehouse, where if a user is looking for a “sofa”, h can find not less than 10,000 sofa models to select from. The new 3D Warehouse includes new upload options, increased file size limits, and a refreshed UI. The new SketchUp Pro is considered as a highly capable and inclusive information modeler.

For better SketchUp Plugin compatibility, the API has been brought up to Ruby 2.0 standards that help developers by offering a platform to create new SketchUp tools. The plugins that might not work in SketchUp 2014 have been updated to be compatible with 2014. It is suggested that the below mentioned steps are followed while upgrading to SketchUp 2014 from previous versions to ensure high quality results:
  • Installing 2014 compatible extension via extension warehouse.
  • Installing 2014 non-compatible extension via extension warehouse.
  • Installing via SU preferences (for rbz files which are found outside of extension warehouse).
  • Finding out if there are any 2014 updates to the extensions.
  • Moving an installed extension from an older version of SketchUp manually, if no .rbz is available. This is not a much preferred method and should be avoided if possible.
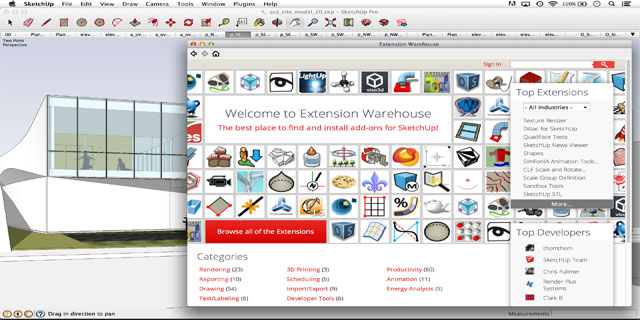
It is important to check out the Extension Warehouse and ensure if the most preferred plugin is already compatible to SketchUp 2014. Extensions in the “My Extensions” page are grouped with 2014 compatible extensions together at the top of the installed plugins list. User can also install all the 2014 compatible plugins with the “Install All” button. Individual plugin pages also show if that plugin is 2014 compatible. User should be careful not to transfer outdated and unused plugins and not to overwrite plugins that are already installed via the Extension Warehouse.

It is possible that user might have to open SketchUp after copying each plugin to ensure that the plugin does not cause any Load Errors on startup. In case a plugin causes Load Errors while SketchUp is starting, it is required to contact the plugin developer for additional assistance. Some of the major new and improved SketchUp plugins 2014 are listed below:

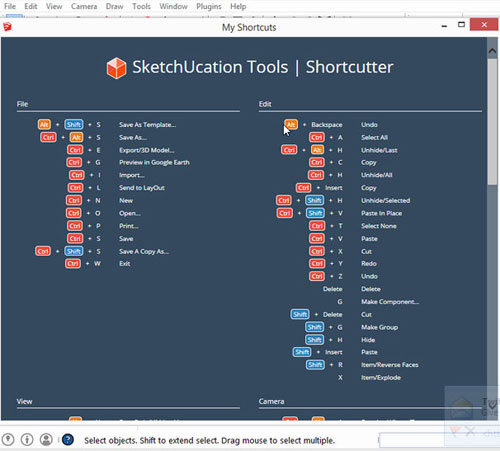
Shortcutter Beta v0.3.1: Shortcutter for SketchUp is a simple utility that displays all the assigned shortcuts of the user in a nice web dialog. It includes Modifier Keys that are are color coded for easy identification. Version 0.3.1 fixes several MAC issues. It is important to note Shortcutter requires SketchUcation Tools to run as its addon. When it is first installed, the SketchUp must be restarted, and the user should also be on-line to use it, because it uses files hosted on SketchUcation to display the UI. It is currently SU8, SU2013 and SU2014 compatible.

Video and download link: http://sketchucation.com/forums/viewtopic.php?p=520206#p520206
 
Shortcutter for SketchUp 


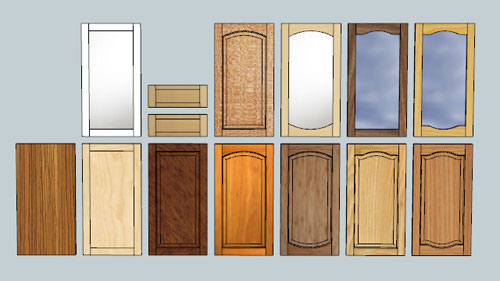
GKWare Door Maker Free / Pro v1.0.24: This plugin creates Cabinet doors for all types of cabinets of any reasonable size in a variety of styles and textures. The new Door Maker Pro adds 4 more Styles, user definable profiles and door handles. There are 7 styles available that are plain, shaker, square, arch, cathedral, double arch and double cathedral. The Pro version adds 4 more styles of multi panel doors which are square square, arch square, cathedral square and three panel square. And about 15 wood grain textures to select from. Adding additional textures is also possible. Besides, the new Door Maker Pro supports user definable profiles. Available in different languages like English, French, Russian, Chinese(traditional), Chinese (simplified), Spanish, Italian and German, the plugin is compatible to Mac OS X, Windows, SU 7, SU 8, SU 2013, SU 2014.

Video link: http://sketchucation.com/plugin/824-gkware_doormaker

GKWare Door Maker for SketchUp 


S4u ScaleTool v2.0.0: With S4u ScaleTool user can select groups or components for scale or push/pull dimension(x,y,z axis). Scale Fix dimension(x,y,z axis) and resetting scale is also possible. 

Video link: http://sketchucation.com/forums/viewtopic.php?f=323&t=57067

Add Layer v1.1.0: Add Layer plugin is available with a new feature that modifies layers. Use can add a new layer and select its behavior. Add Layer brings up a dialog to let you select the name and visibility of the new Layer. User must press Apply or else no changes to the selected Layer will be made. The dialog is not updated to reflect the selected Layer's properties.

CL3VER v2.0.0: CL3VER is the first web-based platform that enables architects, 3D designers, visualization studios and agencies to develop interactive 3D presentations that works in the browser without the need to install or maintain any software. This plugin can be used for the everyday customer speak to allow them to see buildings, products, and any 3D project from different angles, inside or outside, and view and compare alternative designs.

Download and video link: http://extensions.sketchup.com/en/content/cl3ver

SightSpace View v1.2: It is possible to turn any SketchUp model into a mobile Augmented Reality experience with SightSpace View.

Comments vv1.5.2: With the Comments plugin, users can add comments to their file. The users must open a window which allows them to add text including comments, history, etc. to their file. Besides, users can link a comment to a scene: when clicking on a scene, the tab linked appears. The plugin comes with translation in English, French, Portuguese, Spanish and German. Other languages can also be added if required.

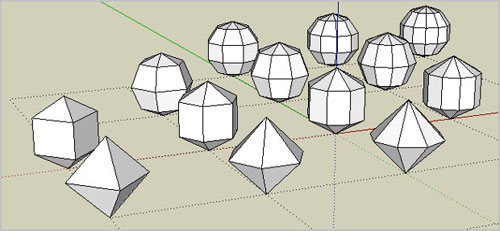
Polyhedra v1.12: Polyhedra plugin helps to draw the five regular Platonic Solids, with size specified either as the length of a side, or the radius (of a circumscribed sphere). With Right-click/Edit [Shape] the size can be changed. User can also delete and redraw to change between side and radius for size. The plugin works with parametric.rb (included in .rbz file).

Polyhedra plugin for SketchUp 


SU Draw Parametric Shapes v2.1: This plugin enables Sketchup users to draw and subsequently edit a range of common geometric shapes by specifying in a dialogue box their size and (where relevant) the number of segments to use when drawing shapes based on circles, polygons, or helix.

Layers Panel v1.0.6: Designed to be very similar to Photoshop's layers panel, this plugin adds the ability to group layers, sort them, hide/collapse groups, lock them, and choose layers to render. Layers Panel replaces SketchUp's layers window and reproduces every feature of it, except layer colors.

SketchUcation Plugin Store v2.6.0: With this plugin user can find, AutoInstall, manage plugins & extensions, all inside SketchUp. It also helps to access over 800 Plugins.

Super Drape v3.2: This plugin helps to drape one group onto another group, and copy materials from within the 1st group into the 2nd group.

3DArcStudio Tree Maker v1.06.04: Creating Sketchup 3D Trees and Plants is easy and simple with this SketchUp plugin. Besides, it also includes predifined tree templates and with all parameters customizable.

LaunchUp v1.1.4: LaunchUp offers a quick launcher to search and execute features of SketchUp, including plugins that have been installed.

3D Print Service v2.0.0: Uploading models to i.Materialise and getting it printed in a range of colours and materials is easy with this plugin.

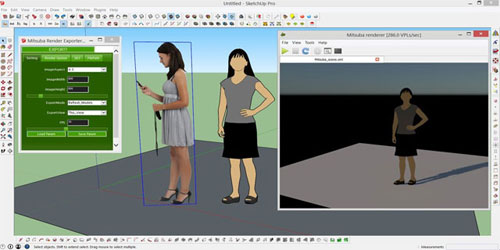
MITSUBA Render Exporter v1.2.9 (20140330): User can now export tool from SketchUp to Mitsuba render. It is important to note that this plugin works only with Mitsuba render.

MITSUBA Render Exporter 


Video link: http://sketchucation.com/forums/viewtopic.php?p=512606#p512606

2D Tools v6.3: The 2D Tools is a broad suite of drawing tools/editing for working in '2D' which is now compatible with MAC. 2D Tools works with deBabelizer.rb which is auto-installed.

Video link: http://sketchucation.com/plugin/702-2dtools

Face2Frame v4: Creates stud wall from a face with added options for displaying graphical and statistical elements.

Rotated Box v1.2.2: Create a box in four clicks and define its rotation.

Generate Ceiling Grid v7: Generate Ceiling Grid plugin supports developing a suspended ceiling "T" grid and tiles.

~~~~~~~~~~~~~~~~~~~~~~~
Published By
Arka Roy
www.sketchup-ur-space.com
~~~~~~~~~~~~~~~~~~~~~~~
Tips to Install Plugins for SketchUp

If you want to enhance the functionality of the SketchUp, then get downloading plugins! Plugins, also called ‘Ruby Scripts’, are the part of ruby code. Keep in mind their purpose. You will have to first decide on which plugins you want to download and integrate with SketchUp. After choosing the right plugin, go to the relevant web page for that particular plugin to download it.

On every plugin page, there is a link to download the plugin, for example: ‘To Download the file Click Here’. There will be a .rb file, and by right clicking on it you will get the message ‘Save Link As’ or ‘Save Target As’. This message is for saving the plugin to your computer. After saving the file, name the file in the ‘Save’ menu. You may change the name of the plugin according to your wish. But never change the extension which is .rb for all SketchUp plugins.

You can find the default location of the Plugins folder on a Windows computer by double-clicking "My Computer" and choosing "Local Disk," "Program Files," "Google," "Google SketchUp 7" and "Plugins." 

The default location of the folder on a Mac can be found by clicking "Macintosh HD," "Library," "Application Support," "Google SketchUp 7" and "SketchUp."

For SketchUp 6 and higher on PCs, the path will be something like:
C:\Program Files\Google\Google SketchUp 6\Plugins\
(replace the '6' with the corresponding version of SketchUp you are using)
For SketchUp 6 and higher on Macs, the path will be something like:
Macintosh HD/Library/Application Support/Google SketchUp 6/SketchUp/ 
(replace the '6' with the corresponding version of SketchUp you are using)
After saving the file to your computer move that file into the SketchUp Plugins folder. Once the script is saved in the correct location, it will load automatically the next time you start SketchUp.

TIP: When downloading a plugin .zip file, save it to your Desktop or My Documents folder, or another convenient location.  Then open the .zip file and drag the entire contents to your Plugins folder.  The reason for this is that .zip files often have subfolders which are essential for the plugins to work correctly.
After completing the installation, click on ‘Plugins’ or the ‘Tool’ menu to locate and use your plugins in SketchUp. Many SketchUp plugin developers prefer to put their plugins into the Tools ‘Menu’ instead of ‘Plugins’ menu like Joint Push Pull, Make Faces and many other Plugins. So you have to check all the menus to find out the new features. You will find some plugins like PageExIm.rb in the ‘View’ menu. Sometimes you have to activate them under ‘Window’ then ’Preferences’ and finally ‘Extensions’.

To discover which ‘Menu’ the plugin may appear in, you have to open the zipped .rb script file you downloaded. There usually is an extra file with the description of it and installation instructions (sometimes even a pdf!) which some plugin developers include.

Tips to Install Plugins for SketchUp

~~~~~~~~~~~~~~~~~~~~~~~
Published By
Arka Roy
www.sketchup-ur-space.com
~~~~~~~~~~~~~~~~~~~~~~~

Friday, April 25, 2014

Wednesday, April 23, 2014

Tuesday, April 22, 2014

Esri's CityEngine eases urban planning mapmaking in 3-D

Geospatial tech leader Esri released an updated version of its CityEngine modeling software that is used to generate three-dimensional designs for planning urban environments.

The software supports decision-making surrounding civic planning and design by making it easier to model architectural plans or changes in urban settings.

The software helps create detailed large-scale 3-D city models with a few clicks of the mouse instead of the work-intensive method of object creation and manual placement, Esri said.

Using a “procedural modeling approach,” which automatically generates maps based on a predefined set of rules, planners can explore how changes in the rules or “grammars” might affect or set up new design possibilities.

The latest version, CityEngine 2013, includes a software developer kit (SDK) that enables developers to use CityEngine to create 3-D urban applications using popular 3-D design applications such as AutoDesk Maya, 3dss Max and SketchUp.

The software also has a feature that lets users rapidly import OpenStreetMap data into a project. OpenStreetMap is an open, collaborative project to create a free editable map of the world by gathering mostly free, crowdsourced data.

Another feature in the new version of CityEngine helps developers easily share their work with other users of ArcGIS, Esri’s flagship geospatial information system technology.

Esri's CityEngine eases urban planning mapmaking in 3-D

~~~~~~~~~~~~~~~~~~~~~~~
Published By 
Arka Roy
www.sketchup-ur-space.com
~~~~~~~~~~~~~~~~~~~~~~~

Monday, April 21, 2014

Download PDF Documents to sharpen your 3D Modelling skill

We have arranged some useful links which focuses on various courses and applications of sketchup. These links are presented in PDF format. The sketchup users can easily download these PDF documents and sharpen their 3d modeling skills to a great extent.

The readers can get familiar with Rapid prototyping and 3D printing technology as well as diversified workshops, sketchup projects etc.


SketchUp Pro Free License - University of Washington

Download Now

COURSE OUTLINE GOOGLE SKETCHUP - School of Visual Concepts

Download Now

Google SketchUp Workshop - UMD

Download Now

John Winkel - WINKEL139

Download Now

GOOGLE SKETCHUP: 3D Design Across The Curriculum

Download Now
3D Building Models and an Example for Use of Photorealistic Models in Geomatics

Download Now


Introduction: What is Google Earth

Download Now

Google Guide: 29 Secrets for Using Google in the Classroom

Download Now

Computer Applications in Historic Preservation HISP 345-01

Download Now

Rapid Prototyping - Washington

Download Now

Download PDF Documents to sharpen your 3D Modelling skill

~~~~~~~~~~~~~~~~~~~~
Published By
Arka Roy
www.sketchup4architect.com
~~~~~~~~~~~~~~~~~~~~


Thursday, April 17, 2014

Tips on Building a perfect Garden Shed


Building a perfect garden shed that will enhance the beauty of your garden is a tough job. The reason is that the shed should match with the tuning of your garden as well as not doing any harm to the plants nearby. The design of the shed must add beauty to your garden. So it is a real headache to choose the right type of garden shed. But don’t forget, you are now 
living in the era of cutting-edge technology. So there are lots of gadgets to help you on this mission. Among many designing programs, Google Sketchup stands tall in the league. It is really exciting to have a fore-view of your garden shed just as it will be once built and the 3D technology of Google Sketchup programming has made this possible.

First of all, you have to select a design as per your choice. You may surf on Internet or simply go to the Google Warehouse to get up to date as well as classy designs. While choosing the design always keep in mind that the shed must have usability and not a fashion statement only. After choosing your design you just have to use some features within Google Sketchup to make a virtual shed for your garden on your computer screen.

Now you can draw your garden and along with this your preferred shed design. You can easily draw this with the help of the tools like Edges and Faces of Google Sketchup. Once you are satisfied with the design, you can make the design into 3D form by the tool Push/Pull in a few seconds. By adding a new dimension in to your drawing, you can have a proper idea about how your garden shed will look like after completion. After visualization of 3D model of your future shed, you can decide whether you want this type of shed or something different.
After figuring out the 3D model, you can add colors as per your preference on the shed. You can use the Paint option to choose colors from a vast color palette. Simple coloring looks good if painted with creativity. After completing your shed, you can see the design from all angles and make addition or alteration on that design using Sketchup. You also can add some beautiful furniture from Google Warehouse like a deck chair or a nice swinging chair with it. Moreover, you can arrange 3D plants around the shed from the catalog of Google Sketchup. 
These steps will allow you to gain a vivid idea about your garden shed. And this way Sketchup definitely makes your work easier and cost effective. This will also lessen the chance of architectural mistake in the shed. So, with the assistance from Google Sketchup, you can have a beautifully designed garden shed without investing much money and efforts.

Tips on Building a perfect Garden Shed 

~~~~~~~~~~~~~~~~~~~~~
Published By
Arka Roy
www.sketchup-ur-space.com
~~~~~~~~~~~~~~~~~~~~~

Enhance your design skill with Sketchup and Photoshop


Photoshop is a powerful application on its own merits. Its power, however, can be significantly increased by using it in tandem with another application like Illustrator, Cinema 4D, or in this case, Google SketchUp. Today, we will create some cool 3D text using this free architectural application.

To create a daytime rendering by exporting images from SketchUp to Photoshop is a wonderful trick. This means no external rendering programs are needed. This rendering is not meant to be realistic, but instead, provide an option for quick artistic renderings without the "SketchUp" look.

It explores the idea of Ambient Occlusion shading to easily and quickly add realism to SketchUp images via Photoshop. This is done without ever using a rendering engine such as MAX or VRAY. The idea behind Ambient Occlusion is basically a really fast way of adding realism to a rendering by adding shadows in corners where geometry meets. You will often see me adding this affect in a lot of the videos may be created using the BURN tool in Photoshop. This video demonstrates how easy it is to get a really cool effect using just images exported from SketchUp, and a few tools from Photoshop.

If any of you have watched the Kerkythea clay model tutorial, you will notice that you get a similar look. The rendering engine is doing all of the work for you. The idea behind this new video is to show the power of the BURN tool in Photoshop, and how it can be applied to architectural illustrations. If there isn’t a lot of complex geometry in the image (in my case an aerial view of my design) than this method serves as an option to bypass using a rendering engine such as Kerkythea altogether and still get a really nice looking final result. Also, if your final illustration is looking a little flat, its an easy way to add a little punch to it.

Now we can have a discussion on how to merge SketchUp with Photoshop:

It explores the idea of Ambient Occlusion shading to easily and quickly add realism to SketchUp images via Photoshop. This is done without ever using a rendering engine such as MAX or VRAY. The idea behind Ambient Occlusion is basically a really fast way of adding realism to a rendering by adding shadows in corners where geometry meets. You will often see me adding this affect in a lot of the videos I created using the BURN tool in Photoshop. This video demonstrates how easy it is to get a really cool effect using just images exported from SketchUp, and a few tools from Photoshop.

If any of you have watched my Kerkythea clay model tutorial, you will notice that you get a similar look. The rendering engine is doing all of the work for you. The idea behind this new video is to show the power of the BURN tool in Photoshop, and how it can be applied to architectural illustrations. If there isn’t a lot of complex geometry in the image than this method serves as an option to bypass using a rendering engine such as Kerkythea altogether and still get a really nice looking final result. Also, if your final illustration is looking a little flat, its an easy way to add a little punch to it.

As the title implies, this architecture illustration tutorial doesn't use a rendering engine. There are few other tutorials in the past that don't involve a rendering program, however this tutorial does things a little differently, and in less time. You will probably notice some similarities to the Ambient Occlusion tutorial which was posted a while back. After making the ambient occlusion tutorial that could take advantage of the export options of Sketchup, and use the line work of the model to generate the shading. Because of this, the process is extremely streamlined and can be done in minutes.

Here's how it works.
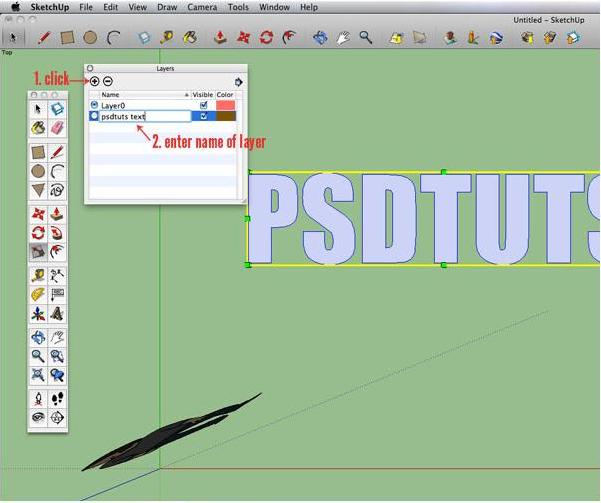
Step 1
Begin by downloading the free version of Google Sketchup here. When you first open Sketchup, you’ll be prompted with a dialog box asking what style to begin with. I have chosen the simple style, with blue sky and green ‘grass’ (this is completely your preference, it will have no effect on your final outcome). Open the main tool box by clicking View > Tool Palettes > Large Tool Set. There are a few tools we’ll make a lot of use of, so it’s helpful to familiarize yourself with their shortcuts. These are the same on Windows and Mac: select: (spacebar), push/pull: (p), offset: (f), orbit: (o), pan: (h), zoom: scroll up or down, or (z)


~~~~~~~~~~~~~~~~~~~~
Published By
Arka Roy
www.sketchup-ur-space.com
~~~~~~~~~~~~~~~~~~~~


Tuesday, April 15, 2014

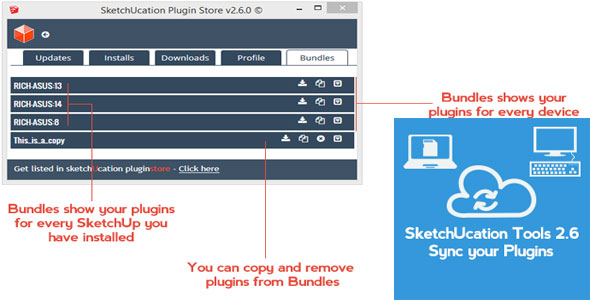
SketchUcation Tools 2.6 released


SketchUcation Tools 2.6 introduces faster downloads, up to 4x, device syncing of plugins, new API for plugin devs and tons of bugfixes, tweaks and improvements.

You NEED to update as this is the most exciting release to date. Keep all your devices plugins in sync across different version of SketchUp!

Yep....running v8 and need v2014 to have the same plugins? Simple one click solution to get everything in sync.

Bundles are a new features in SketchUcation Tools 2.6 that allow you to sync your plugin and extensions across multiple devices and SketchUp versions.

SketchUcation now stores your install setup to the cloud and allows you to retrieve it when you need it! If you get a new device or are upgrading your current version of SketchUp Bundles make it as easy as possible to get you up and running in an instant!

Get it!
SketchUcation Tools 2.6 released


~~~~~~~~~~~~~~~~~~~~~~~
Published By
Arka Roy
www.sketchup-ur-space.com
~~~~~~~~~~~~~~~~~~~~~~~


Sunday, April 13, 2014

DRS Releases Thermal Camera 3D Models Via Autodesk Web Service

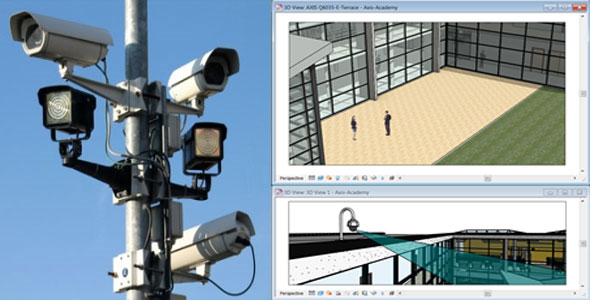
DRS Technologies has unveiled a series of digital building product models of its infrared camera technology through an Autodesk web application service.

Autodesk’s Seek online platform works to help construction architects and engineers view three-dimensional building information modeling data on DRS’ WatchMaster thermal cameras, DRS said Thursday.

The WatchMaster BIM content is designed to allow designers to apply camera models into a computer-aided design layout by using Autodesk software, according to DRS.
DRS camera systems include Internet Protocol and analog connectivity features and are built to operate with other surveillance and security devices.

The company will display its WatchMaster IR camera portfolio during the ongoing ISC West 
 exhibition at the Sands Convention Center in Las Vegas.
DRS Releases Thermal Camera 3D Models Via Autodesk Web Service   
~~~~~~~~~~~~~~~~~~~~~~~
Published By 
Arka Roy
www.sketch-ur-space.com
~~~~~~~~~~~~~~~~~~~~~~~
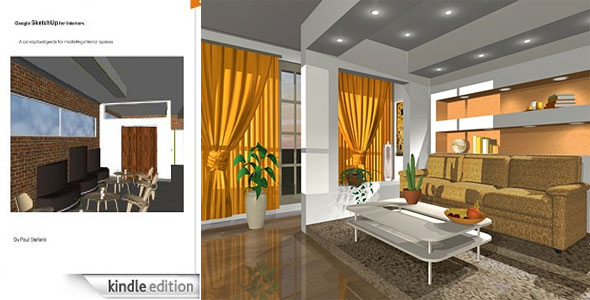
Google SketchUp for Interiors: A conceptual guide for modeling i – Paul Stefanik

Google SketchUp for Interiors: A conceptual guide for modeling i write by very good author that named Paul Stefanik are free for download now, many version are offered, PDF version, TXT version and kindle version, if you are currenlty looking for this book of pdf version, you can download it from our site, the only site that oofer free download of this book, free download of kindle books, google books, free pdf books, pdf ebooks, e-books, pdf files or pdf ebooks, enjoy!
Google SketchUp for Interiors: A conceptual guide for modeling i – Paul Stefanik 

~~~~~~~~~~~~~~~~~~~~~~
Published By
Arka Roy
www.sketchup-ur-space.com
~~~~~~~~~~~~~~~~~~~~~~

Friday, April 11, 2014

3D Design Software – Trimble SketchUp #3DThursday #3DPrinting

This week, I am sharing about 3D design software that I recommend for those who want to get started with design and modeling for 3D printing.

Thanks to the efforts of Thingiverse superusers like Michael “Skimbal” Curry, Trimble SketchUp (formerly Google SketchUp) has been the tool of choice for some of the most popular items from desktop 3D Printing. (See the Gothic Cathedral Playset below.)
With its intuitive “direct modeling” style of control (you will see ideas like these explored in 123D Design) and powerful free version, new 3D designers world over often get started in the craft using this tool. This app has a training system built right into the software itself, to quickly introduce new users.

Be mindful that the output from SketchUp was initially designed for rendering only — your model might need repair before it is ready for printing. There are a number of tutorials online to help you make sure your model is manifold when you export it.

3D Design Software – Trimble SketchUp

~~~~~~~~~~~~~~~~~~~~~~~
Published By
Arka Roy
www.sketchup-ur-space.com
~~~~~~~~~~~~~~~~~~~~~~~~