SketchUp is expert in creating variant tools for handling the shapes and designs smoothly for the designers and architects. This time they have launched Place Shapes Toolbar. It can be applied in the different versions of SketchUP. In this article the work of this toolbar is described. The readers can assume this toolbar by reading various descriptions of the tool. It is easy and good for creating designs for both big and small fields. Its use and tips are also given here. Let’s have a check on it. There is also a link is given for videos and tutorials.
Place Shapes Toolbar is a new Sketchup plugin invented by Alex Schreyer. This brand new Sketchup plugin supports different versions of Sketchup like SketchUp 8, SketchUp 2013, SketchUp 2014, SketchUp 2015, SketchUp 2016 and SketchUp 2017.
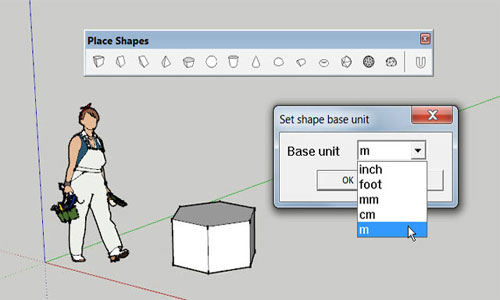
This extension has a toolbar with some menu items that is used for setting simply different common 3D shapes or geometric primitives. SketchUp’s navigate tools allow users for creating any shapes without too much effort. With the use of this toolbar, the users can accomplish fast “solid-based” modeling for dealing with added and subtracted primitives who can produce a precisely watertight object that is ideal for 3D printing. Prior for changing the shapes, anyone can opt for a general unit like foot, inch, mm, cm, m etc.
This toolbar is a good starter shape set for the new users and the kids who want to play in 3D modeling but don’t have any interest to learn.
Usage: At first show to the “Place Shapes” toolbar and click on the shape that has to be placed. Or the other way is to apply the Draw menu’s items. Most of the shapes will adjust themselves in the basis of the underlying geometry. Arranging various shapes is also possible by going to the select tool or pressing the space bar or the ESC key after finishing.
After placing a shape, move and scale tools can be applied for moving and functioning on the shape. In the case of failing work of any shape as per the requirement right click on it and choose ‘unglue’. In the case of placing any shapes, they all stick to the elementary geometry. Exploding a shape to work with its raw geometry is also possible only by applying the right-click menu. While selecting the base unit from the dialog, all the following placements will get that unit. The items that are already arranged don’t need scaling. This is helpful for modeling small stuff like 3D printing or large stuff like buildings.
Tips for working on this tool:
a. At first turn on the X-Ray face style to enable snapping for the hidden points.
b. Go to View>Hidden Lines to allow the hidden lines visible for more precise snapping.
c. These shapes fit well with the SketchUp Pro’s Solid Tools
d. For adding Text to any of the shapes use the 3D TextTool.
For more information and video please follow: extensions.sketchup.com

Read more
~~~~~~~~~~~~~~~~~~~~~~~~~~
Published By
Rajib Dey
www.sketchup4architect.com
~~~~~~~~~~~~~~~~~~~~~~~~~~
Place Shapes Toolbar is a new Sketchup plugin invented by Alex Schreyer. This brand new Sketchup plugin supports different versions of Sketchup like SketchUp 8, SketchUp 2013, SketchUp 2014, SketchUp 2015, SketchUp 2016 and SketchUp 2017.
This extension has a toolbar with some menu items that is used for setting simply different common 3D shapes or geometric primitives. SketchUp’s navigate tools allow users for creating any shapes without too much effort. With the use of this toolbar, the users can accomplish fast “solid-based” modeling for dealing with added and subtracted primitives who can produce a precisely watertight object that is ideal for 3D printing. Prior for changing the shapes, anyone can opt for a general unit like foot, inch, mm, cm, m etc.
This toolbar is a good starter shape set for the new users and the kids who want to play in 3D modeling but don’t have any interest to learn.
Usage: At first show to the “Place Shapes” toolbar and click on the shape that has to be placed. Or the other way is to apply the Draw menu’s items. Most of the shapes will adjust themselves in the basis of the underlying geometry. Arranging various shapes is also possible by going to the select tool or pressing the space bar or the ESC key after finishing.
After placing a shape, move and scale tools can be applied for moving and functioning on the shape. In the case of failing work of any shape as per the requirement right click on it and choose ‘unglue’. In the case of placing any shapes, they all stick to the elementary geometry. Exploding a shape to work with its raw geometry is also possible only by applying the right-click menu. While selecting the base unit from the dialog, all the following placements will get that unit. The items that are already arranged don’t need scaling. This is helpful for modeling small stuff like 3D printing or large stuff like buildings.
Tips for working on this tool:
a. At first turn on the X-Ray face style to enable snapping for the hidden points.
b. Go to View>Hidden Lines to allow the hidden lines visible for more precise snapping.
c. These shapes fit well with the SketchUp Pro’s Solid Tools
d. For adding Text to any of the shapes use the 3D TextTool.
For more information and video please follow: extensions.sketchup.com

Read more
~~~~~~~~~~~~~~~~~~~~~~~~~~
Published By
Rajib Dey
www.sketchup4architect.com
~~~~~~~~~~~~~~~~~~~~~~~~~~
No comments:
Post a Comment