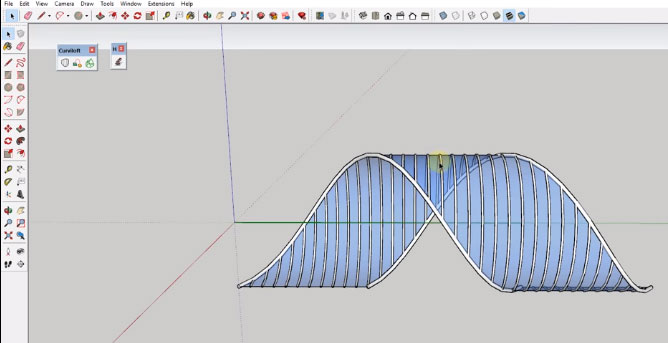
SketchUp Tools are making things easier and creating a Ribbon shaped Spiral structure becomes easier by using the simple tools of SketchUp; it’s just the game of mind.
Aaron Dietzen takes about Modeling the SketchUp Frame and Skin Structure which is called Spiral Ribbon Structure through his video tutorial and this article focuses on that tutorial describing the process in details.
About Aaron Dietzen: Aaron Dietzen is mainly seen in various SketchUp Live or any of the Skill Builder videos or been on the SketchUp forum, that means Aaron is fond of SketchUp and serving as a SketchUp employee for two years with more than ten years in the software. He is more than just a simple Trimble employee; he is a true SketchUp fan. He spends his free time in designing things in SketchUp and loves adventurous works.
About SketchUp: SketchUp or Google SketchUp is mainly a 3D modeling computer program that is used for a broad range of drawing applications used by architects, interior designer, landscape architects, civil and mechanical engineers, film and video game designers also. SketchUp can be getting as a freeware version named SketchUp Make and a paid version with many more extra benefits called SketchUp Pro. SketchUp is software from Trimble Company and there is an online library of free model congregations and 3D Warehouse to which users can add other models; besides that, the program has drawing layout functionality with variable ‘styles’, supports third-party ‘plug-in’ programs hosted on the Extension Warehouse to supply other abilities and enables placement of its models in Google Earth.
As SketchUp users are most of architects, designers, builders, makers and engineers etc. who works hard to give a nice shape to our physical world, they need great tools to do the work. SketchUp is in mission to bring their best to produce some great tools for drawing as drawing is the key thing of the SketchUp users. They draw to search ideas, to identify the things and to show other people their work that they do with love and love to build; SketchUp understands it truly and trying to improve their software day by day.
SketchUp is used to create different designs and models using some awesome featured tools like line tool, shape tool, curve tool etc. This time Aaron has shown us of the way to create the Spiral Ribbons those are basically curved and shaped from a single long line; at first he started from his original point in the SketchUp main page to create a Spiraling Shape or can basically named as Ribbon. This Ribbon is originally helix and rotated in a way that it came into a shape of Ribbon, so he drew a line as per the length and line such as he drew a 150 ft line using ‘Line Tool’ from the origin point. To create a helix over this line the line need to simply select and used Extension Helix along Curve to helix it that would be around this line.
After clicking the Extension Helix along Curve to helix option, a pop-up appears showing the measures where some important things need to put like start and end Radius, the laps, the section for every lap etc. These particular numbers are really essential to remember as these exact numbers have to put for the circles to make it a ribbon shape, after finishing the numbers to put and clicking Ok
option a single helix will be created on the line. A copy of the helix is made next by exploded it and moving it through the ‘Move Tool’ and through connecting and shifting the helixes a complete hymen will be created. The Extension Curviloft is used then, in this extension the last option is used upon the created design which will make scan like designs on it with some dotted lines to figure out the exact points get connected or not. It also counts the segments and after clicking the final face will be created; if one offs the curviloft effect the image will appear as a group, then he created a frame along with the helix. For making a frame, at first he has made tubes along the helix to give it a tougher look and in this tube the segments are remained same as in helix.
Next he hid the tubes, makes the helix a group and clicked inside it to create a circle from the origin with the Circle Tool through the same radius at the front of the object. Now the circle is set into same segment, then the whole object is selected and using Copy tool the circle is copied in the same segment; this copied circle is set using the ‘Move Tool’ and putting the exact amount of circle the object will come to end. After adding the hidden tubes and adjusting the circles as rotate lines the last object will appear as a ribbon shape and this whole object is grouped and copied and them using move tool is placed to give the final spring shape.
Source: www.thesketchupessentials.com

~~~~~~~~~~~~~~~~~~~~~~~~~~~
Published By
Rajib Dey
www.sketchup4architect.com
~~~~~~~~~~~~~~~~~~~~~~~~~~~
Aaron Dietzen takes about Modeling the SketchUp Frame and Skin Structure which is called Spiral Ribbon Structure through his video tutorial and this article focuses on that tutorial describing the process in details.
About Aaron Dietzen: Aaron Dietzen is mainly seen in various SketchUp Live or any of the Skill Builder videos or been on the SketchUp forum, that means Aaron is fond of SketchUp and serving as a SketchUp employee for two years with more than ten years in the software. He is more than just a simple Trimble employee; he is a true SketchUp fan. He spends his free time in designing things in SketchUp and loves adventurous works.
About SketchUp: SketchUp or Google SketchUp is mainly a 3D modeling computer program that is used for a broad range of drawing applications used by architects, interior designer, landscape architects, civil and mechanical engineers, film and video game designers also. SketchUp can be getting as a freeware version named SketchUp Make and a paid version with many more extra benefits called SketchUp Pro. SketchUp is software from Trimble Company and there is an online library of free model congregations and 3D Warehouse to which users can add other models; besides that, the program has drawing layout functionality with variable ‘styles’, supports third-party ‘plug-in’ programs hosted on the Extension Warehouse to supply other abilities and enables placement of its models in Google Earth.
As SketchUp users are most of architects, designers, builders, makers and engineers etc. who works hard to give a nice shape to our physical world, they need great tools to do the work. SketchUp is in mission to bring their best to produce some great tools for drawing as drawing is the key thing of the SketchUp users. They draw to search ideas, to identify the things and to show other people their work that they do with love and love to build; SketchUp understands it truly and trying to improve their software day by day.
SketchUp is used to create different designs and models using some awesome featured tools like line tool, shape tool, curve tool etc. This time Aaron has shown us of the way to create the Spiral Ribbons those are basically curved and shaped from a single long line; at first he started from his original point in the SketchUp main page to create a Spiraling Shape or can basically named as Ribbon. This Ribbon is originally helix and rotated in a way that it came into a shape of Ribbon, so he drew a line as per the length and line such as he drew a 150 ft line using ‘Line Tool’ from the origin point. To create a helix over this line the line need to simply select and used Extension Helix along Curve to helix it that would be around this line.
After clicking the Extension Helix along Curve to helix option, a pop-up appears showing the measures where some important things need to put like start and end Radius, the laps, the section for every lap etc. These particular numbers are really essential to remember as these exact numbers have to put for the circles to make it a ribbon shape, after finishing the numbers to put and clicking Ok
option a single helix will be created on the line. A copy of the helix is made next by exploded it and moving it through the ‘Move Tool’ and through connecting and shifting the helixes a complete hymen will be created. The Extension Curviloft is used then, in this extension the last option is used upon the created design which will make scan like designs on it with some dotted lines to figure out the exact points get connected or not. It also counts the segments and after clicking the final face will be created; if one offs the curviloft effect the image will appear as a group, then he created a frame along with the helix. For making a frame, at first he has made tubes along the helix to give it a tougher look and in this tube the segments are remained same as in helix.
Next he hid the tubes, makes the helix a group and clicked inside it to create a circle from the origin with the Circle Tool through the same radius at the front of the object. Now the circle is set into same segment, then the whole object is selected and using Copy tool the circle is copied in the same segment; this copied circle is set using the ‘Move Tool’ and putting the exact amount of circle the object will come to end. After adding the hidden tubes and adjusting the circles as rotate lines the last object will appear as a ribbon shape and this whole object is grouped and copied and them using move tool is placed to give the final spring shape.
Source: www.thesketchupessentials.com

~~~~~~~~~~~~~~~~~~~~~~~~~~~
Published By
Rajib Dey
www.sketchup4architect.com
~~~~~~~~~~~~~~~~~~~~~~~~~~~
No comments:
Post a Comment