Mario Goles (Designer at Sketchupartists and Interior Designer/3d Architectural visualiser atFreelancer)
In this article, I will explain workflow in my project “Interior Design of a Living Room”. As you, all know that making such a project requires a certain knowledge and experience in CG industry as well as in interior design, so I will cover only the once I believe people have most trouble with. This will include texturing, lighting and rendering processes.
First, I want you to notice that this project have been done in SketchUp. Rendering engine I have used for final visualization was V-Ray. I was also using predefined materials; I often use in my projects, downloaded from “Chaos Group”, “Visual Dynamics” and “Flying Architecture” web sites. I am sure you could find some more web sites, from where you can download “.vismat” files, if you do not find what you are looking for in the ones I mention. I have also used several 3D models downloaded from SketchUP 3D Warehouse. The others I just modeled by myself. For lighting techniques, I used HDRI images that you can also find on the Internet. Some of them are free to download but if you look for purposes that are more professional, I suggest you to invest, as well as for texture images or even 3D models.
Before I explain a workflow process, I just want to mention several things that I believe are crucial in achieving result you are looking for in this project, and are far more important than just following workflow explanation.
- Many people ask me about “V-Ray” options (.visopt file), and how I set up rendering parameters, expecting if they do the same they will get realistic image. You have to understand that any rendering engine, including “V-Ray”, does nothing else but based on parameters setup, calculates how light travels through your scene and it bounces from different surfaces, in order to potentates getting an realistic image. Due to this, almost all its parameters are about setting different light calculation methods. Therefore, if you set its parameters correctly you will get nothing else but nice lighting. To achieve realism in your visualizations, you will have to take care about several other things, which are not less important than proper setting of rendering options.
- Try to have your object geometry as clean as possible. Clean unnecessary edges (lines), weld those that are on the same direction, have surfaces normal properly oriented (always facing a camera), etc. Have your objects in proper scale according to each other as well as according to real world.
- When using 3D models downloaded from a warehouse, try to use those once that are looking realistic and correctly modeled. You can find a trillion 3D models on almost any warehouse, especially on SketchUp 3D warehouse. Give yourself a time to look for “good” once. If you cannot find it, try to model it by yourself, instead of having “bad” one in you project. Non-realistic models (in scale, the way they are modeled, “bed” textures, etc.) will certainly not lead you to the result you are looking for.
- One of the most important parts of achieving realism in your visualizations is texturing. If you apply textures properly to your objects and use realistic texture images with special care of its sizes, you will be half a way to your desired result. You can also find many web sites from which you can download nice texture images. I often use “Arroway textures” or textures downloaded from “SketchUP Texture” web site. Important is, that the size of texture images, is in proper scale to the real world. This can result in having huge image textures for some objects, but you can still compensate with the other once. For example, if you have large surface like parquet floor, where you do not want repeating tiles to be recognized, you will have to use large texture image. However, if you want ceramic tiles of a certain color on your floor, you could use much smaller texture image, which covers only one tile. Anyway, you should make sure that size of your texture image is in proper (realistic) scale to the real world.
Note: If you apply materials that have texture images properly scaled, to your objects, very often only default rendering options will be enough to get nice image. If you will follow above mention facts, as well, as if you in addition organize your projects properly in layers, groups, components, etc. you will find your work in SketchUp easy and achieve desired results with no problems, not to mention that rendering process will be much easier and faster with realistic result.
WORKFLOW
1. TEXTURING
As explained before, it is necessary to use real world scale textures in order to achieve realism. It also requires that such materials are properly assigned to different surfaces of any object in your scene. Quite often happens that 3D models that we use from warehouse, have incorrect texture mapping or we just want to change its default materials. In this case, we often find ourselves in a problem of having nonrealistic material applied. To avoid this problem we will use projected textures. Following example shows how to apply projected materials to the lounge sofa.
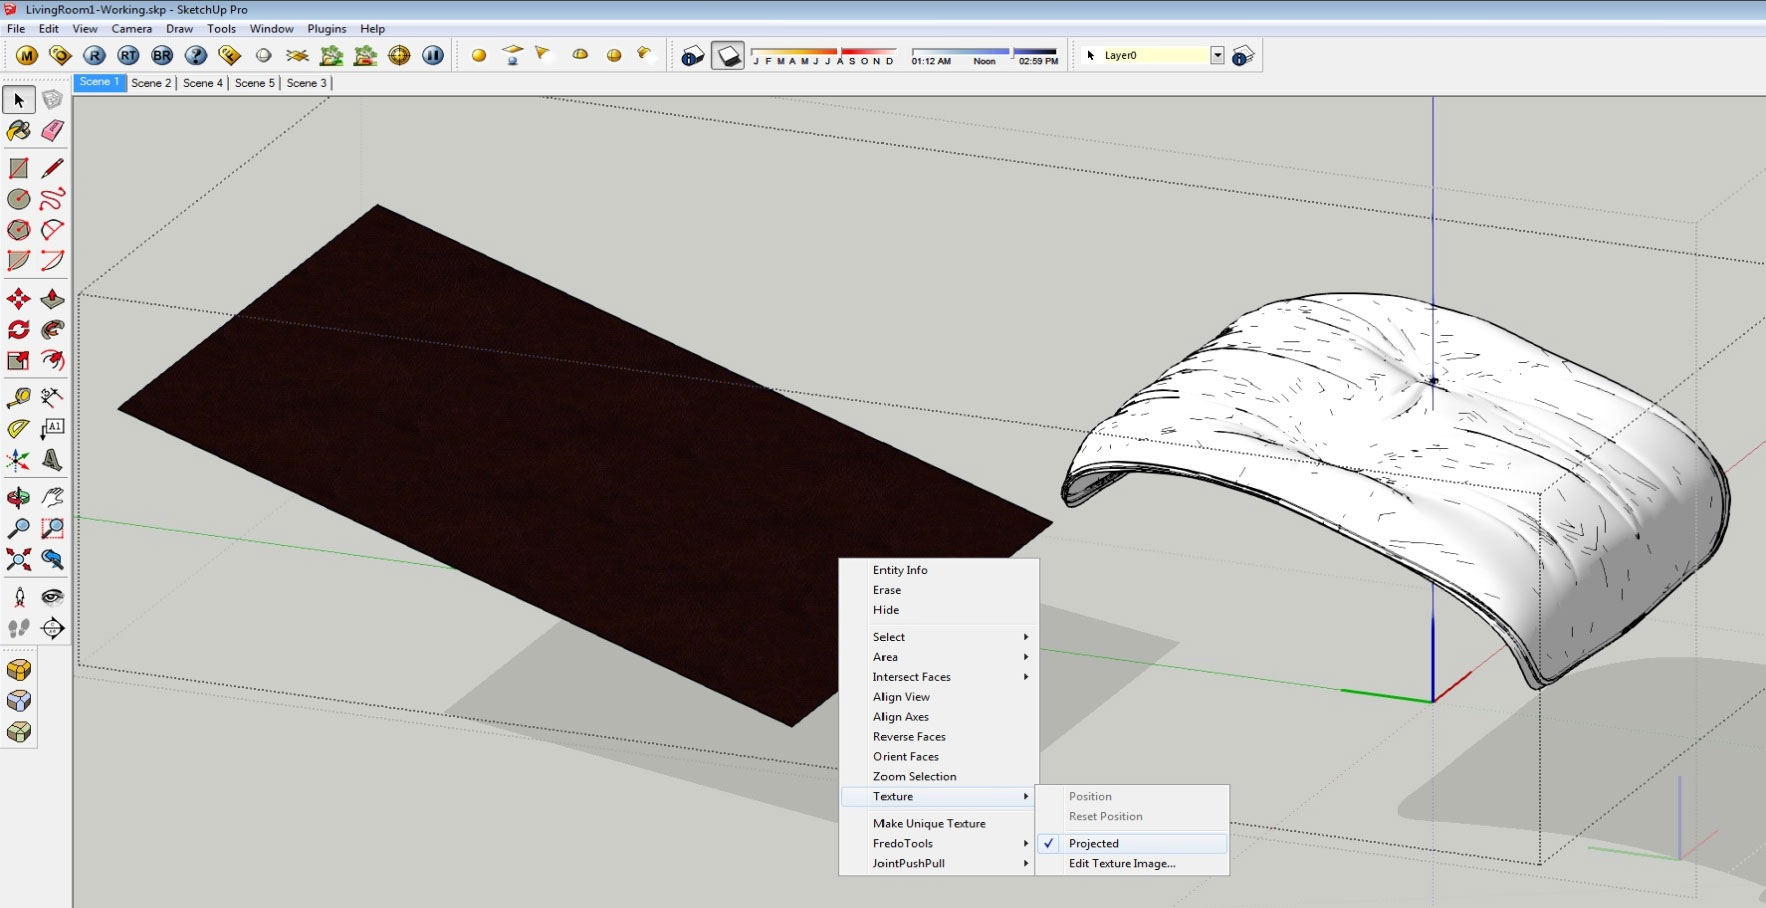
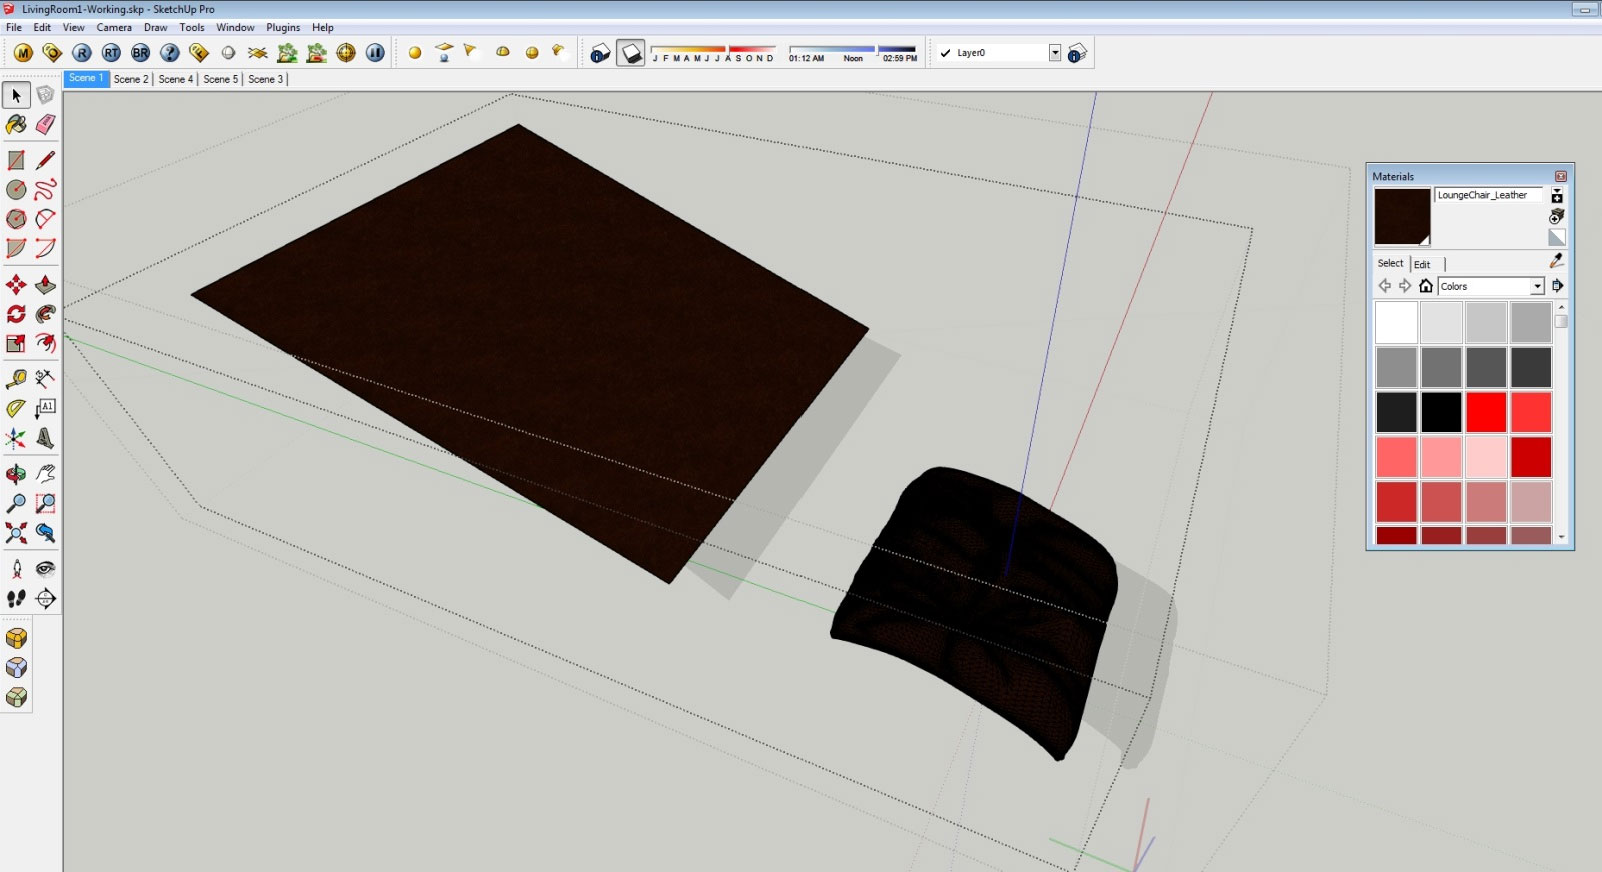
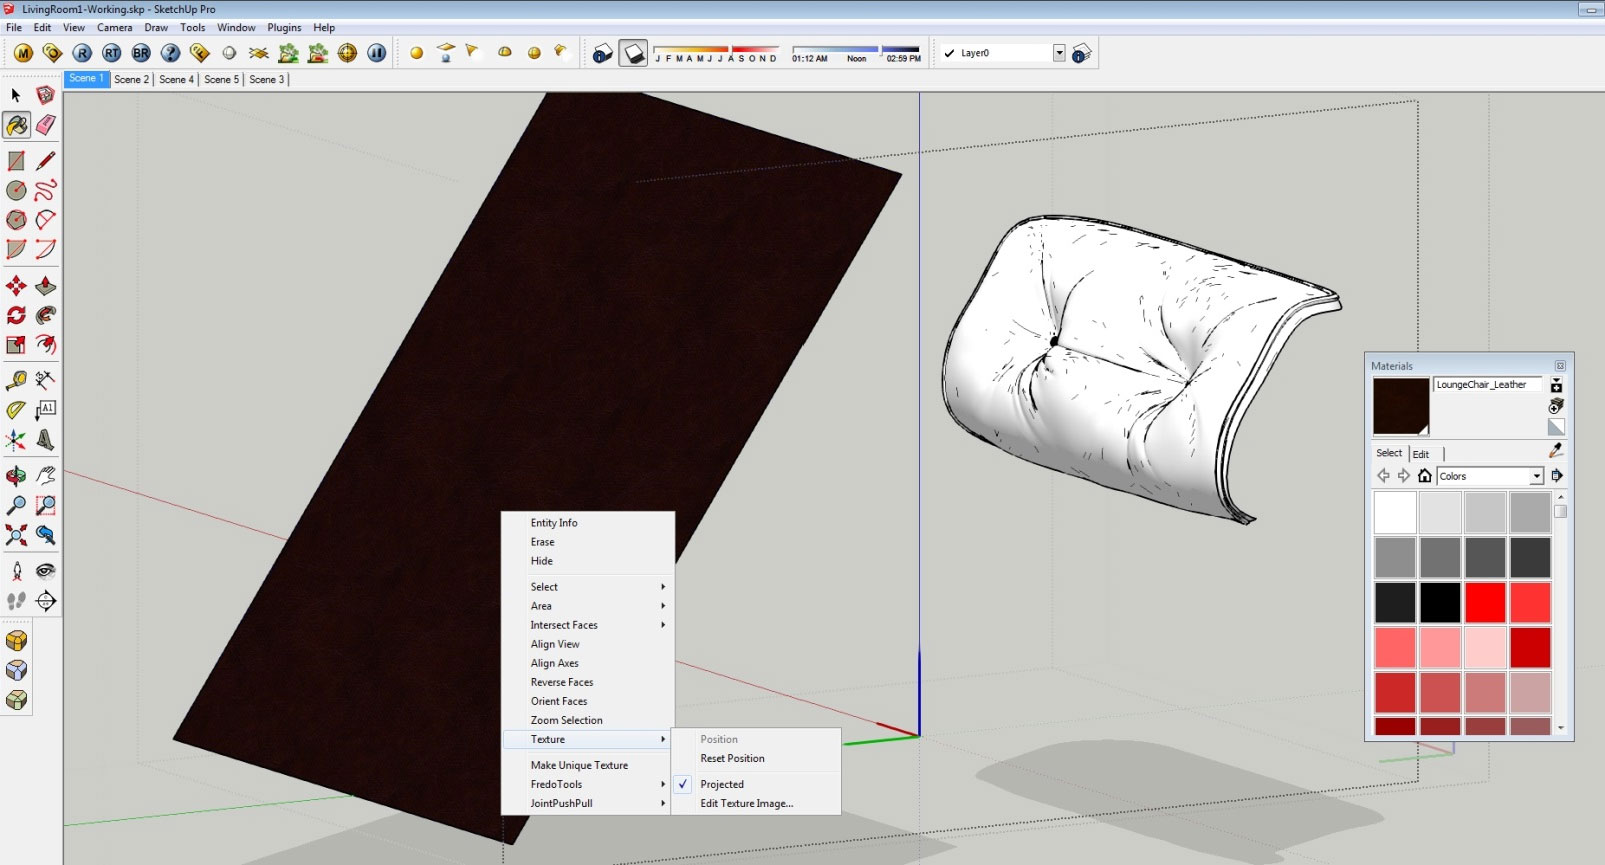
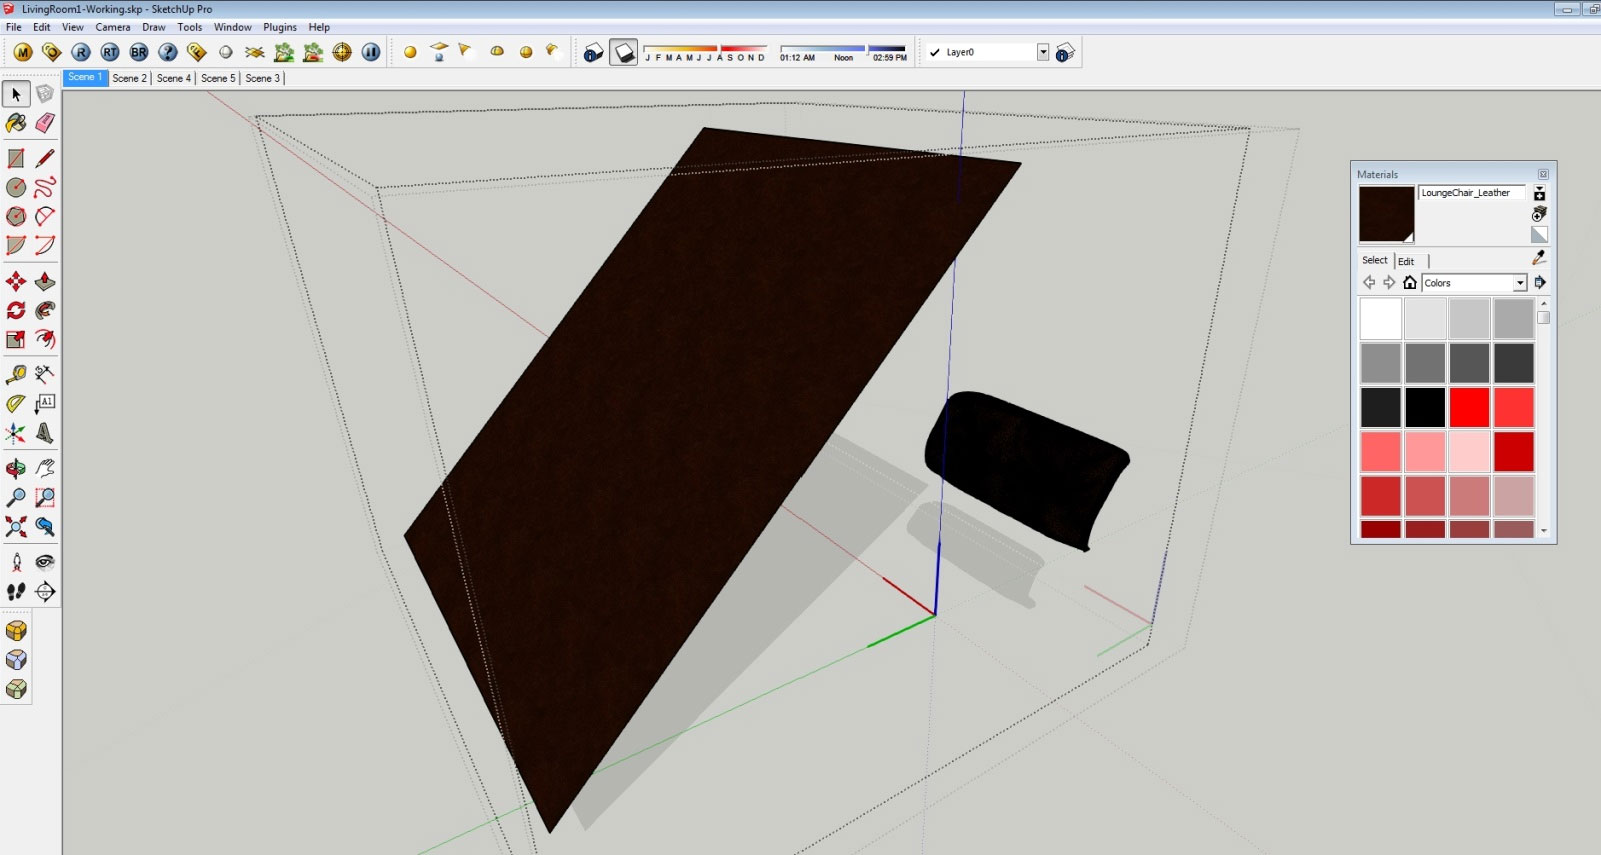
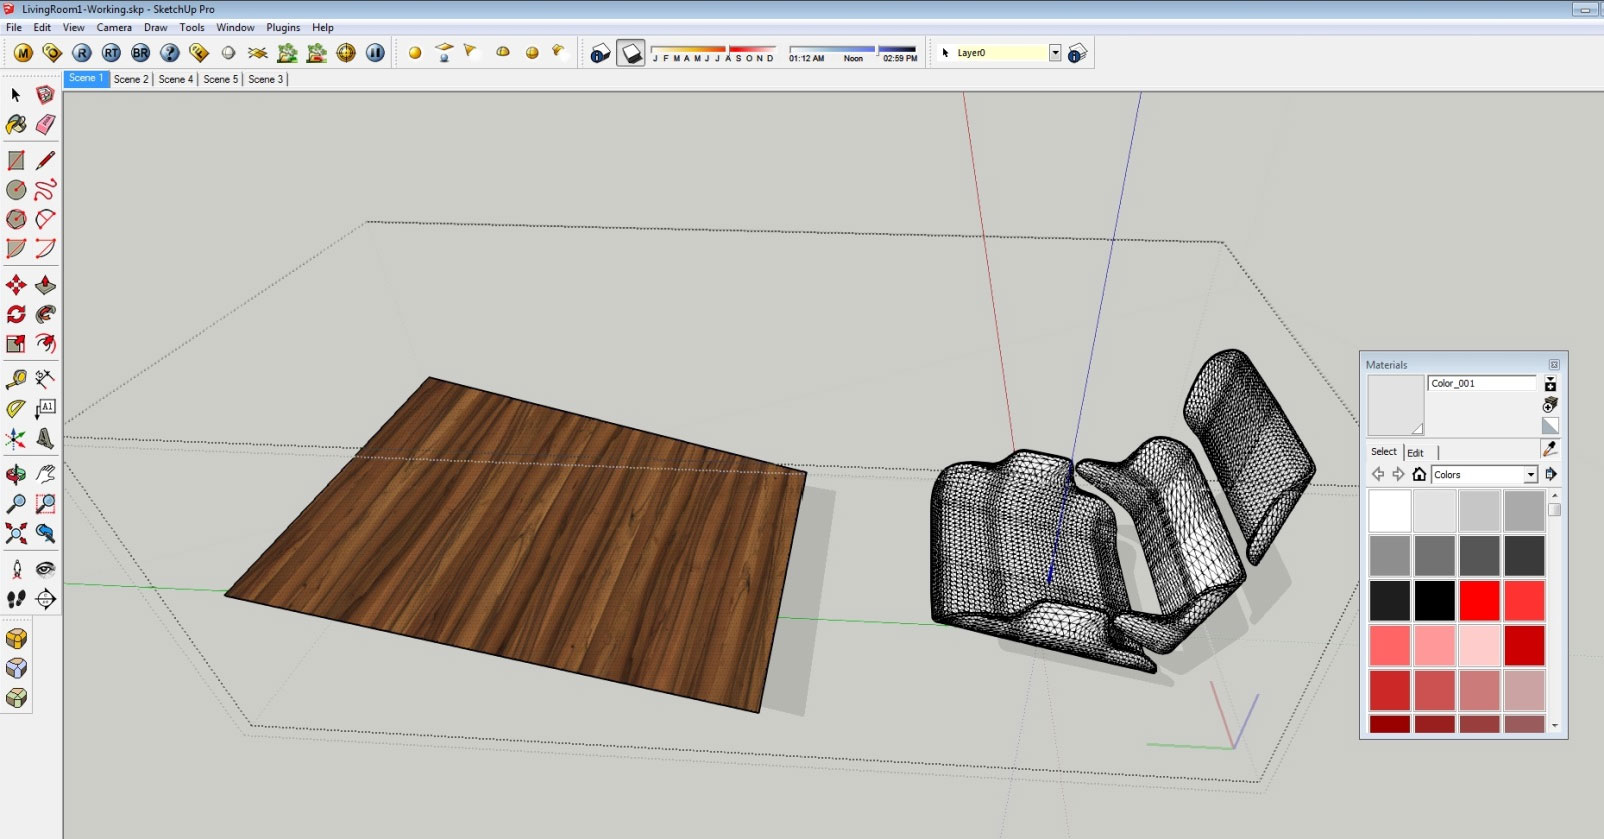
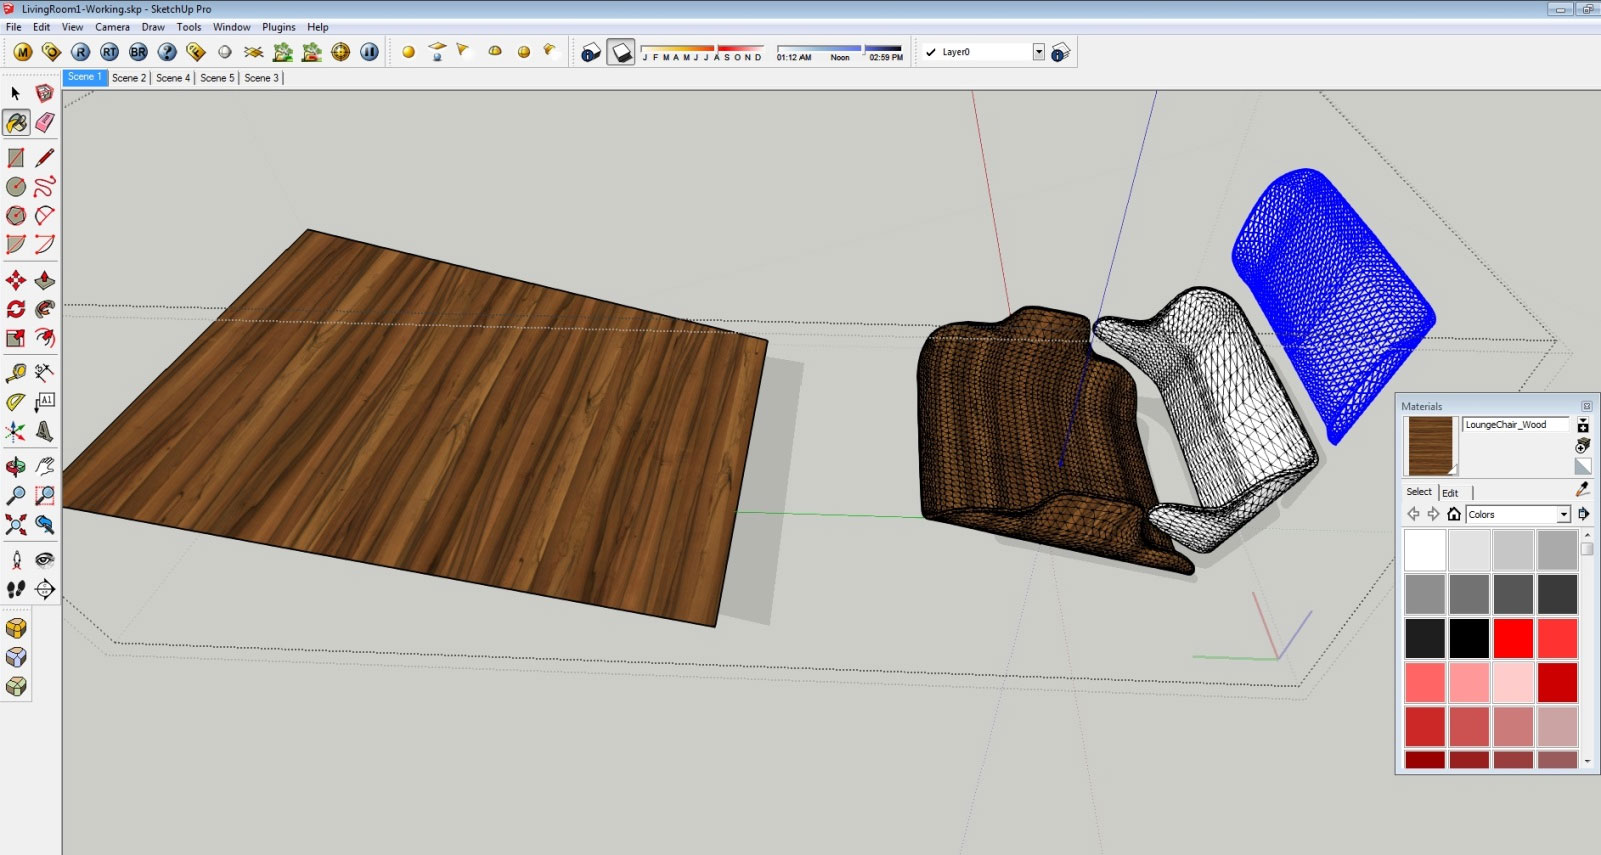
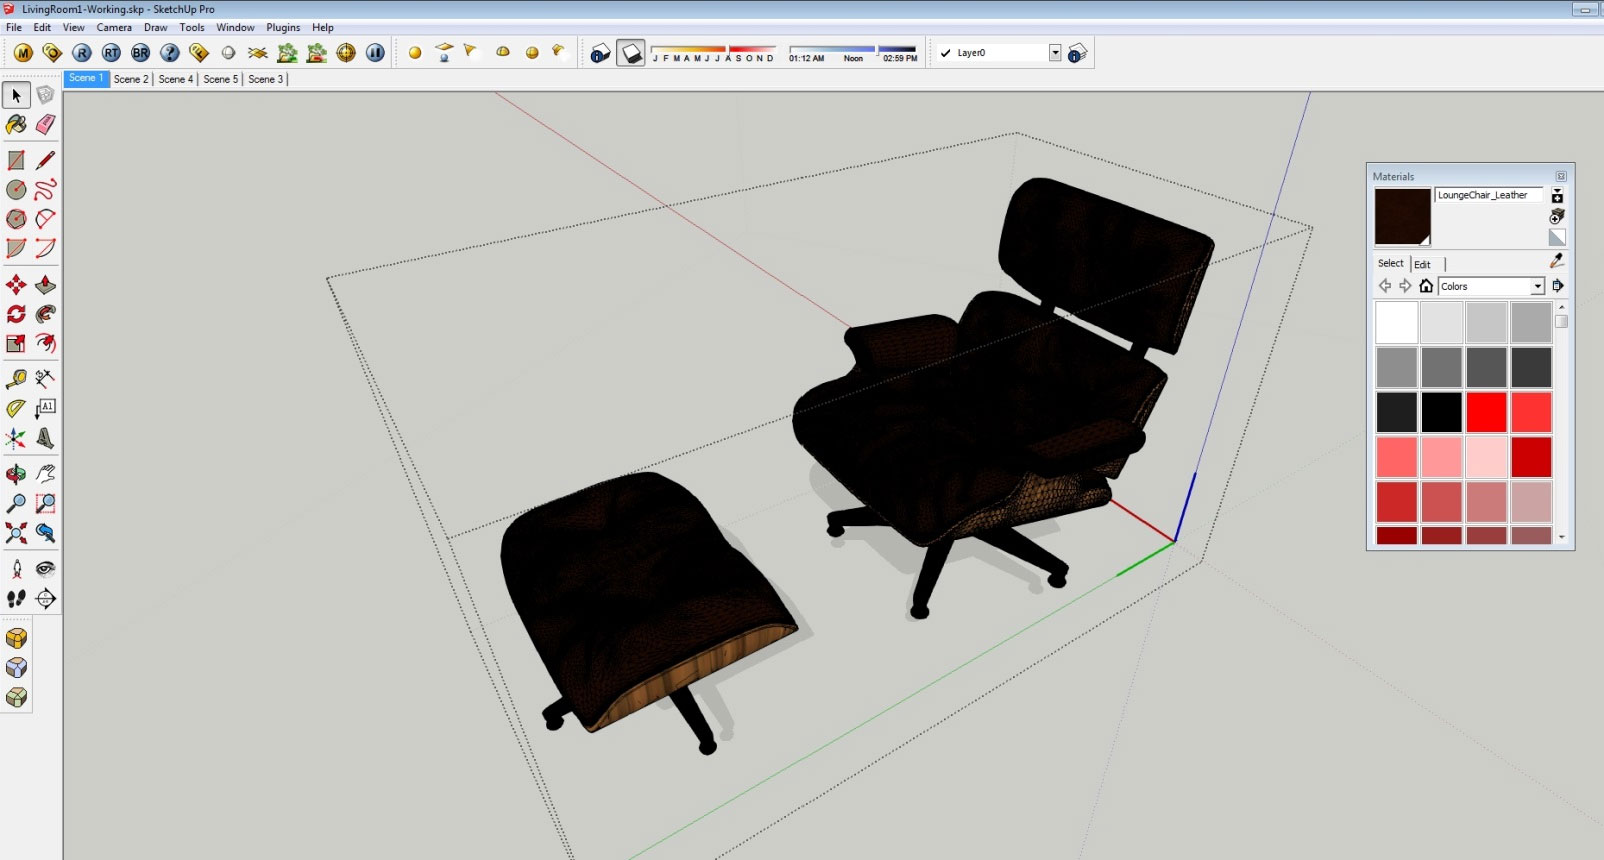
As shown on above images you will apply projected textures to all other objects in your project, which you have downloaded from 3D warehouse and has wrong texture mapping applied.
For objects with flat surfaces, you apply materials as you get used to it in SketchUp, just take good care on sizes of the textures and be sure they look realistic to the real world scale. Following example shows carpet texture settings, in order to look realistic and has proper scale.
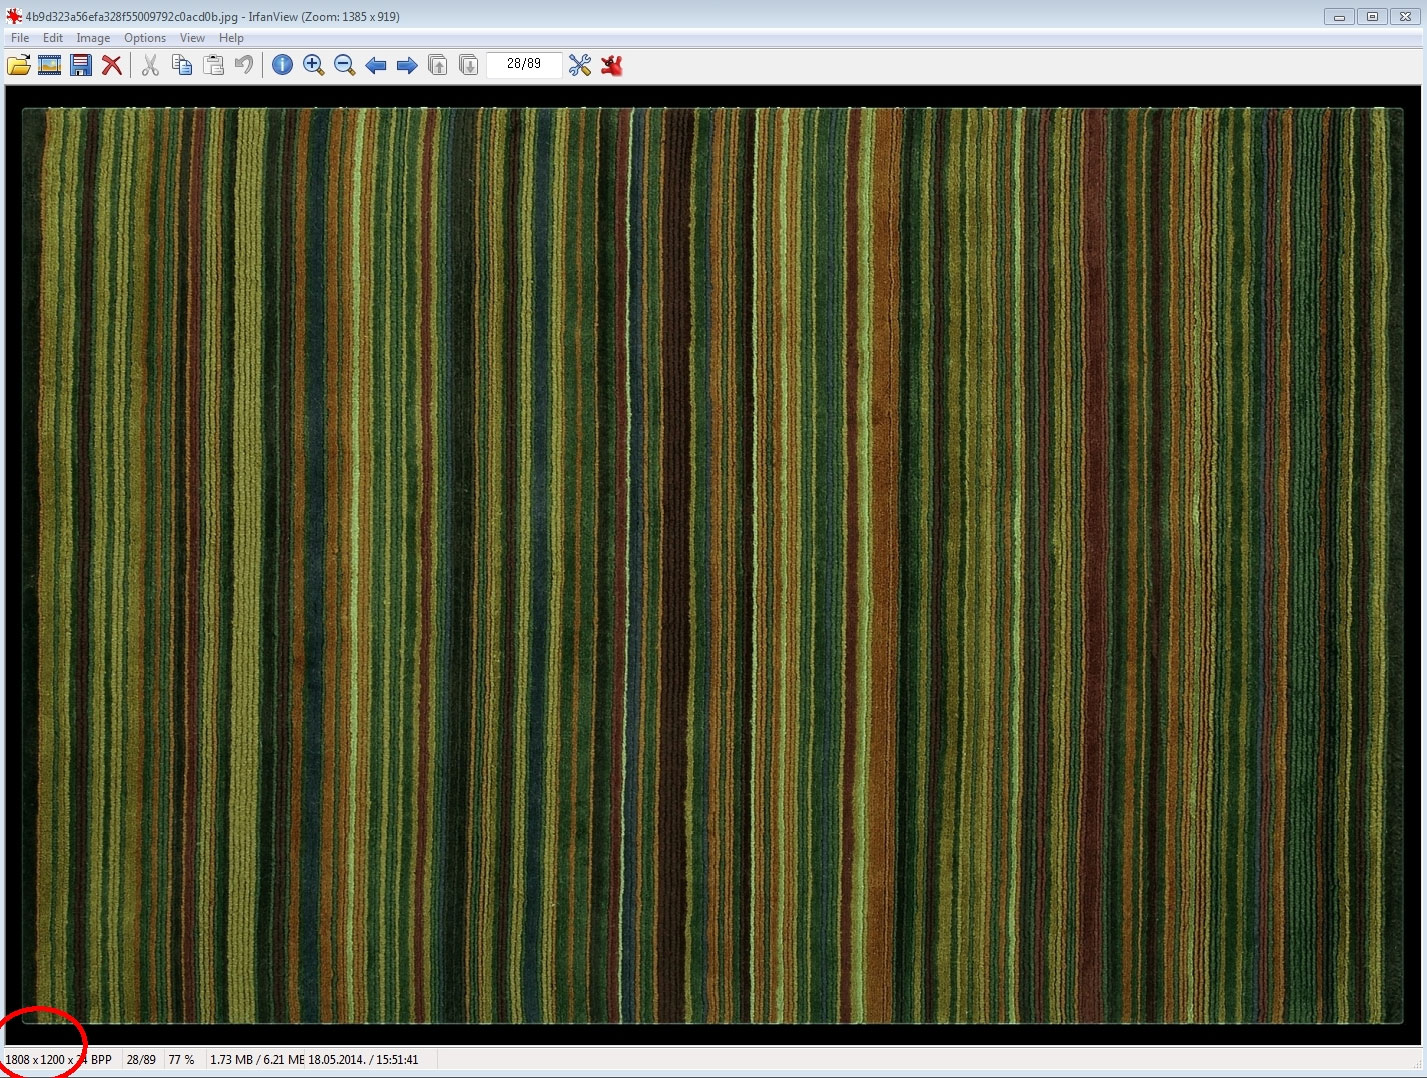
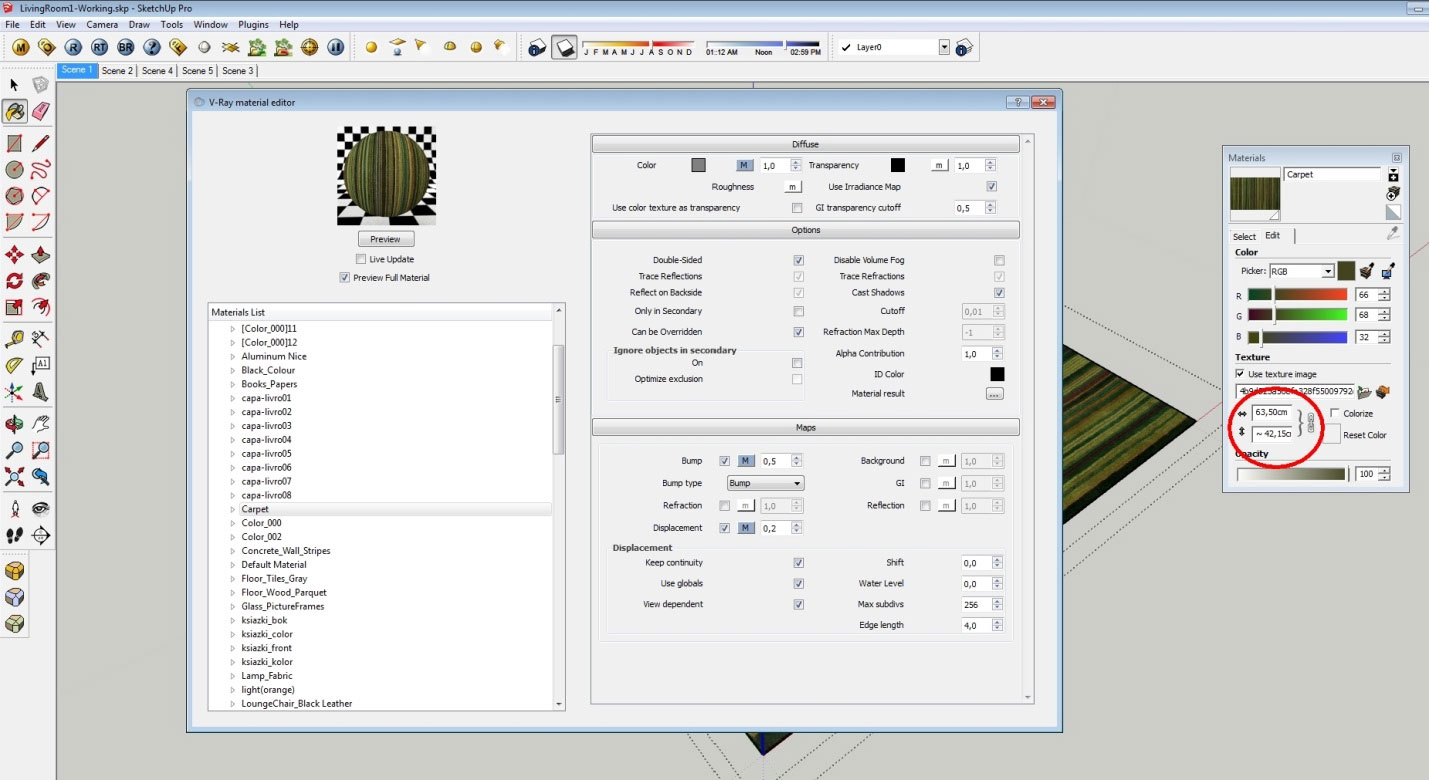
Notice that this texture image is 1808x1200 pixels, even though, settings in SketchUp material browser show its size of 63,50cm x 24,15cm. No matter the scale, you set up in material browser as long as it is in correct aspect ratio to the imported texture image. You can scale any texture to whatever size, as long as it looks realistic to you.
2. LIGHTING
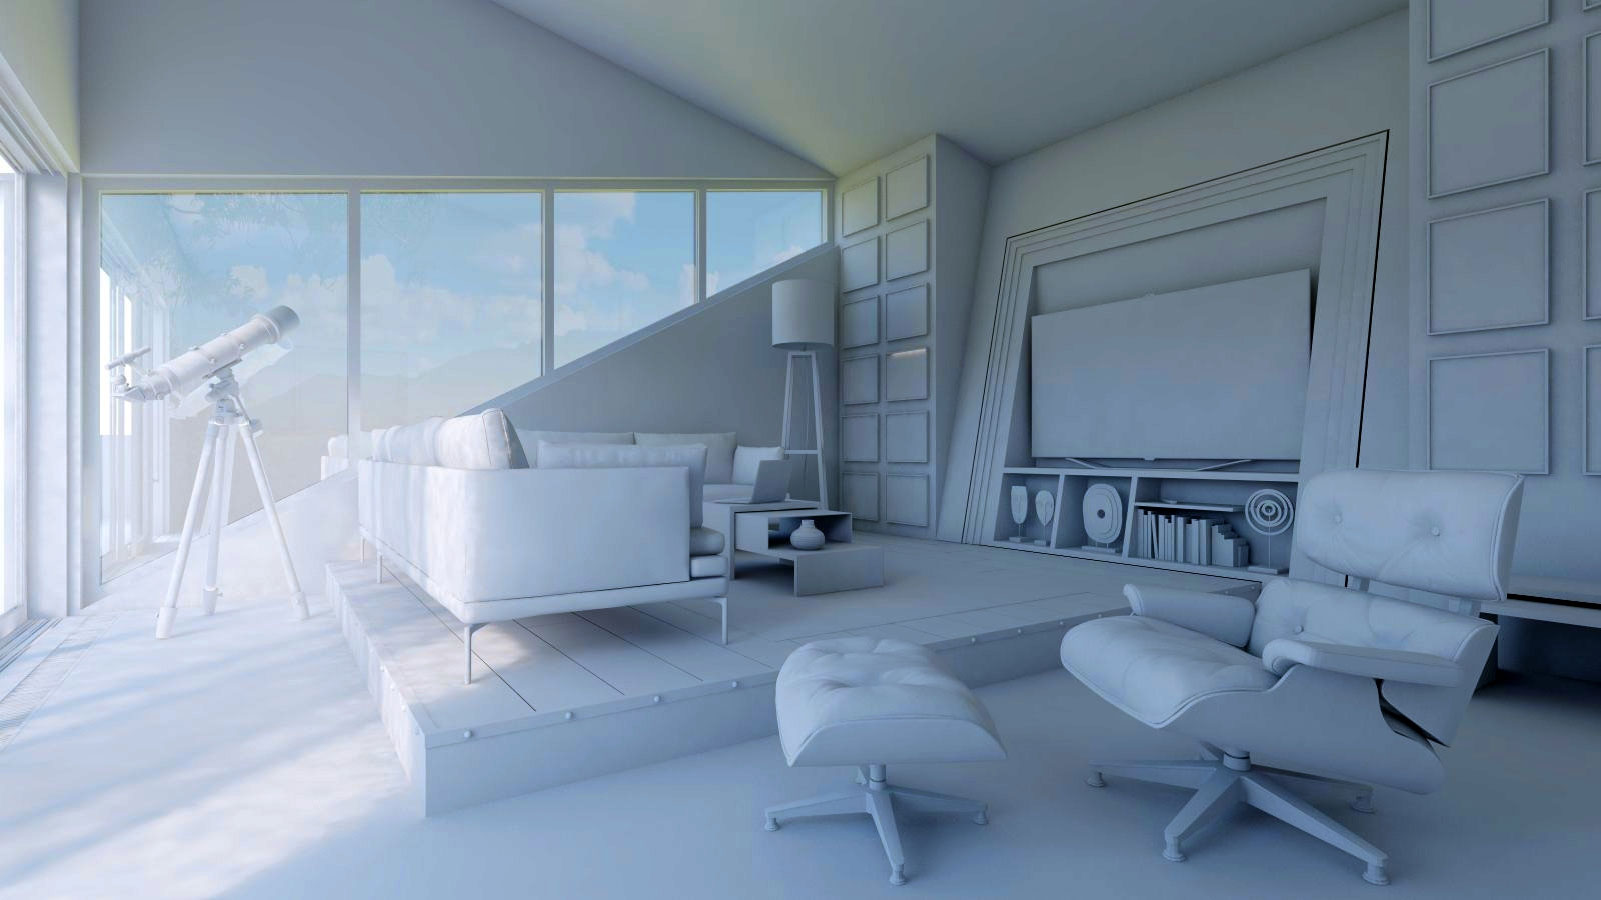
After modeling, texturing and setting the Physical Still camera type view, we want to set desired lighting of our scene. Best way of doing this, is to overwrite all materials with light gray color. White color is to strong and pure white does not exist in the real world. Closest to pure white is crystal-clear snow, but still it is not perfectly white. We will do this by setting V-Ray Global Switches “Override materials” parameter to TRUE, and select “Override color” to something like RGB value of 200.200.200.
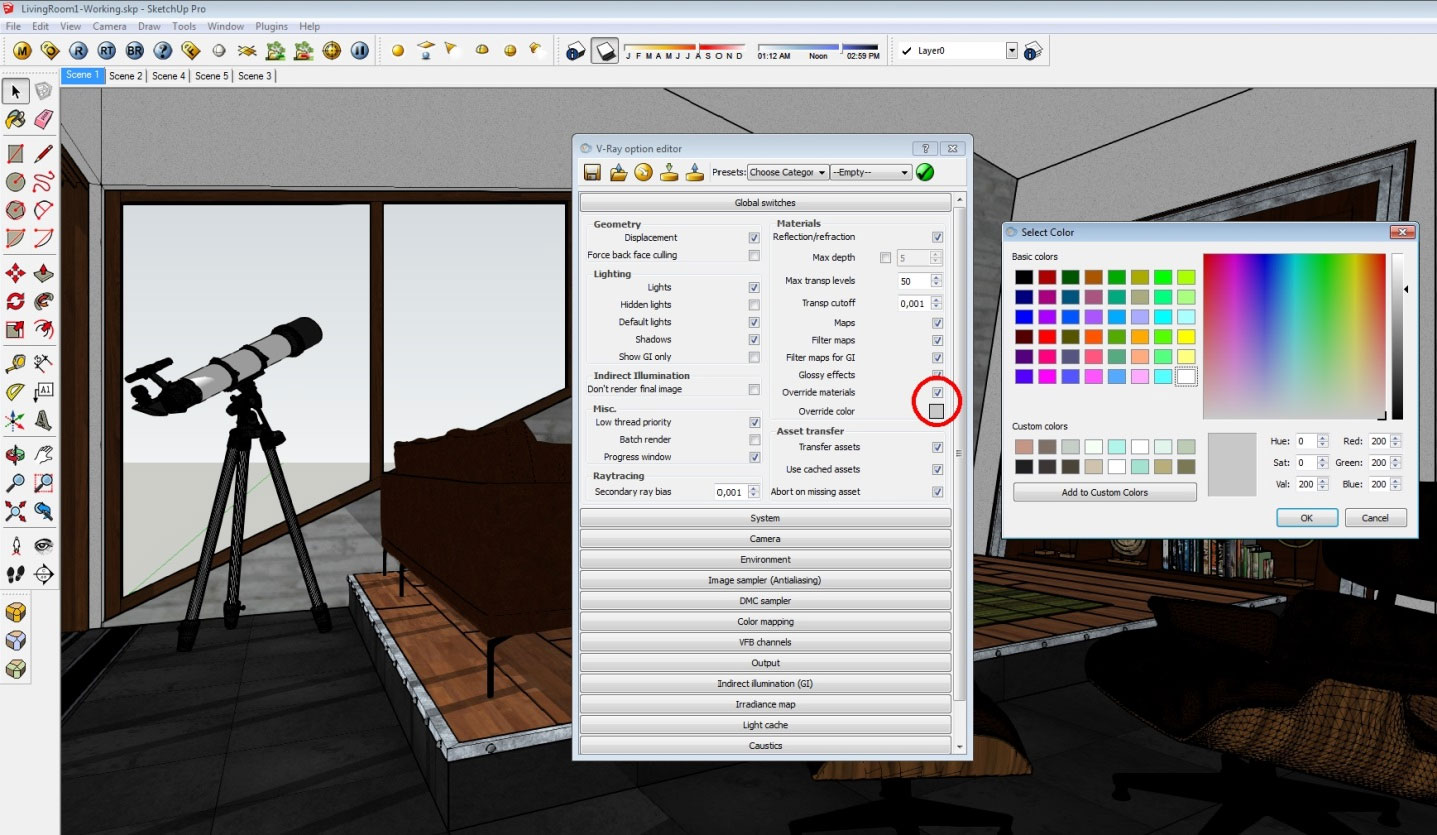
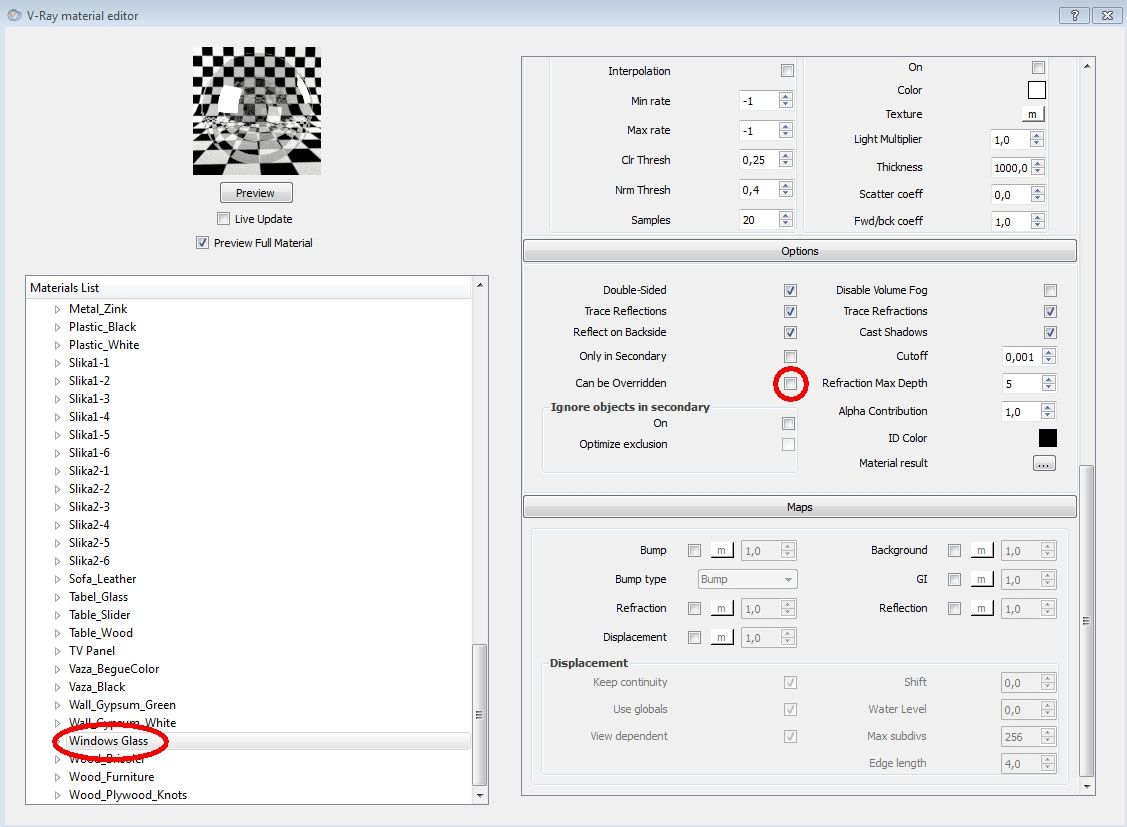
By doing this all materials on our scene will be overwritten with this color, with exception of these once that has “Can be Overridden” parameter set to FALSE. This parameter option will be set in V-Ray material browser, for each particular material. Usually we have to set this parameter to FALSE for all window glass objects, if we want to use daylight system for lighting the scene. Otherwise, the sun light will not be able to enter our scene through the windows and our scene could become completely dark.
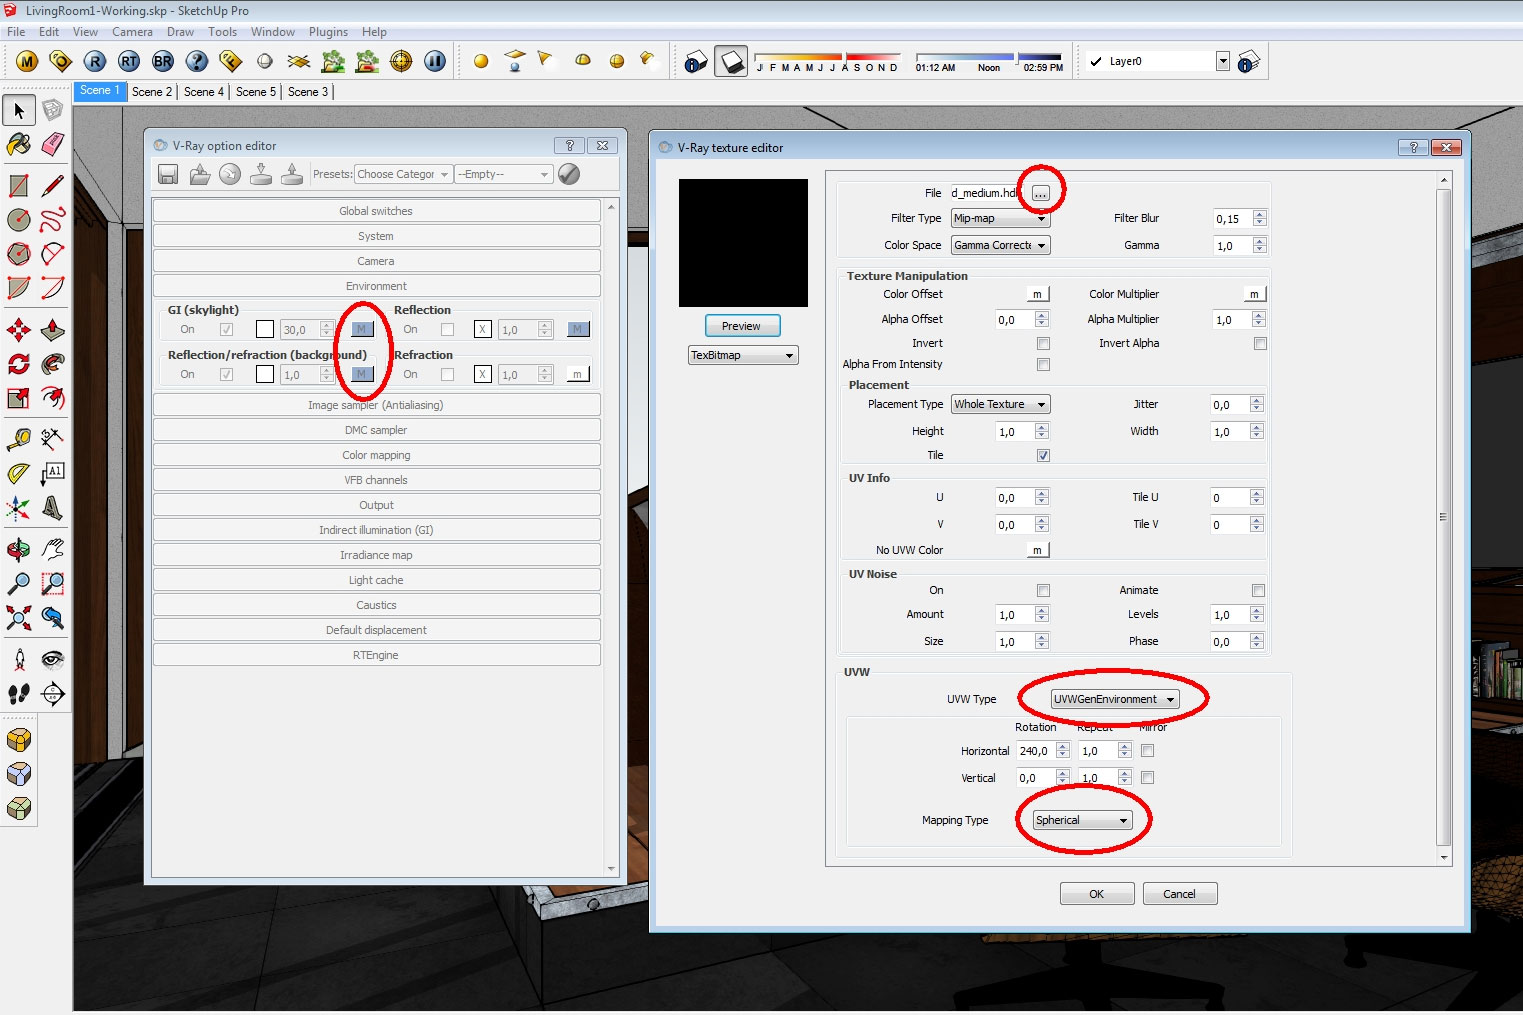
V-Ray uses its default sun for daylight system lighting, but we can also use HDRI images instead. Using HDRI images, we could get even better results in the way of achieving realism of our renders. Notice that this will affect only our scene lighting, as we explained before. You will still have to have proper materials setup as well as apply them correctly. In this particular project, I have used following HDRI image setup for lighting my scene.
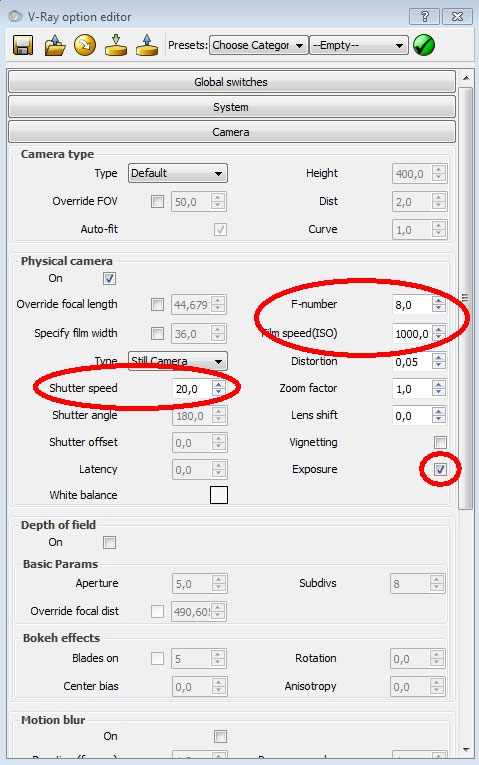
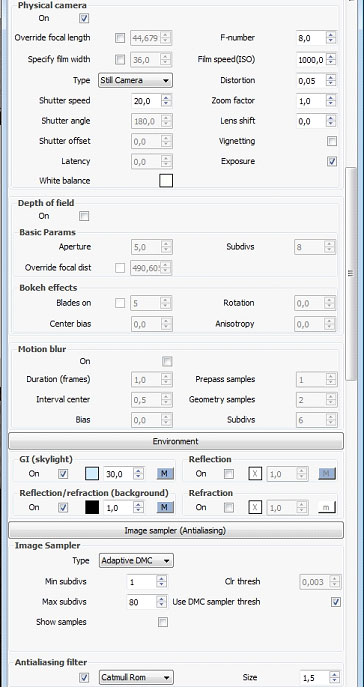
Beside all others, adjusting following V-Ray parameters will be enough to set proper lighting of most of your scenes. You will notice that these parameters are working exactly like on any digital photo camera. Therefore, if you have any experience with digital photography it will be easier for you to understand its adjusting and the way they affect lighting of your render.
- Shutter speed - (Value represents a fractions of a second. Therefore, value of 50 for example, will represent 1/50 of a second. This means that your scene will be brighter than if you set this value to 100, as in this case, the shutter on your camera will stay open for a longer period and therefore more light will get into it.)
- Film Speed (ISO) – (Often used as a quick dial for exposure changes in the scene. High numbers will make your scene brighter as lower numbers will make it darker. If we increase its value on digital cameras, our image will suffer from significant amount of noise. Luckily, this is not the case with V-Ray Physical camera.
- F-Number - (This parameter handles/controls the size of your virtual aperture. Small numbers represents a larger aperture (larger opening) in your camera, which in turn allows more light in, that will in turn give us a brighter images.
Adjusting these three parameters, you will control brightness of your render image. Remember also that these three options will work like explained only if Physical Camera “Exposure” parameter is set to TRUE.
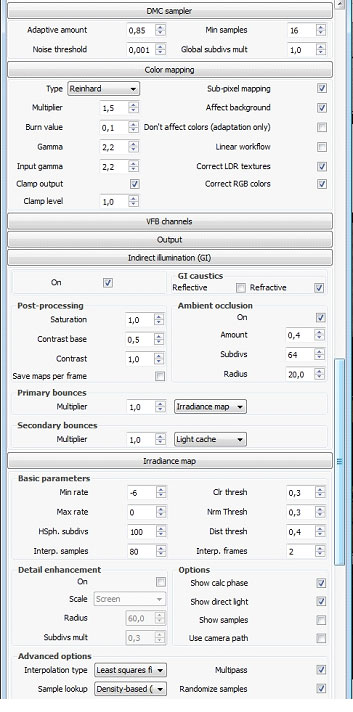
Other option that will take in a count is setting of “Color Mapping” type.
Each of types you can select will have its own calculation method behind, and each of them has its own pluses and minuses, depending on what you want to get as a result. Refer to other V-Ray tutorials in order to understand how each of offered color mapping types affects your rendering. For this particular project, I was using “Reinhard type”. You will notice that by choosing Reinhard color mapping type, several other parameters become available for adjusting. Two most important once, which you might want to adjust, would be the “Multiplier” and the “Burn value”. “Burn value” will allow you to adjust the value of brightest area in your scene, as well as with “Multiplier” you will control the darkest area. Adjusting this options you will control how bright or dark will be brightest and darkest parts of your image. Logically if you decrease Burn value, your render will result with less burn in brightest area as well as if you increase its value, your render will have more burn in brightest area of the image.
Once we have setup lighting options for our scene, we can try to render the override colors image.
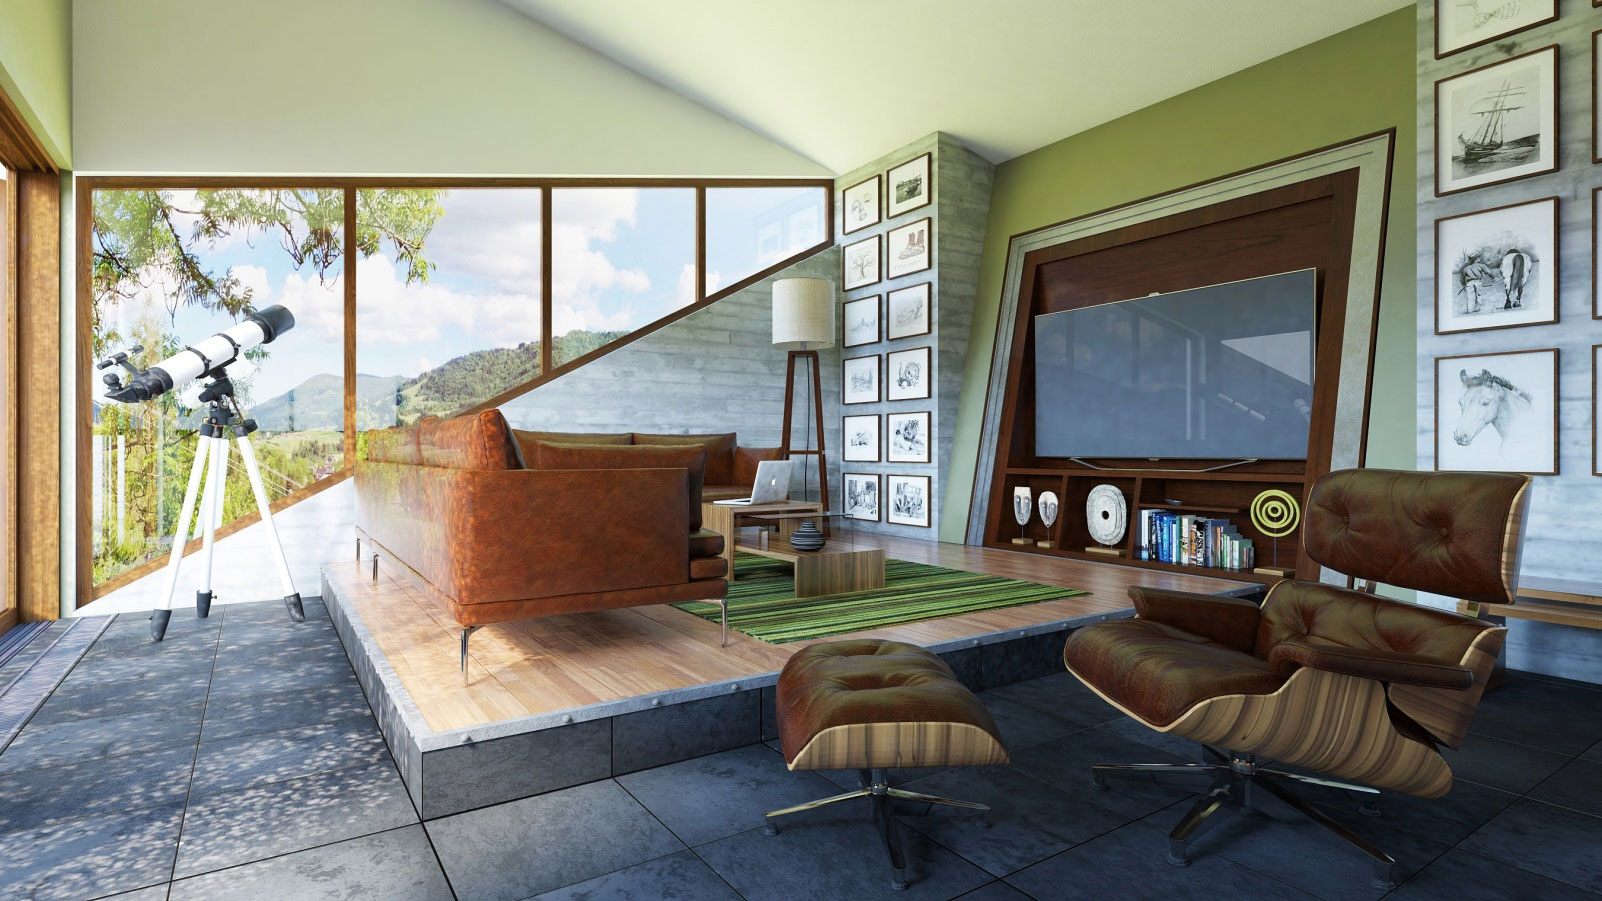
If you are satisfied with the result, now you can uncheck “Override materials” option in V-Ray “Global switches” option group and try to render your image again.
3. RENDER PARAMETERS SETUP
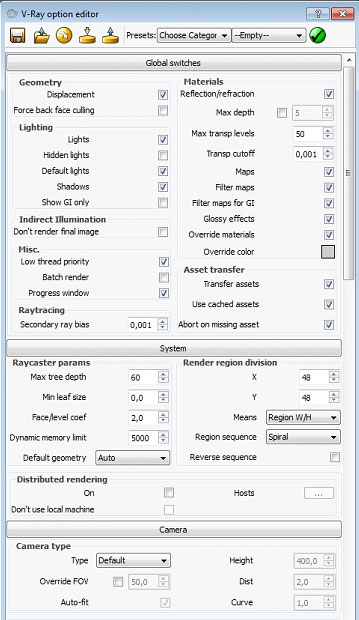
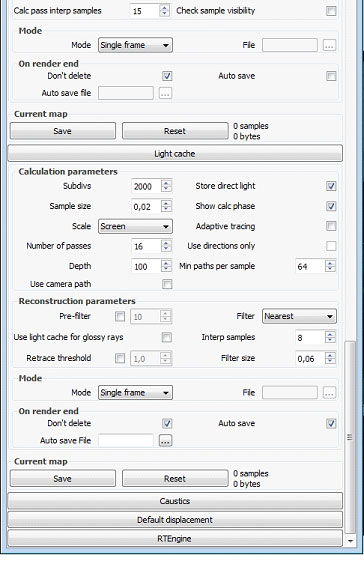
Following V-Ray options have been used in this particular project, in order to get final result.
~~~~~~~~~~~~~~~~~~~~~
Published By
Arka Roy
www.sketchup-ur-space.com
~~~~~~~~~~~~~~~~~~~~~
No comments:
Post a Comment