Thursday, September 25, 2014

Theory of 3D Sketchup modelling

In 3D computer graphics, 3D modeling is the process of developing a mathematical representation of any three-dimensional surface of object (either inanimate or living) via specialized software. The product is called 3D model.

It can be displayed as a two-dimensional image through a process called 3D rendering or used in a computer simulation of physical phenomena. The model can also be physically created using 3D printing devices.

The new comers could also know that the 3D modeling software is a class of 3D computer graphics software used to produce 3D models. Individual programs of this class are called modeling applications or modelers.

SketchUp (Formerly: Google Sketchup) is a 3D modeling program for applications such as architectural, interior design, civil and mechanical engineering, film, and video game design. A freeware version, SketchUp Make, and a paid version with additional functionality, SketchUp Pro, are available.

Theory of 3D modelling

There are many 3D modeling software. Some are freeware and others are commercial that means paid. Among them also some are 3d rendering, but other is not.

Almost all 3D models can be divided into two categories: -

Solid - These models define the volume of the object they represent (like a rock). These are more realistic, but more difficult to build. Solid models are mostly used for no visual simulations such as medical and engineering simulations, for CAD and specialized visual applications such as ray tracing and constructive solid geometry.

Shell/boundary - these models represent the surface, e.g. the boundary of the object, not its volume (like an infinitesimally thin eggshell). These are easier to work with than solid models. Almost all visual models used in games and film are shell models.

There are three popular ways to represent a model:-

Polygonal modeling - Points in 3D space, called vertices, are connected by line segments to form a polygonal mesh. The vast majority of 3D models today are built as textured polygonal models, because they are flexible and because computers can render them so quickly. However, polygons are planar and can only approximate curved surfaces using many polygons.

Curve modeling - Surfaces are defined by curves, which are influenced by weighted control points. The curve follows (but does not necessarily interpolate) the points. Increasing the weight for a point will pull the curve closer to that point. Curve types include nonuniform rational B-spline (NURBS), splines, patches and geometric primitives.

Digital sculpting - Still a fairly new method of modeling, 3D sculpting has become very popular in the few years it has been around.[citation needed] There are currently 3 types of digital sculpting: Displacement, which is the most widely used among applications at this moment, volumetric and dynamic tessellation. Displacement uses a dense model (often generated by Subdivision surfaces of a polygon control mesh) and stores new locations for the vertex positions through use of a 32bit image map that stores the adjusted locations. Volumetric which is based loosely on Voxels has similar capabilities as displacement but does not suffer from polygon stretching when there are not enough polygons in a region to achieve a deformation. Dynamic tesselation is similar to Voxel but divides the surface using triangulation to maintain a smooth surface and allow finer details. These methods allow for very artistic exploration as the model will have a new topology created over it once the models form and possibly details have been sculpted. The new mesh will usually have the original high resolution mesh information transferred into displacement data or normal map data if for a game engine.

The market of 3D modelling

A large market for 3D models (as well as 3D-related content, such as textures, scripts, etc.) still exists - either for individual models or large collections. Online marketplaces for 3D content, such as TurboSquid, The3DStudio, CreativeCrash, CGTrader, FlatPyramid, NoneCG, CGPeopleNetwork and DAZ 3D, allow individual artists to sell content that they have created. Often, the artists' goal is to get additional value out of assets they have previously created for projects. By doing so, artists can earn more money out of their old content, and companies can save money by buying pre-made models instead of paying an employee to create one from scratch.

3D printing is one of the important aspects to learn for the new comers
The 3 Dimensional Printing (3D Printing) is a process for making a physical object from a three-dimensional digital model, typically by laying down many successive thin layers of a material. It is often called additive manufacturing (AM), reasons the additive nature of process in which successive layers of material are laid down under the computer control. A 3D printer is a type of industrial robot. Now a day, 3D printing with SketchUp is more than just prototyping. It offers transformative advantages at every phase of creation, from initial concept design to production of final products and all steps in between. Today's competitive environment makes choosing the right 3D printers more important than ever.
3D Printing: How it originated ?

Human model

The first widely available commercial application of human virtual models appeared in 1998 on the Lands' End web site. The human virtual models were created by the company My Virtual Mode Inc. and enabled users to create a model of themselves and try on 3D clothing.[7] There are several modern programs that allow for the creation of virtual human models.

Uses of 3D model

3D modelling is used in various industries like films, animation and gaming, interior designing and architecture. They are also used in the medical industry for the interactive representations of anatomy. A wide number of 3D software is also used in constructing digital representation of mechanical models or parts before they are actually manufactured. CAD/CAM related software are used in such fields, and with these software, not only can you construct the parts, but also assemble them, and observe their functionality. The 3D modelling is also used in the field of Industrial Design, wherein products are 3D modeled before representing them to the clients. In Media and Event industries, 3D modelling is used in Stage/Set Design.

~~~~~~~~~~~~~~~~~~~~~
Published By
Rajib Dey
~~~~~~~~~~~~~~~~~~~~~
Wednesday, September 24, 2014

SketchUp: Layout Dimension Tool

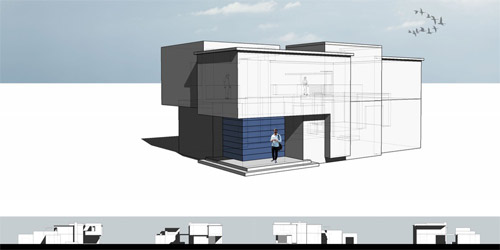
SketchUp is a gift to a designer. A designer knows the importance of angular dimension and editing the same is not too tough. A designer can edit the dimension string with SketchUp, length of the extension lines, and length of the dimension line after you have created an angular dimension.


SketchUp: Layout Dimension Tool

It is easy to edit a dimension using the Dimension Style dialog box. Designers need to follow certain techniques. Some characteristics of the dimension can be edited by clicking on the dimension to select it and clicking an option in the Dimension Style dialog box. The characteristics modified in the Dimension Style dialog box are:
  1. The dimension string's position relative to the dimension line.
  2. The dimension string's position relative to the screen.
  3. The units, scale, and precision represented by the dimension.
Refer to The Dimension Style dialog box for further information on Dimension Style dialog box options. The Dimension Style dialog box is used to adjust dimensions-specific settings such as text alignment to the dimensions line.

A designer can also modify individual dimension elements, such as the length of the extension lines or the contents of the dimension string, after you have created a dimension. Following image shows an angular dimension in Lay Out.

Editing individual dimension elements is possible here. An angular dimension is a group consisting three lines and text string. The first line, called the starting witness line, extends away from the start point of the dimension. The ending witness line extends away from the end point of the dimension. The dimension line is an arc perpendicular to the start and end witness lines and represents the angle. The dimension text is tied to the dimension line and displays the angle in degrees. Double-click on a dimension to access its individual elements. Following is an image of an angular dimension after it has been double-clicked. Notice that there are seven points on the dimension that can be manipulated: vertex, connection points, offset points, and extent points.


SketchUp: Layout Dimension Tool

~~~~~~~~~~~~~~~~~~~~~
Published By
Rajib Dey
~~~~~~~~~~~~~~~~~~~~~
Create glue-less interlocking laser cut parts with sketchup slicemodeler

3D modeling Design with Polymide material

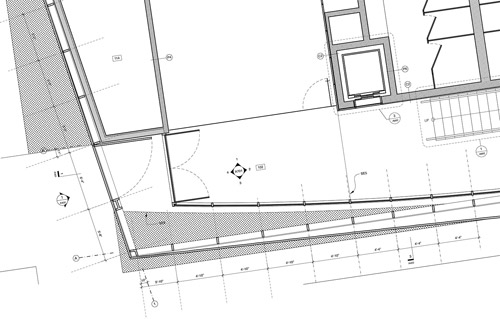
With the use Google sketchup and the slicemodeler plugin its possible to create laser cut 3D shapes that snap together without glue.
What you need:

·         Google stetchup
·         slice modeler plugin
·         sketchup svg export plugin
·         A laser cutter or laser cutting service like http://www.ponoko.com/
·         A SVG editor like inksacpe http://www.inkscape.org/

Step 1: Install sketchup and plugins

3D Create glue-less interlocking laser cut parts with sketchup slicemodelerl

Download and install sketchup, then download the svg export plugin and the slice modeller plugin.

Start sketchup. I use the "Product Design and Woodworking - Millimetres template"
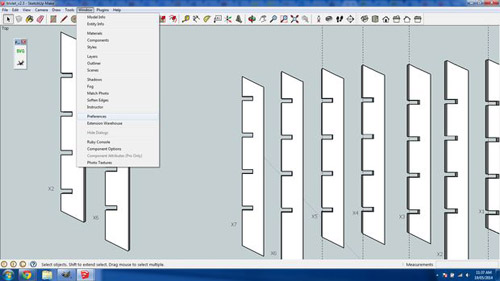
Install the slice modeler and svg export plugins in google sketchup: Window > Preferences > Install Extension. Navigate and select the rbz plugin files.

Step 2: Experiment with different size nodes

3D Create glue-less interlocking laser cut parts with sketchup slicemodelerl

3D Create glue-less interlocking laser cut parts with sketchup slicemodelerl
The glue-less design is achieved by placing small curved bumps (nodes) in each slot. The curve of the bumps allow the parts to slide together but provide enough pressure on the material to fit together snugly. There are multiple factors that will influence the size and number of the nodes, including slot length wood thickness and wood density.

I highly recommend creating parts with different size and numbers of nodes so you can find the best fit that works for you. You might want a very hard fit that needs to be tapped together with a rubber mallet or you might want a fit that can be assembled by hand without any tools. The only way to find the fit that works for you is try different size nodes. See this article for more about nodes.


What worked for me:
My trivets are made out of 4mm Italian poplar Plywood and I found that a single node 5mm wide and having a 0.16mm bulge made a good fit, that could be snapped together by hand. However different materials will need different node sizes and you need to figure out what works for you.

Next we'll create a test object in sketchup to test how various size nodes work with your chosen material.


Step 3: Create a test object in sketchup

3D Create glue-less interlocking laser cut parts with sketchup slicemodelerl
My test object is 2cm high and 7cm wide and 7cm long. Using a square test object shape means all the slices will be the exactly the same. A test object of these dimensions should be enough to gauge how well the different size nodes work. The height is the most important factor to get right. So make sure you create a test object with the same height as your end goal design.

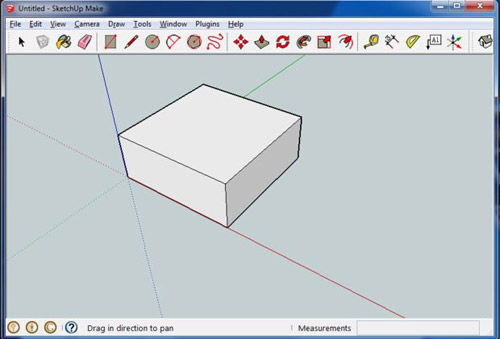
Open sketchup and create a square 7cm by 7cm and extrude it 2cm up.

Now its time to slice it up. Select the object and convert it to component by selecting all (ctrl-A) right clicking on the object and select "make component". Leave the component name as the default one.

IMPORTANT sliceModeler changes the model it's slicing so make sure to make a copy of it. To do this select the model and copy and paste a copy (ctrl-c ctrl-v).

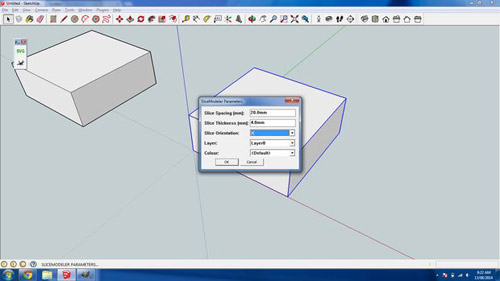
To slice the model select the component and open the sliceModeler dialogue (plugins -> sliceModeler). In the sliceModeler dialogue set:
·         slice spacing of 20mm
·      slice thickness to the thickness of your material, in my case the Italian poplar is 4mm thick.
·         slice orientation to X
·         Leave other settings as the default.
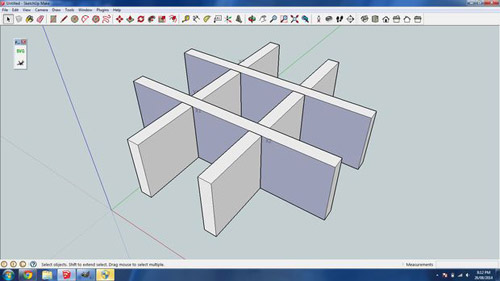
Click ok and say yes to "adding a number to each slice" and yes to leave the original hidden. For the Y orientation dialogue leave everything as default and click yes to "leaving the original section hidden". Click yes to "make flatten copies", leave minimum gap as default. You now have flattened slices and an "assembled" model to work with. Next step we'll add the nodes to a slice.

Step 4: Adding the nodes to a slice

3D Create glue-less interlocking laser cut parts with sketchup slicemodelerl
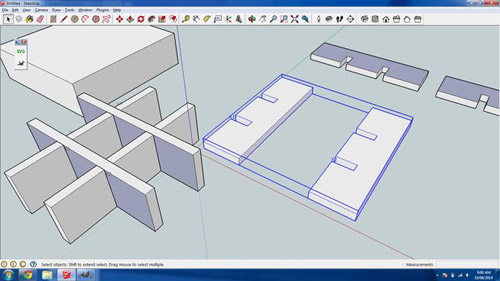
It time to add the nodes to a slice. I find it easiest to work in a new sketchup file. Since this model is square all slices are the same so you only need to copy 1 slice. SliceModeler exports the 4 slices as 2 groups. To copy a single slice double click on the group to edit the group and click on a single slice. Double check the whole slice is selected and copy it (ctrl-c). Open a new sketchup window (ctrl-n) and paste your slice in (ctrl-v).

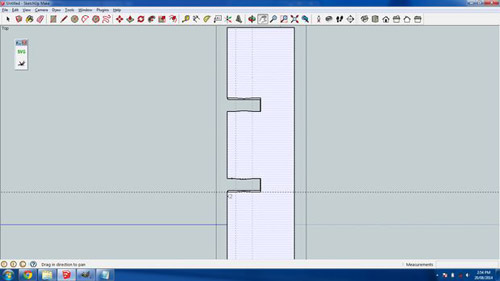
Zoom into your slice and select the top down view. Your slice should be positioned as per the image above.

The node we will create will be 5mm long and have a bulge height of 0.16mm. Click on the tape measure tool and drag a guide from the left edge of the slice and set it's distance to 2.5mm. Now create another guide and set it's distance to 7.5mm. Using these guides will ensure the node length is 5mm. Next we'll create the node bulge.

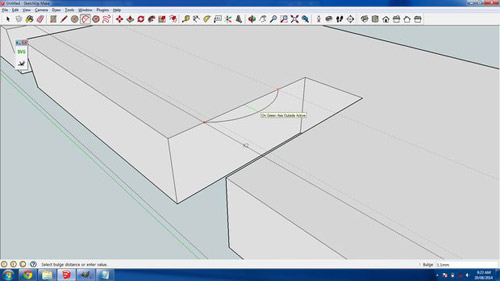
Zoom right into one of the interlocking slots in the slice and use the orbit tool to view the gap at an isometric angle as pictured above. Select the arc tool and create an arc between the two guides as pictured. Make sure the arc is orientated along the green axis. The line in the arc will change green to indicate you are on the right axes. Set the bulge height to 0.16mm. IMPORTANT to create a continuous outline vector for the laser cutter you need to delete the line behind the arc as pictured. Now repeat the arc for the other side of the slot and the same again for the 2nd slot.

You will now have a slice surface with 2 slots and 4 nodes that can be exported to an svg.

Step 5: Exporting the slot into inkscape

3D Create glue-less interlocking laser cut parts with sketchup slicemodelerl 
3D Create glue-less interlocking laser cut parts with sketchup slicemodelerl

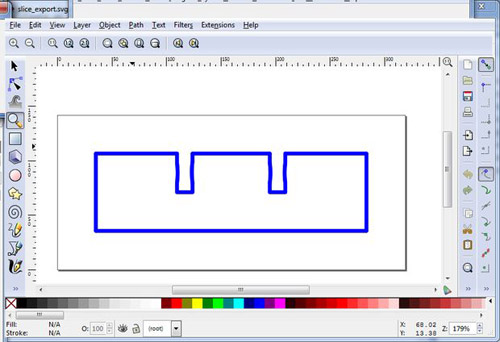
To export the slice svg out of sketchup select the top down view and select none (ctrl-T) then select the surface you just created the nodes on (it will be the top surface). The selected surface will be covered with small dots. Now export the svg by clicking on the flight of idea SVG icon. Deselect "export annotations for faces" leave everything else as default, enter a filename and click ok. Open the file in inkscape and you will see the outline of the slice as per the screen shot.

Step 6: Adding the svg to a laser cutting template

3D Create glue-less interlocking laser cut parts with sketchup slicemodelerl
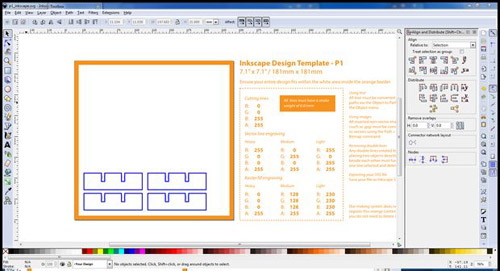
I use ponoko's laser cutting service to cut my test slices. If you use a different laser cutting service follow their instructions. For the rest of this step I'll be talking about ponoko's inkscape template. Download ponoko's inkscape template from here. I used the p1 18x18cm size template. Open the exported slice svg in inkscape, select all (ctrl-A) and copy (ctrl-C). Open the ponoko inkscape template and paste the slice (ctrl-v). Because the test object is square you can simply paste in three more slices so you have a total of 4. Arrange the four slices into a rough 2x2 grid. You want the slices all nicely spaced and aligned so its less movement for the laser. Open inkscape's align and distribute dialogue (shift-ctrl-A) select the left 2 slices and click center on vertical axis do the same for the right 2 slices. Do a similar thing but horizontally. The end result is 4 nicely aligned slices as per the screenshot.

Ponoko is very specific about the template's cutting line color and stroke width. For cutting lines the line color must be solid blue and have a stroke weight of 0.1mm. To set the correct color and stroke weight, open the fill and stroke dialogue, select all (ctrl-A) and double check the stroke paint is R:0 G:0 B:255 A:255 and in the stroke style tab set the width to 0.01mm. The cutting lines in the template should be barley visible. Before uploading the template to ponoko do a sanity check of the cutting vectors. The easiest way to do this is select outline display mode (view -> display mode -> outline) and zoom right into each vector and make sure there are no gaps that will result in an unclean cut.

Your done! Your now ready to upload the template to ponoko for cutting! However I see much more space in the template for slices with different node sizes. In the next step I'll discuss experimenting with different node sizes.

Step 7: Expermenting with different node sizes

3D Create glue-less interlocking laser cut parts with sketchup slicemodelerl
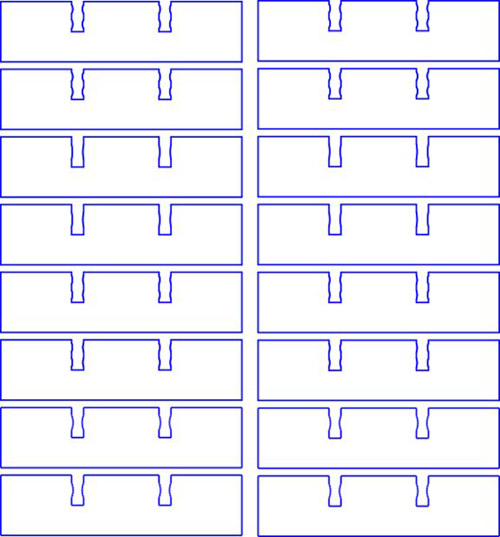
The ponoko template has enough room for 16 slices, so in a single cutting order you can create 4 test objects each with different node sizes. In the pictured file I create 4 test objects with the following node configurations:
·         single node with bulge height of 0.4mm
·         single node with bulge height of 0.2mm
·         double nodes with bulge height of 0.4mm*
·         double nodes with bulge height of 0.2mm*
(A double node is where you have 2 smaller nodes in a slot, this gives better stability then a single node but its harder to assemble).

With the 4mm Italian poplar I found the 0.4mm single node too hard to assemble by hand. I also found the two double node test objects too hard to assemble.

I did find the 0.2mm possible to assemble by hand but it was a touch harder then I'd like, so I dropped the node bulge to 0.16mm. And when I received my next ponoko order the 0.16mm bulge height was quite easy to assemble by hand. It also provided firm interlocking parts that "click" together. Now back to your test object(s).

 Step 8: Assembling the test objects
3D Create glue-less interlocking laser cut parts with sketchup slicemodelerl
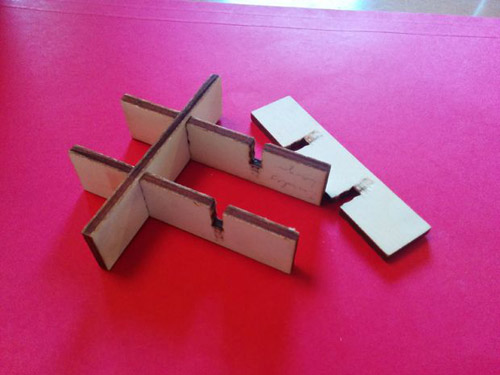
Once you have received your order from ponoko your now ready to assemble the test objects. But first write on each slice which node configuration it is, as its easy to forget. Now attempt to assemble each test object while taking notes on how hard or easy it is to assemble. If you find the right balance between ease of assembly and "fit" then your done. Otherwise if none work, take note if the fit is too loose or tight and repeat the process.
Congratulations! You can now make awesome interlocking laser cut products that can be hand assembled and don't require any glue!

~~~~~~~~~~~~~~~~~~~~~
Published By
Rajib Dey
~~~~~~~~~~~~~~~~~~~~~
Monday, September 22, 2014

The users of AutoCAD Architecture can get assistance from SketchUp

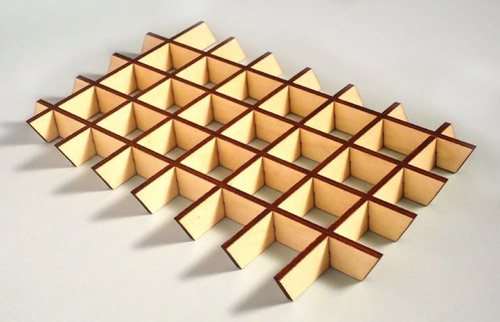
There are some third party tools, which always help all aspects of drawing quality. SketchUp plays here for AutoCAD Architecture. Using the SketchUp, a designer can see is how user-friendly is this application.

AutoCAD Architecture (abbreviated as ACA) is a version of Autodesk's flagship product, AutoCAD, with tools and functions specially suited to architectural work. On the other hand, the SketchUp (Formerly: Google Sketchup) is a 3D modeling program for applications such as architectural, interior design, civil and mechanical engineering, film, and video game design. A freeware version, SketchUp Make, and a paid version with additional functionality, SketchUp Pro, are available.

The free download includes integrated tools for use in uploading to Google Earth. SketchUp is part of the same product family as Google Earth. With this tool, Designers can import a scaled aerial photograph from Google Earth to SketchUp with the click of a button. This can include topographical information as well. The SketchUp Pro comes with Layout, which is a 2D companion to SketchUp Pro. With Layout, you can create professional design documents, dimensioned drawings, and presentation documents from the 3D models you created in SketchUp Pro. When the model updates in SketchUp Pro, the changes would automatically updated in Layout.

If you are a new user of SketchUp, then get rid of worry

SketchUp is not a headache for the new beginners. Therefore, do not lose your sleep. There are help menu, help centre, SketchUp Reference Guide, quick Reference Card where a user can print a PDF showing helpful shortcuts. There is a link for SketchUp as well as a link for Layout. Here are a few helpful tips to help uses get started.
  • When using your mouse, the left button is for tool operations and the right button is for the context menu.
  • The middle button (wheel) has several functions: click and drag to orbit, shift click and drag to pan, double click to re-center your view, and scroll to zoom.
  • The spacebar operates the Select Tool. You can use ctrl spacebar to add to a selection set, shift spacebar to toggle in and out of a selection set, ctrl A to select all, and shift ctrl to subtract from a selection set. Finally, please print and read the Quick Reference Card before proceeding to use SketchUp.
Doing Much more with SketchUp Components

File Formats

One of the many features of SketchUp is that it uses a wide variety of file formats in the likes of DWG, DXF, OBJ, FBX, XSI, and WRL. If the users do not want to take the time to import a file into ACA, they can also create a screenshot of the file and save it in BMP, JPG, PNG, PDF, EPS, and TIF formats for presentation purposes.

How ACA file to import into SketchUp ?

Importing ACA file to SketchUp is not a big deal for the designers. All the designers have to do is to know the basic feature of SketchUp. This process will be much easy if these are possible.
  • Let us begin by opening SketchUp and Select the file Menu.
  • Select the import.
  • User can see the option button, under the preview area.
  • Select options and then select the options that need in the dialog box that opens.
  • Click OK.
  • Now select the file that you wish to import and click open. If you do not see the file you are looking for, be sure to click on the drop-down next to File Type to ensure that you are searching for the correct file type.
  • Congratulations! You have now successfully imported a drawing into Google SketchUp! It is important to note that the SketchUp file will have the same 0,0 origin as your AutoCAD Architecture drawing.
Doing Much more with SketchUp Components

  • The designers should begin it by right-clicking and selecting Make Group.
  • Then select the Line tool and select any corner of the perimeter to start the line.
  • Now, enter the wall height in the Measurements box and press enter. Next, select the Rectangle tool.
  • Begin your rectangle by selecting the endpoint of the line you just drew and end the rectangle at a point on the wall. Continue it until all exterior walls are erected. The designers will definitely found that it is easier to form the exterior first.
  • Now that all exterior walls have been erected and closed, the designers have to create a face. The face is used to build the roof once you are ready to do so. Next, select the face, select the Offset tool and enter the thickness for the exterior walls you have just created. Now select the face and use the Push/Pull tool. Push the face down to create the interior face of the walls. This will develop the interior face of the exterior walls so that you can continue to create the interior walls at this point using the steps above.
Doors and Windows are added

Therefore, after the creation of walls, a designer will need to decide other important things such as header heights, doors and window sizes and styles. Once you are ready, be sure you are in X-ray mode. Now the designers have to insert the door component you selected and place it by referencing a point on an opening in your imported AutoCAD Architecture file. Then he/she have to keep continuing the placement all door components using X-ray mode. Next place all windows using the same method stated above for door placement. For example, if designer are going to place a window component above an overhead door, he/she will reference a point on the window and a point on the door.

Model in 3D

A camera is used by SketchUp to represent user’s point of view of the model. You are a camera that is looking at your model as you work. SketchUp uses several tools for viewing your model in 3D space. These are tools familiar to you in AutoCAD Architecture: Pan, Orbit, Zoom, and Zoom Extents. Each of these tools can be found on the Camera toolbar.

Dynamic Components

Dynamic Components can be defined as components that have parametrics. For example, a cabinet component has doors that open and close. A component is only considered dynamic when it has parametric data. Dynamic components will display with a special badge when parametric data is present. Attaching attributes to a component is what makes the component dynamic. Attributes are items such as the component's name, description, location, size, and number of copies. Some attributes are predefined, which means that they are automatically available for every dynamic component. There are also custom attributes that are unique attributes defined by the developer of the dynamic component.

Every attribute of a component has a value that can be a textual string, a number or the result of a formula. Each attribute and its associated value is called an attribute name/value pair. Formulas can consist of predefined functions, mathematical operators, or the values of other attributes. Functions are shortcuts that perform an operation, such as calculating the square root of a number. It is important to note that all SketchUp users can use dynamic components. However, only SketchUp Pro users can develop dynamic components.

To make a component dynamic, right-click on the component, select Dynamic Components, and then select Component Attributes. Select Add Attributes and a dialog box will display with attributes that can be added to your component. Once you have added the attributes, the new dynamic component can be saved to a component file for additional use later.

How to export a SketchUp File, into AutoCAD Architecture ?

Exporting a Google SketchUp file into AutoCAD Architecture is same easy.
  • Once you are ready to export, select the File menu and select Export.
  • Next, select 2D Graphic or 3D Model, depending on the file you are exporting.
  • Select the export file type from the drop-down. You are exporting to AutoCAD Architecture, so you would select AutoCAD DWG.
  • By selecting the Options button at the bottom, you can choose which AutoCAD version you are exporting to as well as the drawing scale and size.
  • Select OK and then select Export. The export is now complete! It is important to note that you can alternate between ACA and SketchUp multiple times. Your drawing does not have to be complete before importing it into SketchUp or from SketchUp into ACA.
The use 3D Warehouse and it is free

The 3D Warehouse (formerly Google 3D Warehouse) is an accompanying website for SketchUp. It is a free cloud service that allows users to search, upload, download and share 3D models. The site enables modelers to upload their work from within SketchUp or by uploading .SKP or .KMZ files via the 3D Warehouse website. The 3D Warehouse currently holds over 2 million models. Individual models can be viewed in 3D on the web using a modern Internet browser that supports WebGL, or with the SketchUp Mobile Viewer application compatible with current iPad devices. Users can search and download models from 3D Warehouse from a web browser or from within the SketchUp desktop application. In 2008, PC World reported that 3D Warehouse allows users without significant artistic inclination to make and populate 3D models. Also in 2008, The New York Times reported that the 3D Warehouse had become a virtual ‘dictionary’ of the 3D vocabulary, reporting its suitability in filmmaking.

A great feature of SketchUp is the 3D Warehouse, which allows you to search for 3D models made by other users as well as contribute 3D models of your own. It contains 3D models of buildings, cars, bridges, interior furnishings, and much more. A new feature allows you to search for similarly shaped models instead of relying on a text search. This really saves time when you are in a hurry to find a specific item. The 3D Warehouse is a wealth of information and can help you design quickly when facing a tough deadline.

Layout Tool

The SketchUp contains a vast library of colors, textures, shadows, lighting, and so on. The Rendering tools and materials libraries in ACA combined with the tools in SketchUp can produce awesome presentation renderings.
To use the library:
  • Select the File menu and select Send to Layout.
  • This will open Layout, a feature that is included with SketchUp Pro and is used for creating and sharing presentations made from SketchUp.
  • You can add title blocks, save templates, add graphics, and create multi-page documents. Layout gives you more control over color, style, and weight of the lines and faces in your SketchUp model.
End Note: SketchUp is an endless magic. You can make almost anything

An intelligent designer can use the SketchUp in various ways for the classic drawings. Nevertheless, we can tell you that it is just some examples that we have brought to you. There are gigantic things to be discovered by the enthusiastic designers. The world of SketchUp is next to endless. So, the crazy designers, now it is your turn to spot those. Download the free version, try it and see how you like it. There is nothing better than going to a meeting with awesome drawings that took only minutes to complete.

~~~~~~~~~~~~~~~~~~~~~~
Published By
Rajib Dey
~~~~~~~~~~~~~~~~~~~~~~
Sunday, September 21, 2014

Modifying 3D Shapes in SketchUp Using the Scale Tool

In this tutorial, I want to talk a little bit about using the scale tool to work with three dimensional objects. First, let’s take a second and review where the scale tool is located. Look up at the top of your screen for a little icon that looks like a brown box inside a red box with a red arrow coming out of the corner. This is the scale tool.

Modifying 3D Shapes in SketchUp Using the Scale Tool

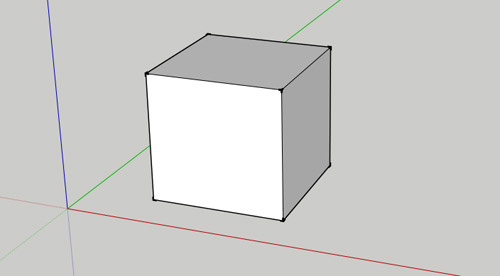
Let’s start off by drawing a box, then extruding it into a cube. You can draw the box using the rectangle tool, and then use the push-pull tool to extrude it into a 3d shape. Once you’ve done that, you should have a shape like the following image below.

Modifying 3D Shapes in SketchUp Using the Scale Tool

I want to start off by talking about how you select your object when working with 3D shapes. When we were working with two dimensional shapes, it didn’t really matter how you selected your object because you were only dealing with a single face. However, with a 3D object, this isn’t the case anymore. You can select any of the individual faces on your cube and scale them without scaling your entire cube. This is useful, but it can also deform your shape, so you have to be careful.

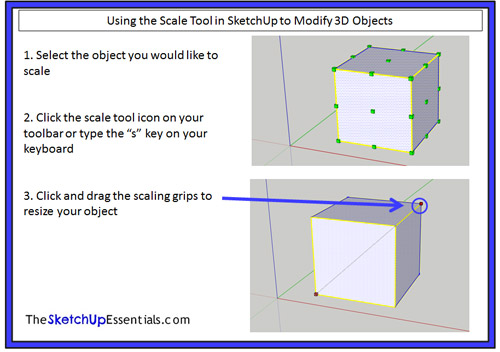
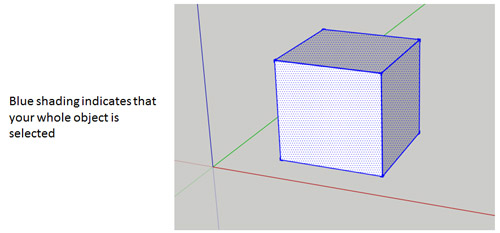
Let’s start by selecting our entire cube. Select the whole cube by dragging a select box all the way around it. If you’ve done this correctly, all the bounding edges and faces in your model should be shaded blue, like the image below.

Modifying 3D Shapes in SketchUp Using the Scale Tool

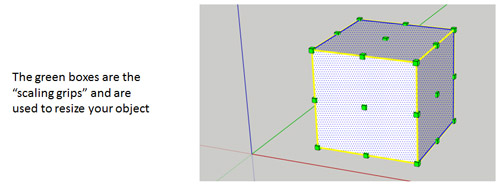
Now, just like with our two dimensional objects, we’re going to activate the scale tool by clicking on the scale tool icon above or just pressing the “s” key on your keyboard. When you do this, you’ll notice a bunch of little green boxes show up on your cube. These are the “scaling grips.”

Modifying 3D Shapes in SketchUp Using the Scale Tool

These grips work exactly like the ones we talked about in the two dimensional scaling tutorial previously. You can click and drag any of these grips to resize your object.

Modifying 3D Shapes in SketchUp Using the Scale Tool

Like with our 2d objects, if you want to scale them uniformly, it’s best to use the corner grips. However, if you want to scale your object along only one axis instead of scaling your whole object, you can use the other edge grips. For example, if I wanted to keep my box the same length and width, but I wanted it to be shorter, I’d select the edge grip in the middle of the top face of my box.

Modifying 3D Shapes in SketchUp Using the Scale Tool
While this would make my box shorter, I would only be changing my object along one axis while keeping the other two axes the same, meaning that my object’s proportions would be different.

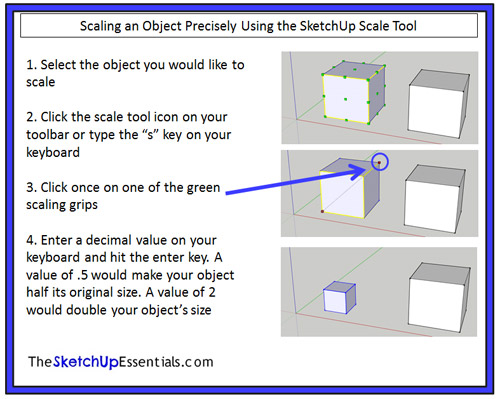
The scaling grips work exactly the same way they did with the two dimensional objects, meaning if you want to scale your object precisely, you can click once on your scaling grip, then type in a decimal value and hit the enter key on your keyboard. This will scale your object based on the value you entered. A value of .5 would make your object half the size it was before. A value of 2 would double the size of your object.

Modifying 3D Shapes in SketchUp Using the Scale Tool

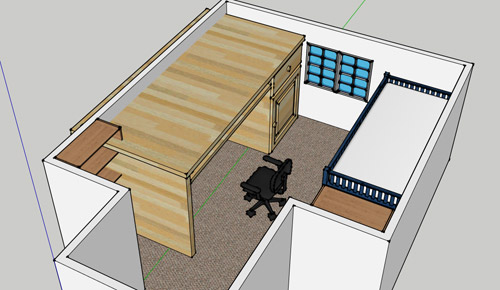
This is especially useful when dealing with objects that you download from the 3D warehouse, because a lot of those objects are not drawn to scale, so they need to be resized either bigger or smaller to fit in your model. For example, I did a quick model of the room that I’m sitting in now, using objects from the 3D warehouse to furnish the room. As you can see from the image below, the desk that I selected is far too large for the room I’ve drawn.

Modifying 3D Shapes in SketchUp Using the Scale Tool

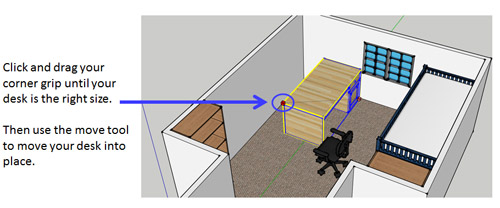
It’s taking up an entire wall, and it’s taller than the windows in the room. What I’d do to make it fit is click on it once to select it, then activate the scale tool and click on one of the corner grips (because the corner grips scale your model while retaining its proportions). I’d drag the corner grip until my desk is resized properly and it looks like it fits in the room.

Modifying 3D Shapes in SketchUp Using the Scale Tool

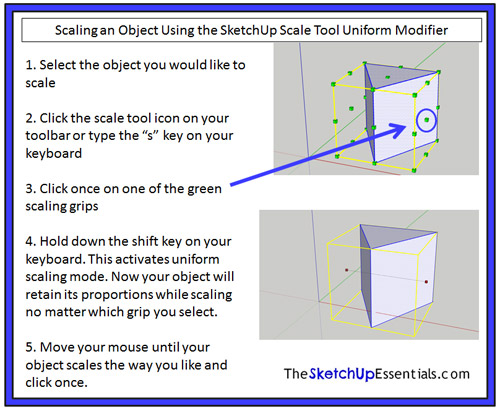
Also note that if you want to scale an object while retaining its proportions, but you don’t want to use the corner grips, you can also use a modifier called “uniform scaling.” To use the uniform scaling option of the scale tool, simply hold down the shift key while resizing your object with the edge grips. This allows you to scale your object using any of the edge grips while still retaining your object’s proportions.

Modifying 3D Shapes in SketchUp Using the Scale Tool

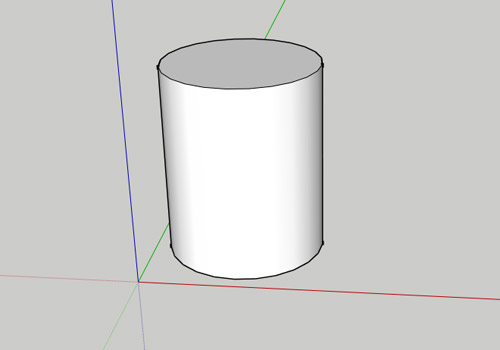
Now we’ve talked a lot about using the scale tool to resize a complete object, but the scale tool can also be used to resize parts of objects in order to adjust shapes. For example, let’s draw a cylinder by drawing a circle with the circle tool, then extruding it with the push pull tool. This will give us an object that looks like the image below.

Modifying 3D Shapes in SketchUp Using the Scale Tool

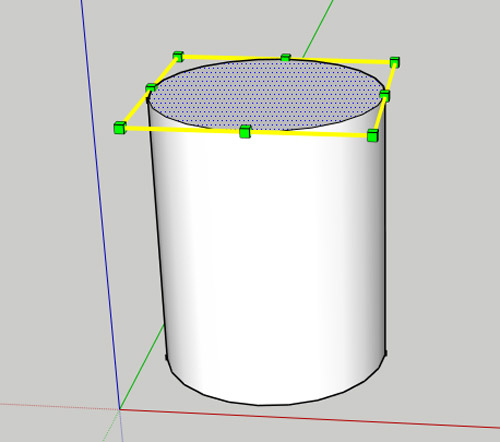
Now, select the top face of the object by clicking on it. Once you’ve selected your top face, activate the scale tool using the “s” key. You’ll notice that you get scaling grips only around the top of your cylinder.

Modifying 3D Shapes in SketchUp Using the Scale Tool

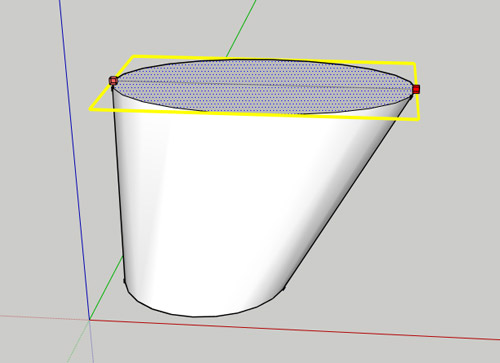
This is because you’re only going to scale this one face. Click and drag one of the edge grips. As you can see, the size of your top face changes, and SketchUp resizes the rest of your model accordingly.

Modifying 3D Shapes in SketchUp Using the Scale Tool

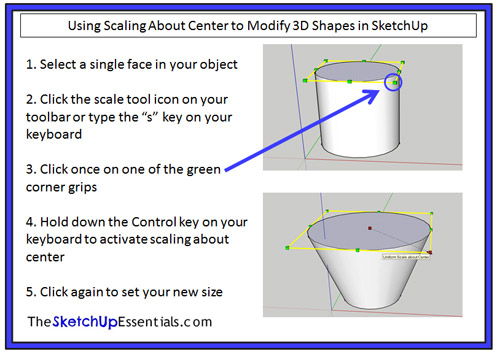
However, let’s say you wanted to make this entire face larger in all directions at once, instead of just one, so you can retain symmetry in your model. To do this, you would use the “About Center” modifier. This modifier works the same way in 3D objects as it does in 2D objects. What you would do is select your top face, activate the scale tool, and select one of the corner grips. Once you’ve selected one of your corner grips, hold down the “Control” key on your keyboard. What this does is force SketchUp to scale your top face around the center of the face you have selected, instead of about a fixed point on the opposite side of your face.

Modifying 3D Shapes in SketchUp Using the Scale Tool

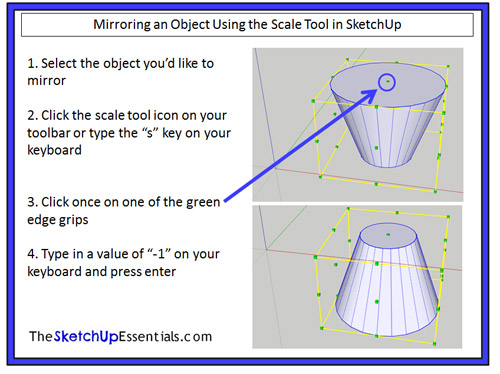
As we discussed in the two dimensional scaling tutorial, SketchUp does not come with a dedicated mirroring tool (it does contain a tool that allows you to flip your objects about an axis). If you want to mirror an object (flipping it so it maintains proportions), the scale tool has this functionality. Let’s use the cone we created above as an example. I’d like to flip this cone over so the wider face is facing down, instead of up. There are two ways to do this. The first way is to select your object, activate the scale tool using the “s” key, and click on one of your edge grips. Then type a value of “-1” on your keyboard and hit enter. This will mirror your object about the opposite edge grip from the one you selected.

Modifying 3D Shapes in SketchUp Using the Scale Tool
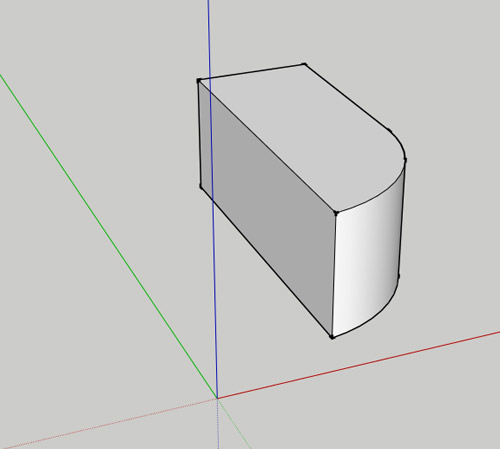
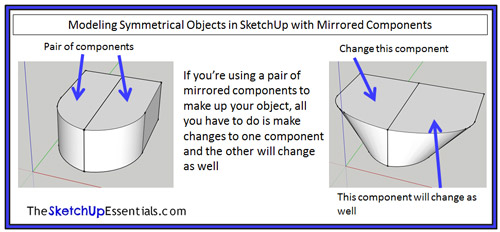
This is an good way to mirror objects in SketchUp. However, sometimes, you want to mirror 3D objects in place instead of moving them with the scale option. To do this, we’re going to use the “About Center” modifier to the scale tool. Here’s a great example – sometimes in SketchUp, you want to copy and mirror components when working with symmetrical objects, because then you only have to spend time modeling half of your object, and the other half will automatically update with your changes. Let’s say you have a 3D shape like the one below.

Modifying 3D Shapes in SketchUp Using the Scale Tool

I’ve made it into a component, and I’m going to create a copy using the move tool.

Modifying 3D Shapes in SketchUp Using the Scale Tool

Now if I used the method discussed above to mirror this object, I’d have to mirror my object, then move it so the sides are aligned the way I want them. Since I already have my object where I want it, I’m just going to mirror it in place using the “about center” modifier of the scale tool.

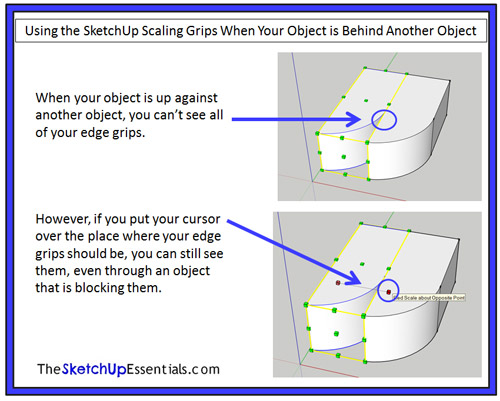
Before I do that, I want to mention one of the great things about the scale tool. If you go ahead and select the copy of the object that you just created, then activate the scale tool, you can see that your scaling grips are blocked by your first object. However, if you place your cursor in the area where your grips should be, SketchUp will show you your grip, even if it is behind another object.

Modifying 3D Shapes in SketchUp Using the Scale Tool

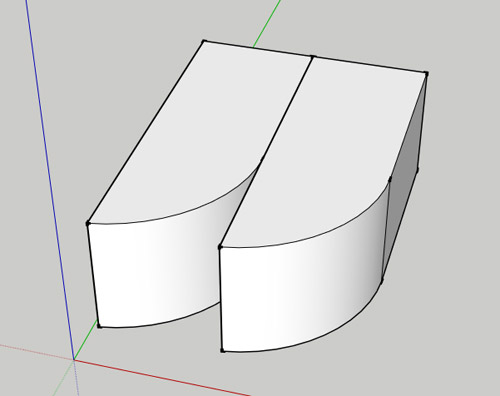
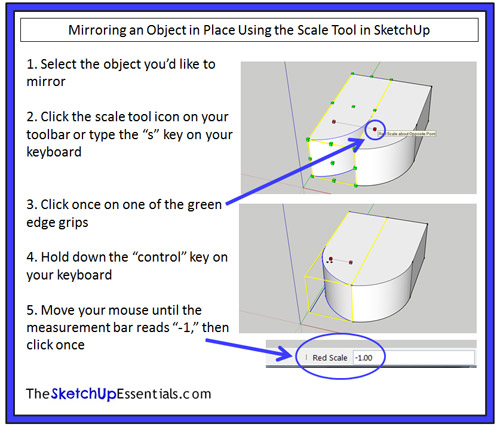
Now let’s mirror our object in place. To do this, we’re going to select the edge grip that was hidden by the other object. Click on it, then hold down the control key on your keyboard to activating scaling about center. Now move your mouse across the object until the value in the measurement bar below reads “-1.”

Modifying 3D Shapes in SketchUp Using the Scale Tool

This will mirror your object while keeping it in the same location. The nice thing about this is as long as we are modeling an object that is symmetrical (the same on both sides across an axis), all we have to do is make changes to one half of our model and the other half will change as well.

Modifying 3D Shapes in SketchUp Using the Scale Tool

As you can see, the scale tool is a very powerful, useful tool that can really help you harness the full power of SketchUp. If you can incorporate it into your modeling workflow, it can save you a lot of time and effort.

~~~~~~~~~~~~~~~~~~~~~~
Published By
Rajib Dey
~~~~~~~~~~~~~~~~~~~~~~