In my article Doing MUCH MORE with SketchUp components, I introduced you to the various(and numerous) uses of the components in SketchUp. And I am pretty sure this article has convinced you of their interest.
But their clear benefits can be greatly reduced when these components are poorly designed, which is more the rule rather than the exception in SketchUp's 3D Warehouse.
Fortunately, it is possible to fix and optimize existing components to make them quickly and easily reusable for your projects. Here's the description of the steps to optimize a correctly modeled SketchUp component :
NB : Do it yourself by searching for « tuto chaise » in the 3d Warehouse and import the component I use in SketchUp training. Select the component « TUTO Chaise à optimiser 2.0 ».
1 Remove unnecessary entities
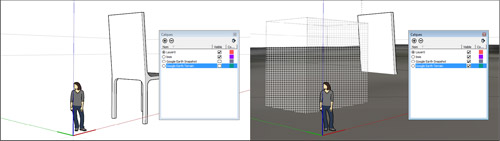
A component is often cluttered with useless elements. This can be edges, faces, guides, images, or other components or groups. Be sure to display all the entities of the component ! Remember to make all layers visible and display hidden geometry from the View drop down menu.
On the chair you just downloaded, you will instantly notice Susan but, when displaying hidden entities, you will also find a hidden guide and a hidden box. Now open the Layers dialog box and check both Google Earth Snapshot and Google Earth Terrain visible. Now delete all the entities that are not part of the chair.
2 Place the insertion point consistently (and intelligently)
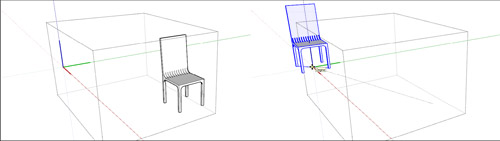
For a chair, it will be on the ground plane, centered in the middle of the seat. This way, you can replace the seat component with another one larger (or shorter) or higher (or smaller) seat with the Reload command.
To find the correct axis origin for this chair, draw a diagonal line from two opposite chair legs. Next, select all the chair entities and move it with the Move tool from the Midpoint of the diagonal line to the Origin of the axes. Delete the diagonal line.
3 Orient the axes of all your components in a homogeneous way.
By orienting all your components homogeneously, you will be able to replace a component by another using the Reload command without having to rotate all copies of the component in your model afterwards.
For example, I chose to always orient the back of the chairs and seats to the green positive axis. For now, the chair's back is oriented to the negative red axis. Select all the chair's entities and use the Rotate tool, using the origin of the axes as center point, to rotate the back to the green positive axis.
NB : To replace a component, rightclick on the component you want to replace, click on Reload in the context menu and browse your hard disk to select another (optimized) SKP file. Click Open to validate the change.

4 Check the scale
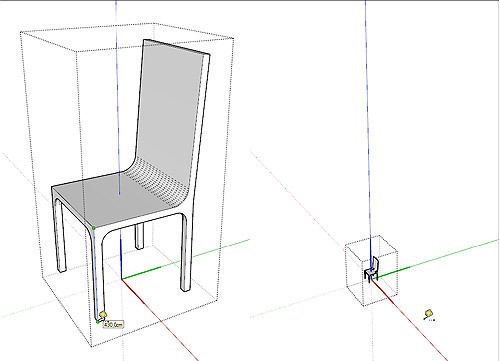
If necessary, adjust the scale of the content of the component using the Tape Measure tool. For this, double-click on the component to edit the component and measure an item that you know the correct length, for example the seat height of a chair. The actual measured value is displayed in the Measurements area. Then type in the correct measurement, pressEnter and confirm when SketchUp asks if you want to resize the active group or component.
NB : Another benefit of using the Tape Measure tool is that scaling occur from the origin of axes wich is not the case with the Scale tool. The Tape Measure tool is also much more accurate. The chair is more than ten times too big. To correct its scale, measure its seat height (430cm) ant type 42,5cm then validate the change.
5 Delete layers other than Layer0
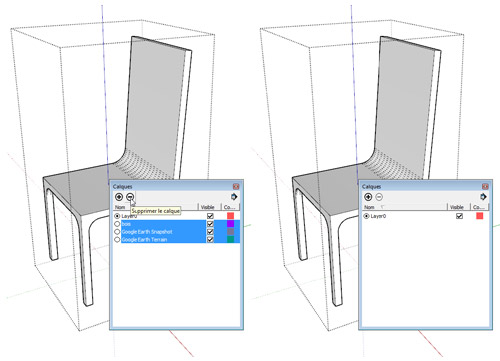
This step is not absolutely necessary, but if you insert a component that's having parts in otherlayers, these layers will also be inserted into your model, which is not always desirable.
The chair component has 3 unnecessary layers : Bois, Google Earth Snapshot and Google Earth Terrain. You can select them and click on the Delete layer icon (« minus » icon). Keep the default option to move entities on the deleted layer to the default layer Layer0 because most entities of the chair are in the Bois layer.
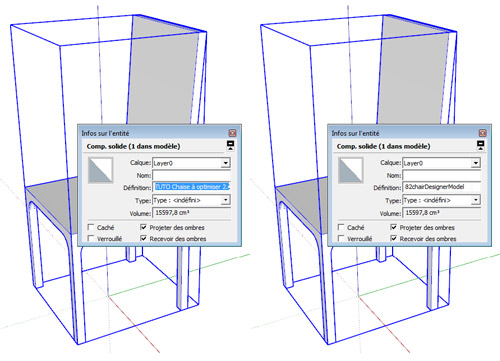
6 Use a consistent naming convention for your components
It is very interesting to give your components meaningful names. This way, you can easily select and even filter components from the Outliner dialog box.
I personally use a Belgian classification system (or more exactly a part of) name BB/SfB developped by the Régie des bâtiments, a public service that manage most of the Belgian federal real estate.
The best part of this classification, for me, is the use of two digits to identify an architecture element. For example, exterior walls begins with 21, interior walls with 22, floors with 23, and so on. Add 10 and you get the secondary parts like 31 for exterior windows, 32 for interior doors and so on. With 10 more you got the finishing... All architecture parts have their coding, from the earth to the furniture. With those two digits, all parts are automatically sorted and you can easily find and select a component or a named group in the Outlinerdialog box. It's a huge time saver.
If needed, close the edited component and select it. In the Entity info dialog box, give it a meaningful name. Following my classification, I would name it 82chairDesignerModel where 82 is for mobile furniture and where I would replace Designer by the name of the designer or the manufacturer and Model by the name of the model or a serial number.
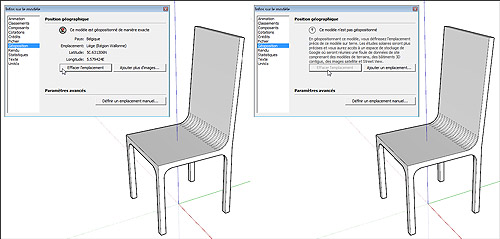
7 Remove geographic coordinates
It may (hopefully seldom) happen that the component is georeferenced, that is to say, it has geographical coordinates of longitude and latitude. In this case, when it is inserted into your model, you can not determine its insertion point, it is automatically placed at the origin of the axes.
To remove those geographical coordinates, you must first save it into a collection, that is to say in a folder on your hard drive or network. Then open the SKP file that you just saved. Then click on the drop down menu File > Geoposition > Clear location. And save your model!
8 Check the texture resolution
If the component contains textures, make sure they are not too high resolution. In SketchUp, it is generally unnecessary (and unproductive) to use images in high resolution as textures. In most cases, an image that do not exceed 512 to 1024 pixels wide will be amply sufficient.
Similarly, to reduce the size of the SKP file, choose the JPEG format (not too compressed to avoid compression artifacts) to one of the other available formats. If your image has an alpha transparency layer, use the PNG format, which is also a great choice if your image has few different colors (like a drawing in black and white).
Your component is now ready to be used easily in other SketchUp models. Enjoy !
~~~~~~~~~~~~~~~~~~~~~~
Published By
Rajib Dey
~~~~~~~~~~~~~~~~~~~~~~
No comments:
Post a Comment