SketchUp users can get a nice new button icon in the toolbar and can add a Custom toolbar button images in LayOut which is though an easy thing but need extra care to do it.
Matt Donley: Matt Donley has been working with SketchUp since 2007; at first he started working as a carpenter and started using SketchUp to model things around his house. After that he started to model his customer’s homes for helping them to visualize their construction projects. He also wrote the “SketchUp to LayOut” book as a help for other construction professionals as a learn how to make construction documents using SketchUp and LayOut. He shares his SketchUp knowledge online with SketchUp users where he teaches how to create tutorials and videos for helping people to learn how to work with 3D model online.
In this article Matt has described about a new idea where he will show how to create own custom buttons for any LayOut command as well as the way of creating a custom button image for users to use the super-secret-hidden-built-in button image editor. Matt always has thought that the default toolbar in LayOut should include a button to insert a SketchUp model into LayOut file; though it is a common thing to do but it is a little weird to have to go to File > Insert every time. Though, this option is a Windows-only option as it has a huge range of toolbar.
In the Image Editor, users can use the drawing tools to create their own icon or can import an icon that they have created in an external image editor. To import, click on File menu and go to Open option. If users don’t want to go through the image editor window they can have the image copied on the clipboard and can select Paste Button Image directly from the button context menu.
Source
www.mastersketchup.com/custom-layout-button

~~~~~~~~~~~~~~~~~~~~~~~~~~~~
Published By
Rajib Dey
www.sketchup4architect.com
~~~~~~~~~~~~~~~~~~~~~~~~~~~~
Matt Donley: Matt Donley has been working with SketchUp since 2007; at first he started working as a carpenter and started using SketchUp to model things around his house. After that he started to model his customer’s homes for helping them to visualize their construction projects. He also wrote the “SketchUp to LayOut” book as a help for other construction professionals as a learn how to make construction documents using SketchUp and LayOut. He shares his SketchUp knowledge online with SketchUp users where he teaches how to create tutorials and videos for helping people to learn how to work with 3D model online.
In this article Matt has described about a new idea where he will show how to create own custom buttons for any LayOut command as well as the way of creating a custom button image for users to use the super-secret-hidden-built-in button image editor. Matt always has thought that the default toolbar in LayOut should include a button to insert a SketchUp model into LayOut file; though it is a common thing to do but it is a little weird to have to go to File > Insert every time. Though, this option is a Windows-only option as it has a huge range of toolbar.
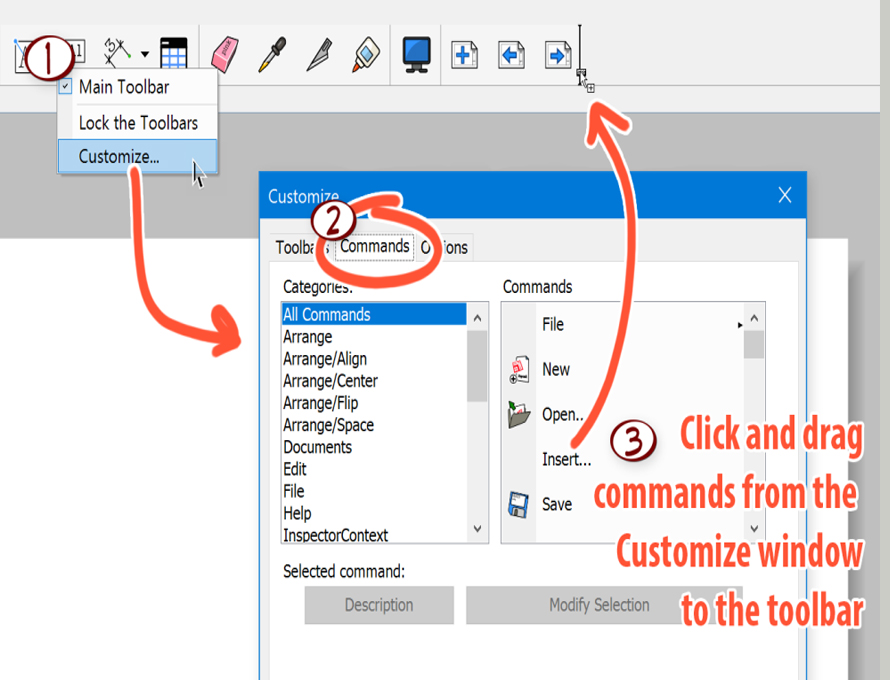
How to add Custom LayOut Commands:
- It is a simple way to add new buttons to any LayOut toolbars and here are the steps to do:
- At first users have to do Right-click in the toolbar area and then select the Customize option.
- Next they need to select the Command tab in the Customize window.
- Then users can find the commands that they want to add to their toolbar and then drag it directly into the toolbar.
Using the LayOut Button Image Editor:
It is not known o all that, when users have the customize window active, all of the toolbar buttons become editable; then users can drag them to various positions and can pull them out of the toolbar to remove them. Users can also click right button on them to get a context-menu; this context-menu will give the users some magical capability to change the look of button. Though the image can be downloaded from a pop-up appears in below the page; here are the ways to add an image to the button:In the Image Editor, users can use the drawing tools to create their own icon or can import an icon that they have created in an external image editor. To import, click on File menu and go to Open option. If users don’t want to go through the image editor window they can have the image copied on the clipboard and can select Paste Button Image directly from the button context menu.
Source
www.mastersketchup.com/custom-layout-button

~~~~~~~~~~~~~~~~~~~~~~~~~~~~
Published By
Rajib Dey
www.sketchup4architect.com
~~~~~~~~~~~~~~~~~~~~~~~~~~~~
No comments:
Post a Comment